
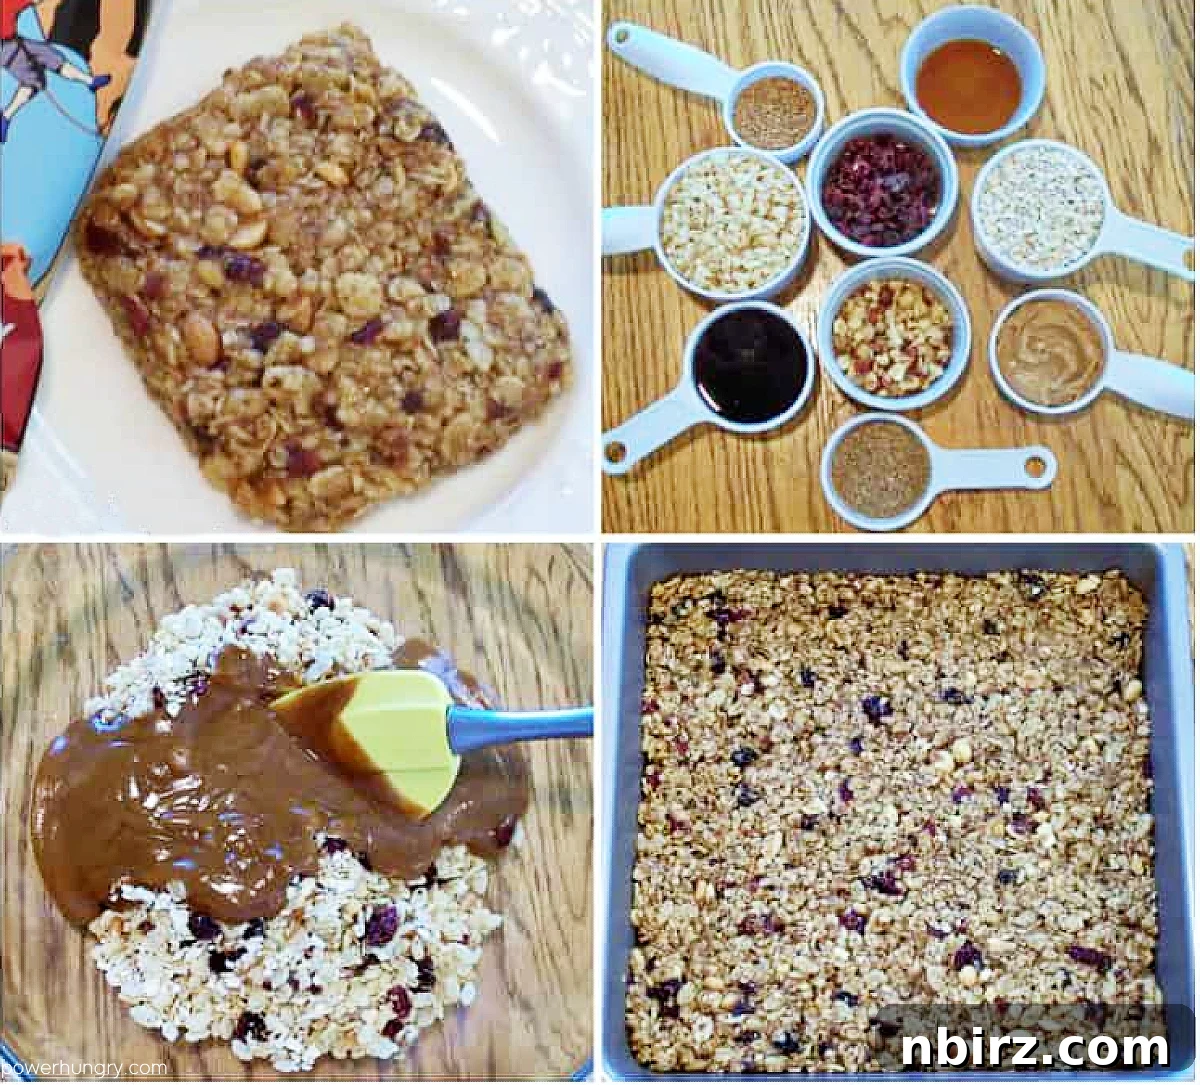
No-Bake DIY Clif Bars are an absolute game-changer for anyone seeking convenient, nutritious, and cost-effective fuel. Perfect for bustling lunches, quick snacks, challenging hikes, extensive camping trips, or simply as a pre/post-workout boost, these bars offer incredible versatility. Best of all, they’re crafted to be completely vegan, gluten-free, and remarkably frugal to prepare, making them an ideal choice for a wide range of dietary preferences and budgets.
Craft Your Own Superior Clif Bars at Home
There’s a unique joy that comes with enjoying food outdoors, whether it’s an elaborate grilled feast, a simple backyard barbecue, or an impromptu picnic in the park. The fresh air and natural surroundings truly enhance every bite. Just like the simple pleasure of unwrapping and savoring a popsicle on a warm day, energy bars hold a special place in my heart for their sheer convenience and portability.
As someone who loves to be active and explore, a reliable energy bar is an indispensable companion. Whether I’m heading to a local park for an afternoon stroll, embarking on a long road trip, or catching a plane for an adventure, having a wholesome snack on hand is crucial. In moments of hunger amidst a busy schedule, an energy bar enjoyed on a sunny park bench can often feel more satisfying than the most exquisite haute cuisine.
While I’ve previously shared recipes for other homemade energy bars, including my popular rendition of Lara Bars, I recently set my sights on tackling another long-time favorite: Clif Bars. My husband and I both enjoy them immensely, appreciating their satisfying texture and energy-boosting qualities. However, the recurring cost of $1.69 per bar quickly adds up, making them a somewhat expensive habit, especially when we like to keep a steady supply around. This financial motivation, coupled with a desire for healthier, more transparent ingredients, sparked my journey to create a homemade version that rivals the original in taste and performance.
Why Make Your Own Clif Bars? The Benefits Are Clear
Beyond the simple pleasure of creating something delicious in your own kitchen, there are compelling reasons to start making your own energy bars, particularly when it comes to replicating popular brands like Clif Bars. The advantages extend far beyond just taste, encompassing health, cost, and customization.
Unmatched Ingredient Control for Optimal Health
One of the primary drivers for embarking on this DIY project was the desire to have complete control over what goes into my body. While commercially produced Clif Bars are known for their distinctive chewy and soft texture, reminiscent of an under-baked oatmeal cookie, a quick glance at their ingredient list often reveals more than just wholesome oats and brown rice syrup. Many store-bought bars contain a range of scientific additives and processed ingredients that can be difficult to pronounce, let alone understand. Furthermore, I’ve often noticed an odd soy aftertaste in some commercial energy bars, which isn’t always desirable.
By making your own, you can confidently steer clear of these unwanted extras. Our homemade version prioritizes simple, natural, and readily available ingredients. There’s no need for soy protein powders, artificial flavors, or mysterious stabilizers. This ensures that every bite is packed with pure, wholesome goodness, giving you clean energy without any hidden nasties. You get to decide the quality and origin of every component, making for a truly superior snack.
Significant Cost Savings That Add Up
Let’s talk economics. As mentioned, buying Clif Bars regularly can quickly become a significant expense. At nearly $2 a bar, a weekly supply for a family or an active individual can easily exceed your snack budget. The beauty of DIY lies in its incredible cost-effectiveness. The raw ingredients for these homemade Clif Bars – oats, rice cereal, dried fruit, nuts, and natural sweeteners – are far more economical when purchased in bulk or even standard quantities. You’ll find that the cost per homemade bar is dramatically lower, offering substantial savings over time without compromising on quality or flavor. This means you can enjoy more bars for less money, making healthy snacking accessible and sustainable.
Tailored to Your Taste and Dietary Needs
Another fantastic benefit of crafting your own energy bars is the unparalleled ability to customize them. Do you have a specific allergy or dietary restriction? No problem. Prefer certain flavors or textures? You’re in charge. This recipe is inherently vegan and gluten-free, but it also serves as a flexible base for countless variations. You can swap out dried fruits, nuts, and seed butters to suit your preferences or what you have on hand. Want more protein? Add a specific type of nut. Craving a different flavor profile? Experiment with extracts or spices. The power to personalize your snack means you’ll always have an energy bar that perfectly aligns with your cravings and nutritional goals, far beyond what any single store-bought flavor can offer.
The Genius of No-Bake: Perfect Texture, Zero Hassle
My journey to perfecting these homemade Clif Bars wasn’t without its detours. Initially, I experimented with a baked approach, attempting to merge several recipes and incorporate high-protein nuts and whole grains. My aim was to achieve that signature chewy texture by slightly under-baking the bars (and yes, it was an egg-free recipe). The results, while edible, were undeniably dense and somewhat unappealing, affectionately described by myself as “an edible enema.” While my ever-supportive husband, Nick, found them delicious, I knew I could do better. The pursuit of perfection led me back to the drawing board.
Drawing inspiration from some of my favorite no-bake cookie recipes, I developed a simple yet brilliant no-bake method for these energy bars. The transformation was remarkable! This no-bake approach not only saved considerable time and effort in the kitchen but also delivered a texture that was incredibly close to the soft, chewy consistency of an authentic Clif Bar. This method ensures the ingredients remain moist and pliable, creating a satisfying chew without the risk of over-baking or drying out. The outcome is a bar that is not only far less expensive than its commercial counterpart but also completely free of any unpleasant aftertastes, providing a clean, delicious, and genuinely satisfying energy boost. It’s truly a “yum!” moment with every bite.
Essential Ingredients for Your DIY Clif Bars
Creating these wholesome energy bars requires a handful of readily available ingredients, each playing a crucial role in achieving the perfect balance of flavor, texture, and nutritional value. The beauty of this recipe lies in its simplicity and the flexibility to adapt to your pantry staples or dietary preferences.
For precise measurements of each ingredient, please refer to the detailed recipe card located at the conclusion of this post. You can easily switch between US Customary (volume) and Metric (weights) units to suit your preferred measurement system.
Here’s a breakdown of the key components:
- Crisp Rice Cereal: This provides that characteristic light, airy crunch that contrasts beautifully with the chewiness of the other ingredients. For a truly gluten-free bar, opt for a brown rice-based cereal like Erewhon Crisp Brown. Otherwise, classic Rice Krispies work perfectly.
- Uncooked Quick-Cooking Oats: The heart of any good energy bar, oats offer sustained energy through complex carbohydrates and fiber. Quick-cooking oats are ideal here as they soften just enough without needing to be cooked, contributing to the soft, chewy texture.
- Ground Flaxseed (Flaxseed Meal): A nutritional powerhouse, ground flaxseed adds beneficial omega-3 fatty acids, fiber, and acts as a natural binder, helping the bars hold together without the need for eggs.
- Finely Chopped Dried Fruit: This is where you can infuse natural sweetness and a burst of flavor. Popular choices include raisins, dried cranberries, or dried cherries. Chopping them finely ensures even distribution and prevents large, clunky pieces in your bars.
- Finely Chopped Nuts or Seeds: For healthy fats, protein, and an added layer of texture. Pepitas (pumpkin seeds) are an excellent choice, providing a subtle crunch and nutty flavor. Almonds, walnuts, or sunflower seeds are also fantastic alternatives.
- Maple Syrup or Brown Rice Syrup: These natural liquid sweeteners are essential for both taste and as the primary binding agent. Maple syrup offers a distinct flavor, while brown rice syrup provides a more neutral sweetness and extra chewiness. If you’re not strictly vegan, honey can be a suitable substitute.
- Nut or Seed Butter of Your Choice: This contributes to the rich, creamy texture and provides healthy fats and protein. Peanut butter is a classic, but almond butter, cashew butter, or sunflower seed butter (for nut-free options) are equally delicious. Choose a natural, unsweetened variety for best results.
- Vanilla Extract: A splash of vanilla enhances all the other flavors, adding a warm, inviting aroma and taste to your bars.
- Optional: Ground Cinnamon: For a touch of warmth and spice, especially complementary if you’re using apple or autumnal fruit variations.
Simple Steps to Create Your Own No-Bake Clif Bars
For a comprehensive list of directions, including all ingredient quantities, please consult the recipe card provided further down the page.
Making these delicious and healthy energy bars is incredibly straightforward. Follow these steps, and you’ll have a batch ready for chilling in no time:
- Prepare Your Dry Ingredients: In a large mixing bowl, combine the crisp rice cereal, quick-cooking oats, ground flaxseed meal, finely chopped dried fruit, and your chosen finely chopped nuts or seeds. Give everything a good stir to ensure they are well mixed. This foundational blend is crucial for an even texture throughout your bars.
- Create the Wet Binding Mixture: In a small saucepan, gently combine your chosen syrup (maple or brown rice) and nut or seed butter over medium heat. Stir continuously until the mixture has melted and is completely smooth and well-blended. Alternatively, for a quicker option, you can microwave this mixture in a small, microwave-safe bowl for 30-60 seconds, stirring halfway through, until fully melted. Once smooth, remove from heat and stir in the vanilla extract until it’s fully incorporated. If you’re adding optional ground cinnamon, now is the time to blend it into the wet mixture.
- Combine Wet and Dry: Pour the warm nut butter and syrup mixture evenly over the dry cereal and fruit mixture in the large bowl. Begin by stirring with a sturdy wooden spoon to initially coat the ingredients. As the mixture cools slightly, it will become quite sticky. At this point, don’t be afraid to get your hands in there! Using your hands allows you to effectively and thoroughly coat all the dry ingredients, ensuring a consistent bind. Simply scrape any residue off your hands once you’re done mixing.
- Press into a Pan: Prepare an 8-inch (20 cm) square pan by lightly spraying it with nonstick cooking spray. Transfer the sticky bar mixture into the prepared pan. To achieve a perfectly flat and firm bar, use a large piece of wax paper or parchment paper to press the mixture down very firmly and evenly into the pan. Really tamp it down with steady, consistent pressure – this is key for bars that hold their shape beautifully when cut.
- Chill to Set: Once pressed, allow the pan to cool on a wire rack for a few minutes before transferring it to the refrigerator. Chill for at least 30 minutes. This crucial step allows the bars to firm up and set completely, making them easy to slice without crumbling.
- Slice and Serve: Once thoroughly chilled and firm, remove the slab from the pan. Using a sharp knife, carefully cut the large slab into 12 individual bars.
Optimal Storage for Long-Lasting Freshness
Proper storage is essential to maintain the freshness, texture, and integrity of your homemade No-Bake Clif Bars. These bars are incredibly stable when stored correctly, ensuring you have a convenient, healthy snack ready whenever you need it.
Once you’ve cut your bars, tightly wrap each individual bar in plastic wrap. This step is critical for preventing them from drying out and absorbing odors from other foods in your refrigerator. Store the wrapped bars in an airtight container in the refrigerator. When stored in this manner, your DIY Clif Bars will remain fresh and delicious for an impressive period of up to three months. This makes them an excellent option for meal prepping and ensures you always have a wholesome grab-and-go snack available.
For even longer storage, these bars freeze beautifully. Simply wrap them individually as described, then place them in a freezer-safe bag or container. They can be frozen for up to six months. When ready to enjoy, simply pull one out of the freezer and let it thaw at room temperature for 15-30 minutes, or enjoy it chilled for a firmer texture.
Unleash Your Creativity: Exciting Variations for Your Bars
One of the most rewarding aspects of making your own energy bars is the endless potential for customization. This base recipe is incredibly versatile, allowing you to experiment with different flavors, textures, and nutritional boosts. Don’t be afraid to mix and match ingredients to create your signature bar! Here are some inspiring variations to get you started, alongside tips for developing your own unique creations:
- Cheery Cherry Almond Bliss: For a vibrant and slightly tart flavor, use finely chopped dried tart cherries as your fruit component. Pair these with lightly salted, roasted almonds for the nuts, which will enhance the overall taste. While any nut butter works, almond butter truly elevates this variation (though it might be a bit pricier, many find it worth the indulgence!). To deepen the flavor profile, add 1/4 teaspoon of almond extract to your wet mixture alongside the vanilla.
- Classic Apple Pie Delight: Capture the cozy essence of apple pie in a bar! Incorporate finely chopped dried apples for the fruit. For the sweetener, stick with brown rice syrup or honey, as their subtle flavors won’t overpower the apple. This variation truly shines with the addition of the optional ground cinnamon (maybe even a pinch more than the recipe calls for). For nuts, toasted walnuts or pecans are perfect, adding a complementary warmth and crunch.
- Decadent Chocolate Chip Cookie: Indulge your sweet tooth with this satisfying chocolatey version. Simply replace the dried fruit entirely with an equal amount of miniature semi-sweet chocolate chips. For a healthier twist, consider using cacao nibs or carob chips. An important tip for this variation: combine the dry cereal mixture with the syrup mixture, then let the combined ingredients stand for about 10 minutes before folding in the chocolate chips. This prevents the chips from melting too much into the warm mixture, ensuring delightful pockets of chocolate throughout.
- Pepita Cranberry Zest: A fantastic option for those who love a combination of tart and nutty. Use finely chopped cranberries for your dried fruit, providing a lovely tang. For the seeds, raw pepitas (pumpkin seeds) are an excellent choice, offering a mild, earthy flavor and a satisfying chew. This variation works beautifully with either honey or brown rice syrup as the binder.
- Hearty Peanut Butter Cookie: A comforting and protein-packed option! For the fruit, use finely chopped dates, which add natural sweetness and a sticky texture. Dry roasted peanuts are the obvious (and delicious) choice for the nuts, amplifying the peanut butter flavor. For the syrup, you can use straight honey, or for a richer, more complex taste, try a half-honey, half-molasses blend. Of course, peanut butter is the star for the nut butter component here.
Tips for Customizing Your Own Bars:
- Fruit Swaps: Almost any dried fruit can work! Think apricots, figs, blueberries, or even a mix. Ensure they are finely chopped for even distribution.
- Nut & Seed Diversity: Explore different nuts like pistachios, cashews, or macadamias, or seeds like chia or hemp for added nutrients. Roasting nuts briefly before chopping can enhance their flavor.
- Sweetener Adjustments: While maple and brown rice syrup are staples, experiment with agave nectar or even date paste for different flavor and binding properties.
- Flavor Boosters: Don’t limit yourself to vanilla and cinnamon. Consider a touch of orange zest, a dash of ginger, or even a hint of espresso powder for unique flavor profiles.
- Protein Power-Ups: For an extra protein punch, you can sparingly add a tablespoon or two of a neutral-flavored protein powder (like pea protein for a vegan option) into the dry mixture, but be mindful that too much can alter the texture.
Embrace the possibilities and enjoy these wonderfully versatile energy bars as easy, customizable fuel for all your adventures, big and small!
Explore More Easy DIY Energy Bar Recipes
If you’ve enjoyed making these No-Bake Clif Bars, you’ll love these other simple and healthy energy bar recipes:
- 3-Ingredient Grain-Free Granola Bars {Vegan, Keto Option}
- Chocolate Coconut Protein Bars {5 ingredients, Vegan}
- 3-Ingredient Keto Protein Bars {Vegan, Easy}
- No-Bake Quinoa Protein Bars {Vegan, Gluten-Free}
DIY No-Bake Clif Bars (Vegan, Gluten-Free)
No-Bake DIY Clif Bars are ideal for lunches, snacks, hikes, camping, workout fuel, and so much more! They are vegan, gluten-free, and frugal to make, too.
By: Camilla
Print Recipe
Ingredients
- 1 ¼ cups crisp rice cereal (e.g., Erewhon Crisp Brown for gluten-free, or Rice Krispies)
- 1 cup uncooked quick-cooking oats
- 2 tablespoons ground flaxseed (flaxseed meal)
- ¼ cup finely chopped dried fruit (e.g., raisins, dried cranberries, dried cherries)
- ¼ cup finely chopped nuts or seeds (e.g., pepitas, almonds, walnuts)
- ⅓ cup maple syrup or brown rice syrup (or honey if not strictly vegan)
- ½ cup nut or seed butter of your choice (e.g., peanut butter, almond butter, sunflower seed butter)
- 1 teaspoon vanilla extract
- Optional: ½ teaspoon ground cinnamon
Instructions
- Combine the rice cereal, oats, flaxseed meal, dried fruit, and nuts in a large bowl. Mix well.
- In a small saucepan over medium heat, combine the syrup and nut butter. Stir until melted and well-blended (alternatively, microwave in a small microwave-safe bowl for 30-60 seconds until melted). Stir in the vanilla extract until fully blended.
- Pour the warm nut butter mixture over the cereal mixture, stirring until all dry ingredients are thoroughly coated. Initially use a wooden spoon, then get your hands in there for the best coating (it will be sticky, but effective).
- Press the mixture firmly and evenly into an 8-inch (20 cm) square pan (lightly sprayed with nonstick cooking spray). Use a large square of wax paper or parchment paper to really tamp it down and ensure a compact bar.
- Cool the pan on a wire rack, then transfer to the refrigerator and chill for at least 30 minutes to allow the bars to set completely.
- Once chilled, remove the slab from the pan and cut into 12 bars.
Notes
Storage: Tightly wrap individual bars in plastic wrap and store them in an airtight container in the refrigerator for up to 3 months. For longer storage, bars can be frozen for up to 6 months.
Variations:
- Cheery Cherry: Use chopped dried tart cherries and lightly salted roasted almonds. Add ¼ teaspoon almond extract to the wet mixture.
- Apple Pie: Use chopped dried apples and replace syrup with rice syrup or honey. Ensure to include the cinnamon option, and use toasted walnuts or pecans.
- Chocolate Chip Cookie: Replace dried fruit with an equal amount of miniature semi-sweet chocolate chips (or cacao nibs, or carob chips). Combine cereal and syrup mixtures, let stand 10 minutes before adding chips.
- Pepita-Cranberry: Use chopped cranberries for dried fruit and raw pepitas for nuts/seeds. Use honey or brown rice syrup.
- Peanut Butter Cookie: Use chopped dates for dried fruit and dry roasted peanuts for nuts. Use honey, or half honey-half molasses for the syrup, and peanut butter for the nut butter.
Nutrition
Serving: 1 bar
Enjoyed this recipe? Please consider leaving a rating and comment below!