
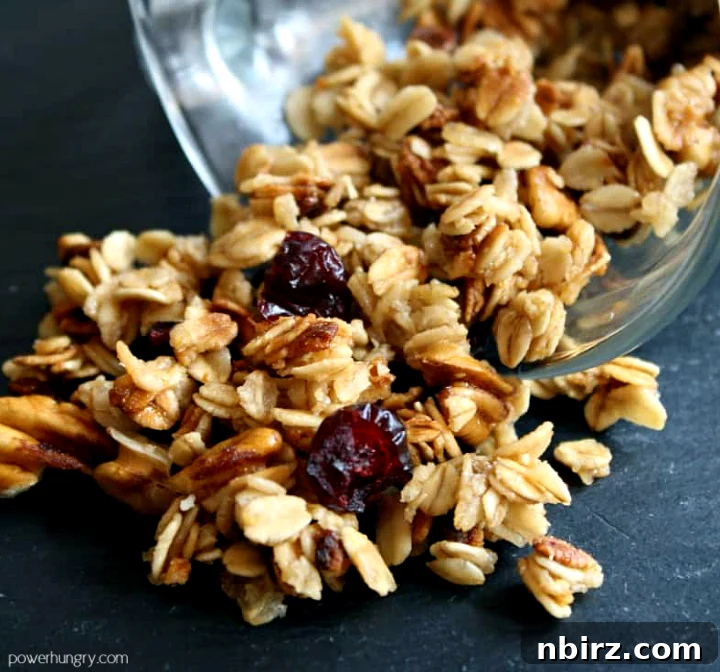
Busy mornings just got a whole lot better! This shamelessly easy, incredibly fast microwave mug granola is your new best friend. Healthy, wonderfully crunchy, and packed with satisfying clusters, this delightful treat is also completely vegan and gluten-free. Get ready to indulge in pure deliciousness!
Almost Instant Microwave Granola: A Game-Changer for Busy Mornings
Imagine this: you could spend 45 minutes to an hour meticulously crafting a large batch of artisanal granola, followed by another 20 minutes of washing bowls, measuring cups, countertops, and a baking sheet. While there’s certainly a time and place for such culinary endeavors, what about those mornings when time is a luxury you simply don’t have?
Now, consider an alternative: you could create a perfectly portioned, wonderfully delectable granola, just like the one pictured above, in under 5 minutes. All in one mug. This isn’t a dream – it’s a reality, and it’s about to revolutionize your breakfast routine.
This recipe is designed for ultimate convenience and singular enjoyment. There’s no need to share, unless you genuinely want to! Prepare to be amazed by how quickly and effortlessly you can whip up a healthy, satisfying meal.
Unbeatable Benefits of This Speedy Granola Recipe
This microwave mug granola isn’t just fast; it’s packed with advantages that make it an ideal choice for anyone seeking a wholesome, convenient, and delicious breakfast or snack:
- Lightning-Fast Preparation: From start to finish, this granola is ready in under 5 minutes, making it perfect for even the most rushed mornings.
- Effortless & Simple: With minimal ingredients and straightforward instructions, it’s virtually foolproof – no complex steps or special equipment required.
- Diet-Friendly: Naturally gluten-free (ensure certified GF oats are used) and entirely vegan, catering to various dietary needs and preferences.
- Fiber-Rich Goodness: Rolled oats provide an excellent source of dietary fiber, promoting digestive health and keeping you feeling full and energized.
- No Refined Sugars: Sweetened naturally with maple syrup, this recipe avoids processed sugars, offering a healthier way to satisfy your sweet cravings.
- Perfect Portion Control: Makes a single, ideal serving, eliminating waste and the temptation to overeat a large batch.
- Infinitely Customizable: This basic recipe is a fantastic canvas for countless variations, allowing you to tailor flavors and textures to your exact taste.
- Minimal Cleanup: Preparing everything in a single mug drastically cuts down on post-cooking mess, leaving you more time to enjoy your day.
Essential Ingredients for Your Healthy Microwave Mug Granola
The precise measurements for each ingredient are detailed in the comprehensive recipe card located at the conclusion of this article. For your convenience, you can easily switch between US Customary (volume) and Metric (weights) units.
Crafting this incredible mug granola requires just a handful of staple ingredients, most of which you likely already have in your pantry. We’ll focus on the core five, with salt and water as optional but recommended additions that don’t add to the “main five” count:
- Rolled Oats: The foundation of our granola. You can use quick-cooking or old-fashioned rolled oats. If you require a gluten-free option, be sure to select oats that are certified gluten-free. Oats provide fiber and that satisfying chewy texture.
- Maple Syrup: Our primary sweetener, offering a natural, rich flavor. It also helps bind the granola and create those coveted clusters. We’ll explore options for other sweeteners in the recipe notes.
- Chopped Nuts or Seeds: Essential for crunch, healthy fats, and added protein. Almonds, walnuts, pecans, pumpkin seeds, sunflower seeds, or a mix would all work wonderfully. Choose your favorite!
- Chopped Dried Fruit: Adds a touch of sweetness, chewiness, and an extra burst of flavor. Raisins, cranberries, chopped apricots, or dates are excellent choices. This ingredient is added after microwaving to prevent burning.
- Oil of Choice: A small amount of oil helps the granola become crispy and golden. Coconut oil (melted), olive oil, or avocado oil are all great options, each contributing a slightly different flavor profile.
- Water (and optional salt): A small amount of water helps create the right consistency for coating the oats, while a pinch of salt enhances all the flavors.
Effortless Step-by-Step Instructions for Perfect Mug Granola
Please refer to the full, detailed directions conveniently located within the recipe card below for all specifics.
Let’s get cooking! Creating your own delicious microwave granola is surprisingly simple. Follow these steps for crunchy, golden perfection:
Step One: Combine Wet and Dry Ingredients (Excluding Dried Fruit)
Begin by gathering a generously sized mug (preferably 14-16 ounces) – this is crucial to prevent any overflow during the microwaving process. Into this mug, add your rolled oats, maple syrup, oil, water, and optional salt, along with your chosen chopped nuts or seeds. It’s vital to omit the dried fruit at this initial stage. Microwaving dried fruit for several minutes will result in hard, unappetizing, and even teeth-breaking bits of charcoal.
Stir all these ingredients thoroughly with a fork until the oats and nuts/seeds are evenly coated with the liquid mixture. Ensure there are no dry spots, as uniform coating helps in even toasting and cluster formation.
Step Two: Adjust Your Microwave to Medium (50%) Power
This step might seem a little intimidating if you rarely venture beyond the “Popcorn” or “Reheat” buttons on your microwave, but it’s essential for achieving that perfect toasted texture. You’ll need to locate and press the “Power Level” button (yes, it exists on most microwaves!). Adjust it until it displays “Medium” or “50% Power.” Don’t worry, you’ve got this! This lower power setting allows the granola to gently toast rather than burn, ensuring a crispy result.
Step Three: Microwave and Stir for Golden Perfection
Place your mug in the microwave and cook on Medium (50%) power for a total of 3-1/2 to 4-1/2 minutes. The exact time may vary slightly depending on your microwave’s wattage, so keep an eye on it. The key is to pause halfway through the cooking time (after about 2 minutes) to give the mixture a good stir. This is important because the oats and nuts/seeds at the bottom and edges of the mug will toast faster than those at the top.
When you resume microwaving, continue until the oats and nuts/seeds are beautifully golden brown and emit a wonderfully fragrant, toasty aroma. You might be skeptical that “toasting” can happen in a microwave, but trust us – it absolutely does, yielding delightfully crispy results!
Step Four: Incorporate Dried Fruit and Cool
Once your granola has reached its golden, toasty stage, carefully remove the hot mug from the microwave. Now is the time to add your chopped dried fruit, if you’re using it. Stir it in thoroughly, ensuring it’s well distributed throughout the warm granola. The residual heat from the oats will slightly soften the dried fruit, making it perfectly chewy without burning.
Allow the granola to stand for 2 to 3 minutes, giving it a chance to cool. As it cools, the oats will become perfectly crispy, firming up into those delightful clusters we all love.
Step Five: Enjoy Your Quick & Healthy Granola!
Your instant microwave mug granola is now ready to be savored! You can enjoy it straight from the mug as an energizing, crunchy snack, or elevate it into a complete and satisfying meal by adding a splash of your favorite milk (dairy or plant-based). You can also top it with fresh fruit or a dollop of yogurt.
With the time you’ve saved and the wholesome oat power you’ve gained, you’ll feel ready to conquer your day with a newfound skip in your step!
Unleash Your Creativity: Customize Your Granola Flavors
This basic microwave mug granola recipe is incredibly versatile, serving as a perfect blank slate for your culinary imagination. Don’t hesitate to experiment with different additions and flavor profiles to match your personal preferences:
- Nuts and Seeds: Beyond the classics, try chopped pecans, cashews, pistachios, hemp seeds, chia seeds, or even shredded unsweetened coconut for added texture and nutrition.
- Dried Fruits: Explore varieties like chopped dates, figs, dried cherries, blueberries, or even finely diced candied ginger for a spicy kick.
- Spices: A pinch of cinnamon, nutmeg, ginger, allspice, or pumpkin pie spice can transform the flavor. Add between 1/4 and 3/4 teaspoon of your chosen spice along with the salt in Step 1.
- Extracts: A few drops of vanilla extract, almond extract, or even peppermint extract can add a delightful aroma and taste dimension. Incorporate these with the liquid ingredients.
- Citrus Zest: Finely grated lemon, orange, or lime zest (about 1/2 teaspoon) can brighten the entire flavor profile, offering a fresh, zesty note. Add this with the extracts.
- Sweetener Variations: While maple syrup is fantastic, you can also use agave nectar, brown rice syrup, or honey (if not vegan). For granulated sugar, use an equal amount and add an extra 2 teaspoons of water to maintain moisture.
- Chocolate Chips: For a decadent treat, stir in a few chocolate chips or chunks *after* the granola has cooled slightly, so they don’t melt completely.
The beauty of this recipe lies in its forgiving nature, so feel free to adjust the sweetener or salt slightly to your liking. Happy eating and happy experimenting!
Serving Suggestions & Storage Tips
How to Enjoy Your Microwave Granola:
- Classic Breakfast: Serve with your favorite milk (dairy, almond, soy, oat), yogurt, or kefir.
- Topping: Sprinkle over smoothie bowls, oatmeal, or even ice cream for added crunch.
- On-the-Go Snack: Enjoy it plain as a quick, energizing bite anytime.
- With Fresh Fruit: Pair with sliced bananas, berries, or diced apples for a wholesome meal.
Storing Leftovers (if any!):
While this recipe is designed for a single serving, if you happen to make a slightly larger batch or want to prepare it ahead, ensure it cools completely. Store your microwave mug granola in an airtight container at room temperature for up to 3-5 days. It’s best enjoyed fresh for maximum crispiness, but it will retain its flavor and a good amount of crunch for a few days.
Frequently Asked Questions (FAQ)
Can I use instant oats instead of rolled oats?
While rolled oats (old-fashioned or quick-cooking) are recommended for their texture and ability to form clusters, you *can* use instant oats. However, the texture might be softer, and they tend to absorb liquid more quickly, so you might need to adjust the microwaving time slightly, keeping a close watch to prevent burning.
My granola didn’t get crispy enough. What went wrong?
The most common reasons for less-than-crispy granola are either too much moisture, not enough cooking time, or not using the correct power level. Ensure you are using the 50% power setting. If it’s still not crispy after the recommended time, microwave in 30-second intervals until it achieves the desired crunch, stirring between each interval. Also, remember that granola crisps up significantly as it cools.
Can I double the recipe?
This recipe is optimized for a single serving in one mug. While you could technically multiply the ingredients, trying to cook a double batch in a single mug might lead to uneven cooking and less crispiness. For larger quantities, it’s generally better to make separate single servings or consider a traditional oven-baked granola recipe.
Can I make this oil-free?
The oil is crucial for achieving that characteristic crispiness and golden color in microwave granola. While you could omit it, the texture would be significantly different and likely less crunchy. For an oil-free granola, oven-baked versions often work better by using ingredients like applesauce or mashed banana for binding.
What kind of mug should I use?
Always use a large, microwave-safe mug, preferably 14-16 ounces or larger, to prevent spillage as the oats heat and expand. Glass or ceramic mugs are ideal.
Explore More Healthy & Delicious Granola Recipes
If you love this quick microwave version, you might also enjoy some of our other healthy granola recipes:
- Healthy Oil-Free Granola (vegan, GF)
- How to Make Low-Calorie Granola (vegan, GF, 72 calories)
- Banana Bread Protein Granola (vegan, GF)
- Oil-Free Buckwheat Granola (vegan, GF, oat-free)
- Grain-Free Banana Granola (oil-free, no added sugar)
- Grain-Free Red Lentil Granola (vegan)
- Fresh Apple Pie Granola (vegan, gluten-free)
Fast Microwave Mug Granola (Gluten-Free)
Print Recipe
Ingredients
- 1 tablespoon pure maple syrup
- 2 teaspoons water
- 2 teaspoons oil (e.g., olive oil, avocado oil, or melted coconut oil)
- Optional: 1/8 teaspoon fine sea salt
- 1/3 cup quick-cooking or old-fashioned rolled oats (gluten-free if needed)
- 1 tablespoon chopped nuts or seeds (e.g., almonds, walnuts, pumpkin seeds)
- 1 tablespoon chopped dried fruit (e.g., raisins, apricots, cranberries)
Instructions
- In a large mug (14 to 16 oz), combine the maple syrup, water, oil, salt (if using), oats, and nuts/seeds until well blended. Ensure all oats and nuts are coated.
- Microwave on Medium (50%) power for 2 minutes. Stir well, making sure to scrape and incorporate any syrup from the bottom of the mug.
- Continue to microwave on Medium (50%) power for another 1-1/2 to 2 minutes, or until the oats are golden brown and fragrant. Keep a close watch to prevent burning.
- Stir in the chopped dried fruit (if using). Let the granola stand for 2 to 3 minutes to cool. It will become perfectly crispy as it cools.
- Enjoy warm or at room temperature as a quick snack or breakfast with your favorite milk.
Notes
- Other Sweeteners: You can replace maple syrup with an equal amount of another liquid sweetener like agave nectar or brown rice syrup. If using granulated sugar, use an equal amount and add an additional 2 teaspoons of water.
- Spices: For added flavor, stir in 1/4 to 3/4 teaspoon of sweet spices like cinnamon, ginger, or pumpkin pie spice along with the salt in step 1.
- Extracts & Zest: A few drops of vanilla or almond extract, or 1/2 teaspoon of finely grated citrus zest (lemon, orange, or lime), can be added to the syrup mixture for an aromatic boost.
Nutrition (Approximate per serving)
Calories: 225 kcal |
Carbohydrates: 32.3g |
Protein: 3.9g |
Fat: 13.2g |
Saturated Fat: 1.8g |
Sodium: 237mg |
Fiber: 3g |
Sugar: 12.3g
Enjoyed this recipe?
We’d love to hear from you! Please consider sharing your thoughts and rating this recipe below. Your feedback helps us create more delicious content!