
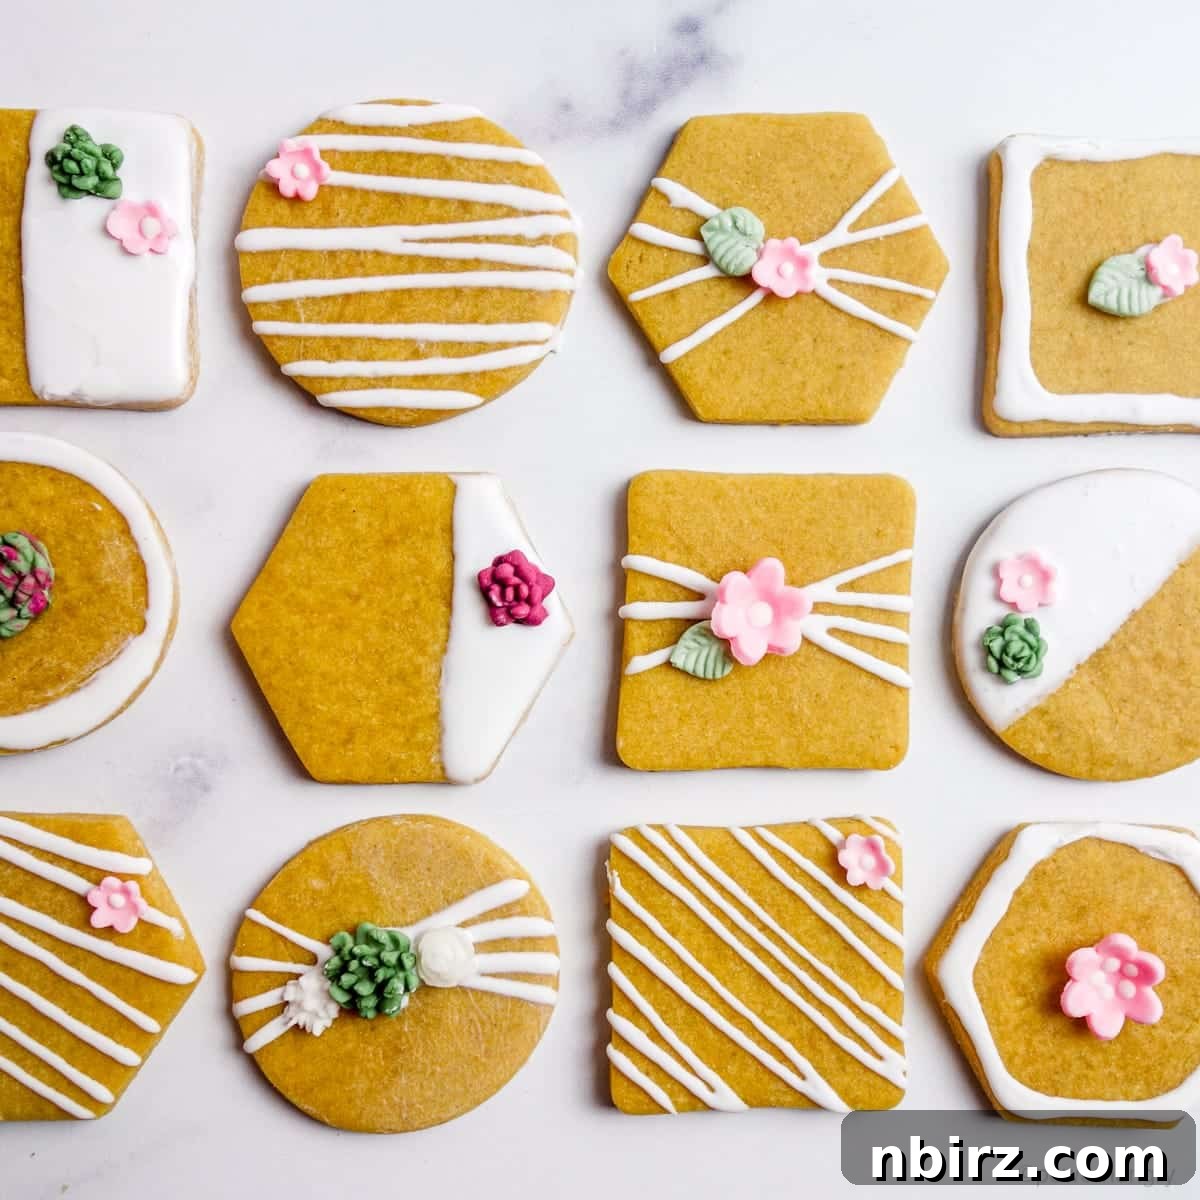
Welcome to the delightful world of baking where dietary restrictions don’t mean sacrificing flavor or fun! These Vegan Chickpea Flour Cut-Out Cookies are a game-changer for anyone seeking grain-free, gluten-free, nut-free, and irresistibly easy treats. Boasting a uniquely nutty flavor profile, they are utterly perfect whether enjoyed plain with a cup of tea or adorned with your favorite icing for a special touch. Get ready to bake a batch of inclusive happiness!
Discover the Magic of Chickpea Flour in Sweet Baking
Chickpea flour, often known as gram flour or “besan,” is simply finely ground dried chickpeas. It’s truly a powerhouse ingredient in my kitchen due to its remarkable versatility, cost-effectiveness, and distinctly delicious nutty flavor. While many are increasingly familiar with its applications in savory culinary traditions worldwide—think crispy socca crepes from the Mediterranean, golden panisses fries from Southern France, or the ingenious Burmese tofu—its potential in sweet treats is often overlooked by Western bakers.
However, across the Middle East and Southeast Asia, chickpea flour has been a cherished component in desserts for centuries. For instance, India’s rich besan burfi, a delectable fudge, and Persia’s fragrant nan-e nokhodchi, delicate chickpea flour cookies infused with cardamom and pistachios, are prime examples. My recipe for chickpea flour roll-out cookies draws profound inspiration from these rich traditions, offering a modern, accessible take that’s a true boon for anyone navigating gluten-free, grain-free, or nut-free dietary requirements. It showcases how this humble legume flour can transform into extraordinarily tender and flavorful cookies.
Why You’ll Love These Vegan Chickpea Flour Cookies: Key Benefits
These chickpea flour cut-out cookies aren’t just delicious; they come packed with fantastic benefits that make them a go-to recipe for various lifestyles and dietary needs:
- Completely Vegan: Free from eggs and dairy, making them suitable for a plant-based diet without compromising on taste or texture.
- Nut-Free: A safe and delicious option for those with nut allergies, allowing everyone to enjoy a classic cookie.
- Gluten-Free: Naturally free from gluten, making them an excellent choice for individuals with celiac disease or gluten sensitivities.
- Grain-Free: Beyond just gluten, these cookies are also grain-free, ideal for paleo-friendly diets or those avoiding grains for other health reasons.
- Fast & Easy Preparation: Designed for efficiency, these cookies require minimal fuss and can be prepared quickly.
- Made in One Bowl: Simplify your clean-up! This recipe streamlines the process by keeping all mixing to a single bowl.
- Holds Shape Perfectly: Say goodbye to spreading cookies! These maintain their beautiful cut-out shapes, perfect for intricate decorating.
Whether you’re catering to specific dietary needs or simply looking for a new, exciting cookie recipe, these chickpea flour delights are sure to impress with their simplicity and satisfying results.
Essential Ingredients for Your Chickpea Flour Cookies
Crafting these delectable vegan chickpea flour cookies requires just a handful of simple ingredients. Each plays a crucial role in achieving the perfect flavor and texture. While the exact measurements are detailed in the recipe card below, let’s explore why these components are key.
For precise amounts of each ingredient, refer to the detailed recipe card at the end of this post. You can easily switch between US Customary (volume) and Metric (weights) for your preferred measurement system.
- Chickpea Flour: The star of our show! Ensure you use a fine, good-quality chickpea flour (also known as besan). It’s naturally gluten-free and provides a unique nutty depth and binding properties to the dough.
- Confectioners’ Sugar (Powdered Sugar): This fine sugar dissolves easily, contributing to the cookies’ tender texture and delicate sweetness. For a 100% grain-free cookie, it’s vital to use a confectioners’ sugar that is specifically labeled “grain-free” or made without cornstarch, as many brands use cornstarch as an anti-caking agent.
- Plant Butter (Vegan Margarine – Stick Form): The fat component is crucial for tenderness and flavor. Opt for a high-quality vegan butter in stick form, rather than a tub-style spread. Stick butters typically have a higher fat content and lower water content, which mimics traditional butter more closely and results in better cookie texture. Make sure it’s melted for this recipe.
- Vanilla Extract: A classic flavor enhancer that complements the nutty notes of chickpea flour beautifully.
- Water: A touch of water helps to bring the dough together, ensuring it reaches the right consistency for rolling and cutting.
- Salt (Optional/Adjustable): A pinch of salt balances the sweetness and enhances all the flavors in the cookie. While optional, I highly recommend it for the best taste.
Selecting quality ingredients will undoubtedly elevate the outcome of your homemade chickpea flour cookies. Double-check your powdered sugar for cornstarch if strict grain-free is your goal!
Baking Your Perfect Vegan Chickpea Flour Cut-Out Cookies
A comprehensive guide to all steps is also available in the recipe card below. Follow these instructions for delightful results!
Step One: Prepare Your Baking Surface
Before you begin mixing, prepare your baking sheet. Line a large baking sheet with parchment paper. This step is crucial for preventing sticking and ensuring your delicate cut-out cookies are easy to transfer after baking. Set it aside for later use.
Step Two: Combine the Dry Ingredients
In a medium-sized mixing bowl, thoroughly whisk together the chickpea flour, confectioners’ sugar, and salt. Whisking ensures that all dry ingredients are evenly distributed, preventing lumps and guaranteeing a consistent texture throughout your cookie dough. Take your time with this step to avoid any pockets of unmixed ingredients.
Step Three: Incorporate the Wet Ingredients to Form Dough
Now, add the melted vegan butter, water, and vanilla extract to your dry ingredient mixture. Stir everything together until it’s completely blended. A wonderful aspect of working with chickpea flour is that, unlike wheat flour, there’s no gluten to develop. This means you don’t have to worry about over-mixing; you won’t end up with tough cookies! Just ensure all ingredients are fully combined into a cohesive dough.
It’s important to note that chickpea flour dough will typically appear more greasy than a traditional wheat flour dough. This is perfectly normal and expected for this type of recipe, so don’t be alarmed by the appearance. It contributes to the unique texture of these grain-free cookies.
Step Four: Prepare to Roll Your Dough
For best results, roll out your dough between two sheets of parchment paper, plastic wrap, or wax paper. This technique prevents sticking and makes handling the dough much easier. Roll the dough to an even 1/4-inch (about 6mm) thickness. Consistency in thickness is key for uniform baking, ensuring all your cookies cook through at the same rate. Using a rolling pin with guides can be helpful here, or simply eyeball it with confidence!
Step Five: Create Your Cookie Shapes
Using your favorite 2-inch (5 cm) cookie cutters, carefully cut out shapes from the rolled dough. You have the flexibility to use larger or smaller cutters, but it’s important to stick to one size per baking batch. Baking cookies of a uniform size ensures even cooking, preventing smaller cookies from burning while larger ones remain underdone. Get creative with your shapes for festive or themed occasions!
Step Six: Arrange Cookies on the Baking Sheet
Carefully transfer your freshly cut cookie shapes to the prepared baking sheet using a thin metal spatula. This helps to maintain their perfect form. Ensure you space the cookies about two inches apart on the parchment paper to allow for proper air circulation during baking. Once you’ve cut out as many shapes as possible from the initial roll, gather the dough scraps, gently re-roll them, and cut out additional shapes until all the dough has been utilized. This minimizes waste and maximizes your cookie yield!
Don’t let any dough go to waste! Gather the remaining dough scraps, gently press them together, and re-roll to cut out more delightful shapes. Continue this process until every last bit of dough has been transformed into a potential cookie masterpiece.
Step Seven: Chill the Cookies and Preheat Your Oven
Once all your cookies are arranged on the baking sheet, place the entire sheet into the freezer for 15 minutes. This chilling step is absolutely vital for these cut-out cookies! It helps the vegan butter solidify, preventing the cookies from spreading too much during baking and ensuring they retain their crisp, clean edges. While the dough chills, preheat your oven to 300°F (150°C). This lower temperature is ideal for baking these delicate, grain-free cookies to perfection without over-browning them.
Step Eight: Bake Until Golden
Remove the chilled baking sheet from the freezer and immediately transfer it to your preheated oven. Bake for approximately 20 to 25 minutes. You’ll know they are ready when the surface of the cookies appears dry and the edges begin to turn a very light, delicate golden brown. Avoid over-baking, which can make them too hard. Keep an eye on them, as oven temperatures can vary.
Step Nine: Cool and Enjoy!
Once baked, resist the urge to move them immediately. Allow the cookies to cool on the baking sheet for about 5 minutes. This brief cooling period helps them firm up, making them less prone to breaking when handled. After 5 minutes, use a metal spatula to carefully transfer them to a wire cooling rack to cool completely. Cooling completely is essential before decorating or storing to ensure their structure is set and any icing adheres properly. Then, they are ready to be decorated as desired or simply enjoyed plain!
Understanding the Texture of These Unique Cookies
These vegan chickpea flour cut-out cookies are designed to be wonderfully soft, yet firm enough to hold their shape without being floppy. They are not intended to be crispy, offering a delightful melt-in-your-mouth experience. This soft texture is a signature characteristic of baking with chickpea flour.
However, if your preference leans towards a crisper cookie, you can easily adjust the baking method. Simply increase your oven temperature slightly to 325°F (160°C) and bake for a shorter duration, around 18 to 23 minutes. Keep a close watch; the goal is for the cookies to achieve a more pronounced golden-brown hue and feel firmer to the touch, indicating that more moisture has been baked out, resulting in a satisfying crispness.
The Distinctive Flavor Profile of Chickpea Flour Cookies
The taste of chickpea flour is truly distinctive and incredibly appealing, especially in these cookies. If you’re new to chickpea flour in sweets, it might be a novel experience. To put it in perspective, imagine trying peanut butter for the first time – its unique flavor profile might seem unusual initially. Similarly, chickpea flour possesses a delightful, earthy nuttiness that quickly becomes a beloved taste for many.
This inherent nutty flavor pairs exceptionally well with a variety of additions. A drizzle of melted chocolate, for example, beautifully complements the chickpea base, creating a sophisticated treat. However, these cookies are equally delicious and satisfying enjoyed entirely on their own, allowing the natural essence of the chickpea flour to shine.
For those who might prefer to soften the distinctive nutty flavor or add another layer of complexity, these cookies are incredibly adaptable. Consider incorporating strong spices such as warming cinnamon, zesty ginger, fragrant cardamom, pungent cloves, or a comforting blend of pumpkin pie spices. These additions can transform the flavor profile, offering a new dimension while still celebrating the unique qualities of chickpea flour.
Elevate Your Cookies: Creative Decoration Ideas
One of the joys of baking cut-out cookies is the endless possibility for decoration! These perfectly shaped chickpea flour cookies are a blank canvas for your creativity. You can choose to keep it simple or go all out with elaborate designs, depending on the occasion or your mood.
For a quick and elegant finish, a straightforward icing made from powdered sugar and a non-dairy milk (like almond or oat milk) is always a winner. It provides a sweet glaze that sets beautifully. Melted chocolate, whether dark, milk, or white vegan varieties, makes another excellent topping, adding richness and a lovely sheen. For those looking to create more intricate designs, a vegan royal icing (I highly recommend this recipe from The Hidden Veggies for its excellent consistency) is perfect for piping fine details and creating crisp outlines.
As you can see in the images, I’ve had fun creating charming flowers, succulents, and leaves. These were crafted using an easy vegan gum paste recipe from Geeky Cakes and silicone molds, demonstrating just how versatile these cookies can be for artistic expression. Let your imagination run wild and turn these wholesome cookies into edible works of art!
Frequently Asked Questions About Vegan Chickpea Flour Cookies
Here are answers to some common questions you might have about making and enjoying these unique vegan chickpea flour cut-out cookies:
How Should I Store These Delicious Cookies?
Proper storage is key to maintaining the freshness and quality of your chickpea flour cookies. Store them in an airtight container at a cool room temperature for up to 3 days. If you need them to last longer, they can be kept in the refrigerator for up to 1 week. For extended freshness, these cookies freeze beautifully for up to six months. Just be sure they are in a tightly sealed, freezer-safe container to prevent freezer burn.
Do These Cookies Really Hold Their Shape Well?
Absolutely! One of the fantastic qualities of this particular recipe is that the cookies do not spread during baking. This means you’ll achieve perfectly clean-edged cut-out shapes every single time. The chilling step before baking is crucial for this, ensuring your intricate designs remain intact and beautiful.
Can I Double or Triple the Recipe for More Cookies?
Yes, certainly! I intentionally designed this recipe as a small batch to allow for easy experimentation, especially if you’re new to chickpea flour baking. Plus, for most everyday needs, a small batch is often sufficient. However, if you’re baking for a party, a special event, or simply want to stock up, feel free to double, triple, or even quadruple the cookie dough recipe to meet your desired quantity. The ratios will scale up perfectly.
Can I Prepare the Dough in Advance?
Yes, absolutely! This is a great time-saving tip for efficient baking. You can prepare the cookie dough up to 2 days in advance. Simply cover it tightly and refrigerate. For even longer storage, the dough can be frozen for up to 3 months when wrapped securely in an airtight container. When you’re ready to bake, remember to let the dough come close to room temperature before attempting to roll it out; this will make it much more pliable and easier to work with.
Are There Substitutions for Vegan Butter?
While vegan stick butter is recommended for the best texture, you do have some flexibility. You can use an equal measure of melted coconut oil as a direct substitute. If you are not adhering to a vegan diet, regular unsalted butter (melted) can also be used. Be aware that subtle differences in flavor and texture might occur with substitutions, but both options should yield delicious results.
What Are Some Flavor Variations I Can Try?
These chickpea flour cookies are wonderfully versatile! Beyond the basic vanilla, you can experiment with different extracts such as almond, lemon, or orange extract for a new flavor dimension. Finely grated citrus zests (lemon, orange, or lime) can add a bright, fresh note. As mentioned, incorporating warming spices like cinnamon, ginger, cardamom, or even a chai spice blend works beautifully with the nutty base of chickpea flour. Feel free to get creative and tailor them to your personal taste!
Happy Baking! I hope you enjoy these unique and wholesome vegan chickpea flour cut-out cookies.
More Gluten-Free & Vegan Baking Inspiration
If you loved these chickpea flour cookies, you might be interested in exploring more of our delicious and allergen-friendly recipes:
- 2-Ingredient Chickpea Flour Tortillas {vegan, grainfree}
- Coconut Flour Cut-Out Cookies {vegan, grain-free}
- Maple Almond Flour Cut-Out Cookies {vegan, grain-free}
- 2-Ingredient Almond Flour Cut-Out Cookies {vegan, keto option}
- Vegan Cassava Flour Gingerbread Cut-Out Cookies {gluten-free}
Vegan Chickpea Flour Cut-Out Cookies (Grain-Free, Nut-Free)
These delightful vegan chickpea flour cut-out cookies are the perfect choice for anyone seeking grain-free, nut-free, dairy-free, egg-free, and gluten-free treats!
Cook Time: 20-25 minutes
Additional Time (Chilling): 15 minutes
Total Time: Approximately 50 minutes
Yields: 12 (2-inch/5 cm) cookies
By: Camilla
Ingredients
- 1 cup (120 g) chickpea flour
- 1/2 cup (50 g) confectioners’/powdered sugar (ensure no cornstarch for grain-free)
- 1/4 cup plant-based stick butter, melted (vegan margarine)
- 1 tablespoon (15 mL) water
- 1 teaspoon vanilla extract
- 1/4 teaspoon salt (optional, adjust to taste)
Instructions
- Line a large baking sheet with parchment paper and set aside.
- In a medium bowl, whisk the chickpea flour, confectioners’ sugar, and salt until well blended.
- Stir in the melted vegan butter, water, and vanilla extract until completely blended. The dough will appear somewhat greasy; this is normal for chickpea flour dough.
- Roll out the dough between two sheets of plastic wrap, parchment paper, or wax paper to an even 1/4-inch (6mm) thickness.
- Using 2-inch (5 cm) cookie cutters, cut out shapes from the rolled dough. For even baking, ensure all cookies in a batch are of similar size.
- Use a metal spatula to carefully transfer the cookie shapes to the prepared baking sheet, spacing them two inches apart. Re-roll any dough scraps and cut out more shapes until all dough is used.
- Place the baking sheet with the cut-out cookies into the freezer and chill for 15 minutes. This step is crucial for maintaining shape.
- While the dough chills, preheat your oven to 300°F (150°C).
- Remove the baking sheet from the freezer. Bake in the preheated oven for 20 to 25 minutes, or until the surface of the cookies looks dry and the edges are lightly golden brown.
- Let the cookies cool on the baking sheet for 5 minutes before carefully transferring them to a wire cooling rack to cool completely. Decorate as desired, or enjoy plain.
Notes
Storage: Store the cookies in an airtight container at cool room temperature for 3 days, in the refrigerator for 1 week, or in the freezer for up to six months for optimal freshness.
Variations: Feel free to experiment with different extracts (e.g., almond, lemon, orange), or add finely grated citrus zests (e.g., lemon, orange, lime). You can also incorporate your favorite baking spices like cinnamon, cardamom, or ginger for added flavor complexity.
Nutrition Information (Approximate per serving)
Serving: 1 cookie
Calories: 82 kcal
Carbohydrates: 9 g
Protein: 2 g
Fat: 4 g
Saturated Fat: 1 g
Polyunsaturated Fat: 3 g
Trans Fat: 1 g
Sodium: 49 mg
Fiber: 1 g
Sugar: 5 g
(Nutrition values are approximate and may vary based on specific ingredients and preparation.)