
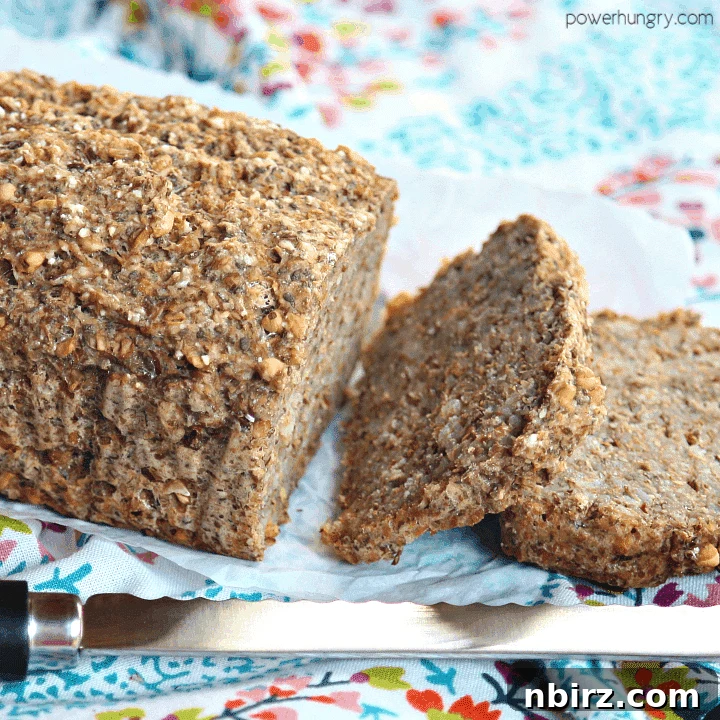
Welcome to the world of effortless and incredibly healthy baking! This 4-ingredient buckwheat flax chia bread is a true kitchen hero, crafted to be your perfect go-with-everything loaf. Not only is it vegan, gluten-free, and oil-free, but it’s also remarkably easy to prepare, making wholesome eating more accessible than ever before.
Hello, fellow food enthusiasts! I hope you’ve had a wonderful week filled with joy and perhaps a little bit of delicious food. Mine was certainly productive, spent perfecting this truly remarkable buckwheat bread recipe. After numerous trials, I am thrilled to share a creation that consistently delivers on taste, texture, and health benefits. This bread is more than just a recipe; it’s a testament to simple, wholesome ingredients transforming into something extraordinary.
The Unrivaled Benefits of This Wholesome Buckwheat Chia Flax Bread
This bread doesn’t just taste good; it embodies a spectrum of health-conscious advantages that make it an exceptional choice for any lifestyle. It truly earns its “amazing” reputation for a multitude of reasons:
- Only 4 Core Ingredients: Beyond just water and optional salt, this recipe relies on a minimalist approach, proving that incredible flavor and nutrition don’t require a lengthy ingredient list.
- Flourless and Naturally Gluten-Free: Made entirely without traditional flours, it’s an excellent option for those avoiding gluten, providing a natural and wholesome alternative.
- Oil-Free & Sugar-Free: With zero grams of sugar and no added oils per serving, this bread is a clean eating dream, perfect for managing blood sugar levels and promoting heart health.
- Completely Vegan: Free from eggs and dairy, it’s a compassionate choice that aligns with plant-based diets without compromising on texture or richness.
- Low Calorie: Each satisfying slice contains approximately 46 calories, allowing you to enjoy your bread guilt-free.
- Incredibly Delicious: Most importantly, despite its healthful profile, this bread is wonderfully flavorful, boasting a nutty, hearty taste that you’ll crave.
Bread Made with Whole Buckwheat Groats: A Nutritional Powerhouse
At the heart of this extraordinary bread lies buckwheat, a truly phenomenal ingredient and one of my absolute favorite grains. Despite its misleading name, buckwheat is not related to wheat at all. It is, in fact, a naturally gluten-free pseudocereal, derived from the seed of a plant that belongs to the same family as rhubarb. This distinction makes it an ideal choice for anyone with gluten sensitivities or those looking to diversify their grain intake.
Buckwheat is celebrated not only for its distinct, earthy flavor but also for its impressive nutritional profile. It’s an excellent source of plant-based protein, dietary fiber, and a wide array of antioxidants. These antioxidants, including rutin and quercetin, are also found in superfoods like green tea and dark chocolate, contributing to buckwheat’s profound health benefits. Incorporating buckwheat into your diet means choosing a grain that supports overall well-being, making it a perfect foundation for a truly feel-good bread!
The Journey to Simple, Wholesome Buckwheat Bread
The inspiration for this unique bread arose from encountering various recipes for simple, whole-grain buckwheat loaves across different platforms. While many of these traditional recipes typically involved extended soaking times for buckwheat (ranging from 2 to 8 hours in cold water) and the inclusion of psyllium husk for structure, I was determined to refine the process for optimal texture and ease.
My goal was to achieve a more “bread-like” consistency – firm yet tender, without the potential gumminess sometimes associated with psyllium. Through careful experimentation, I decided to move away from psyllium altogether. Instead, I honed in on a powerful combination of flaxseed meal and chia seeds. This duo proved to be superior not only for providing the necessary structure to prevent post-bake deflation but also for enhancing the bread’s overall texture and contributing a complementary nutty flavor that perfectly accentuates the buckwheat. This streamlined approach allows for a quicker preparation without sacrificing the rustic charm and hearty bite of homemade bread.
Essential Ingredients for Your Perfect 4-Ingredient Buckwheat Flax Chia Bread
The precise measurements for each ingredient are provided in the comprehensive recipe card at the end of this article. You can easily switch between US Customary (volume) and Metric (weights) units for your convenience.
Crafting this remarkable bread requires just a handful of wholesome ingredients:
- Whole Buckwheat Groats: The star of our recipe, providing robust flavor and a hearty base.
- Flaxseed Meal: Essential for binding and adding healthy fats and fiber.
- Chia Seeds: Another powerful binder, contributing texture and omega-3s.
- Baking Powder: The leavening agent that gives our flourless bread its lift.
In addition to these core ingredients, you will also need water and an optional pinch of salt to enhance the flavors.
The synergy between chia seeds and flaxseed meal is truly remarkable in this recipe. Together, they create a natural gel that acts as a powerful binder, ensuring the bread holds its shape beautifully without any post-bake collapse. Beyond their structural contributions, both flax and chia enrich the bread with additional fiber, essential omega-3 fatty acids, and a subtle nutty undertone that perfectly complements the earthy flavor of buckwheat. Furthermore, their inherent oil content eliminates the need for any added fats, keeping this recipe entirely oil-free while maintaining a moist and tender crumb.
How to Make the 4-Ingredient Buckwheat Flax Chia Bread: A Step-by-Step Guide
For precise measurements and detailed timings, please refer to the complete recipe card found further down the page.
Step One: Quick-Soak the Buckwheat for Efficiency
As an inherently impatient baker, I sought to streamline the traditional long soaking process. My experiments led to a successful quick-soak method using boiling water, drastically cutting down preparation time. This approach allows the buckwheat groats to begin breaking down and softening in just about 20 minutes, significantly faster than the hours required for cold water soaking. The beauty of this method is that it leaves plenty of whole, yet tender, groats within the mixture, contributing a delightful “nubby” and hearty texture to the finished bread. After soaking, remember to thoroughly drain the buckwheat and give it a quick rinse under cool running water in a colander to wash away any excess starch and ensure a clean flavor.
Step Two: Hydrate the Chia Seeds and Flaxseed Meal for Binding
While the buckwheat is soaking, turn your attention to our fantastic binders. In a separate bowl, combine the chia seeds and flaxseed meal with cold water. This crucial step allows these super seeds to absorb the liquid and form a thick, gelatinous mixture, often referred to as a “chia egg” or “flax egg.” This gel is what will provide the necessary structure and binding properties, effectively replacing traditional flour and eggs in our recipe. Let this mixture stand for at least 5 minutes; you’ll observe it thickening considerably, indicating it’s ready to integrate into your bread batter.
Step Three: Achieving the Perfect Batter Consistency
Once your buckwheat has been soaked, drained, and rinsed, transfer approximately two-thirds of it to a food processor or high-speed blender. The goal here is to process it using quick ON/OFF pulses until it reaches an almost, but not entirely, smooth consistency. We want to break down most of the groats to create a cohesive base, but still retain some texture. Scrape the processed buckwheat back into the bowl with the remaining one-third of whole buckwheat. Now, vigorously stir in the hydrated chia-flax mixture, baking powder, and optional salt until everything is thoroughly combined. This method of processing only a portion of the buckwheat ensures that the finished loaf has a desirable “bread-like” crumb – firm enough to slice without crumbling – while the unblended groats provide a delightful, hearty chewiness that truly elevates the texture of this unique bread.
Step Four: Prepare Your Pans for Optimal Baking
Before you begin mixing your batter, preheat your oven to 325°F (160°C). This ensures the oven is at the correct temperature when your bread is ready to bake, promoting an even rise and thorough cooking. For this recipe, it is highly recommended to use three small loaf pans, typically measuring around 5×3 inches (12.5×7.5 cm). These smaller pans are ideal for achieving a robust structure and preventing the center from drooping after cooling, a common issue with larger loaves of this type of bread. Line each small pan with parchment paper, leaving an overhang on the sides for easy removal, and lightly grease or spray the exposed sides with nonstick cooking spray. While a single large 9×5-inch pan can be used (it will require a longer baking time of about 85 to 90 minutes), be aware that it might result in a slightly less firm center once fully cooled. The key is to opt for smaller baking vessels to encourage better structure and a consistent bake.
Step Five: Distribute the Batter Evenly
Carefully spoon the prepared buckwheat batter into your greased and lined pans. Spread the batter evenly and smooth the tops with a spatula. To further ensure optimal structure and prevent any sinking, fill the pans quite close to the top. Don’t fret if you don’t have the exact 5×3-inch loaf pan size; smaller pans, or even a muffin tin, can work wonderfully (just remember to adjust baking times accordingly for smaller portions). The principle remains the same: smaller vessels help promote better structural integrity for this unique, flourless bread.
Step Six: Bake to Golden Perfection
Place your filled pans into the preheated oven and bake for approximately 45 to 50 minutes. You’ll know the bread is ready when the tops appear dry, firm, and lightly golden brown, and a toothpick inserted into the center of each loaf comes out clean. This indicates that the internal structure is set and the bread is thoroughly cooked. The outcome will be beautifully firm, hearty loaves with a wonderfully nutty and subtly toasted flavor. Once baked, transfer the pans to a wire cooling rack and allow the loaves to cool in their pans for about 10 minutes before using the parchment overhang to gently lift them out. Crucially, let the bread cool completely on the rack before attempting to slice it. Slicing warm bread can lead to a gummy texture, whereas fully cooled bread will yield crisp, clean slices. You can slice them thick for a substantial bite or very thin for delicate sandwiches. For larger slices, simply cut the loaves lengthwise!
This bread takes exceptionally well to toasting, which enhances its nutty flavor and adds a delightful crispness. However, it is equally wonderful untoasted, serving as a versatile base for sweet or savory toppings.
Serving Suggestions and Customization
The versatility of this buckwheat flax chia bread is one of its greatest assets. Its robust flavor and hearty texture make it an ideal companion for a wide range of meals and snacks. Enjoy it simply toasted with a smear of your favorite nut butter, a drizzle of honey, or a scattering of fresh berries for a wholesome breakfast. It also pairs beautifully with avocado and everything bagel seasoning for a savory treat, or as a sturdy base for open-faced sandwiches. Consider serving it alongside soups or salads, using it as a vehicle to soak up delicious broths and dressings. For a delightful crunch, try baking it into croutons for a gluten-free addition to your favorite salads. Don’t hesitate to get creative with your toppings – anything from hummus and vegetables to fruit spreads and cheeses will find a happy home on this nutritious bread.
I am absolutely enamored with this bread, and I genuinely hope that you will be too! Its simplicity, nutritional value, and delightful taste make it a staple in my kitchen, and I believe it will quickly become one in yours as well. Please do let me know if you give it a try—I love hearing about your baking adventures and how you enjoy this recipe.
Happy baking!
Explore More Great GF & Vegan Buckwheat Recipes:
- Oil-Free Buckwheat Granola
- 1-Ingredient Buckwheat Bread
- Vegan Buckwheat Banana Bread
- Buckwheat Almond Shortbread Cookies
- No-Bake Buckwheat Granola Bars
Buckwheat Flax Chia Bread {Vegan, Oil-Free, Gluten-Free}
By: Camilla
Healthy and wholesome 4-ingredient buckwheat flax chia bread is a perfect go-with-everything bread! It is vegan, gluten-free, oil-free, & easy to make, too.
Ingredients
- 1 and 3/4 cups (322 g) whole buckwheat groats
- Boiling water, to cover
- 1 cup (237 mL) water
- 3 tablespoons (39 g) chia seeds
- 3 tablespoons (20 g) flaxseed meal
- 1 tablespoon baking powder
- 3/4 teaspoon fine sea salt (optional)
Instructions
- Place buckwheat in a large bowl; pour boiling water over until fully covered. Let stand for 20 minutes (the buckwheat should begin to soften and break down). Drain thoroughly and rinse under cold water in a colander.
- In a small bowl, combine 1 cup of cold water with the chia seeds and flaxseed meal. Stir well and let stand for at least 5 minutes to thicken into a gel.
- Preheat oven to 325°F (160°C). Line 3 small loaf baking pans (approximately 5×3 inches) with parchment paper, leaving an overhang. Lightly grease or spray any exposed sides of the pans.
- Transfer approximately two-thirds of the soaked buckwheat mixture to a food processor or blender. Process using ON/OFF pulses until almost, but not completely, smooth. Scrape the processed buckwheat back into the bowl with the remaining one-third of whole buckwheat, along with the chia-flax mixture. Vigorously stir to combine, breaking up any remaining whole buckwheat chunks as you mix.
- Add the baking powder and salt to the bowl, stirring until thoroughly blended into the batter. Spoon and spread the batter evenly into the prepared pans, smoothing the tops.
- Bake in the preheated oven for 45 to 50 minutes, or until the top appears dry and firm, and a toothpick inserted into the center of each loaf comes out clean.
- Transfer the pans to a cooling rack and let them cool for 10 minutes. Using the parchment paper overhang, carefully remove the loaves from the pans. Allow them to cool completely on the rack before slicing. Slice each loaf into 8 slices. Enjoy plain, or toasted for an extra layer of flavor and crispness!
Notes
Storage: Store the cooled loaves, tightly wrapped in plastic wrap or in an airtight container, in the refrigerator for up to 2 weeks. For longer storage, wrap them in plastic wrap and then foil, and freeze for up to 6 months.
Nutrition
Serving: 1 slice | Calories: 46 kcal | Carbohydrates: 8.3g | Protein: 1.8g | Fat: 1.1g | Saturated Fat: 0.1g | Sodium: 87mg | Fiber: 1.7g
Like this recipe? Share your thoughts below!