
The Ultimate Flourless Brown Rice Yeast Bread: Gluten-Free, Oil-Free, & Psyllium-Free!
Are you searching for a genuinely simple, incredibly versatile, and unbelievably delicious gluten-free bread recipe that doesn’t require a long list of obscure ingredients or complex techniques? Look no further! This comprehensive guide introduces you to my revolutionary flourless brown rice yeast bread – a recipe that truly stands out. Made with just four fundamental ingredients (plus water and optional salt), this bread is not only gluten-free, psyllium-free, and oil-free, but also remarkably cheap, easy to prepare, and utterly wonderful. Imagine the convenience of soaking rice for a mere 30 minutes, blending a simple batter, and having a fresh, hearty loaf of sandwich bread ready in no time!
Redefining Gluten-Free Bread with Uncooked Brown Rice
The journey to perfecting this bread began with a fascinating tip from a dedicated reader. A few weeks ago, I received a comment asking if I was familiar with the trending gluten-free rice bread recipes circulating on popular platforms like YouTube and TikTok. Intrigued, I immediately delved into research.
What I discovered was a growing movement! I watched numerous videos showcasing how to transform uncooked white rice into surprisingly impressive, perfectly squared loaves of sandwich bread. These recipes typically involved minimal additions: a sweetener, oil, yeast, water, and optional salt. However, many aspects of these popular recipes often lacked precision. The suggested scale of the loaves, the exact proportions of ingredients, and even the precise dimensions of baking pans were frequently vague. This lack of clear guidance left much to interpretation and potential frustration for home bakers.
Furthermore, many of these trending recipes made highly assertive claims, often without adequate explanation, which frankly, sparked my curiosity and a desire to test these “rules” myself. Some of the most common assertions included:
- Only white rice is suitable, with a strong preference for specific varieties like Calrose rice, sushi rice, or other short-grain white rice.
- The rice absolutely must be soaked overnight for optimal results.
- A high-speed blender is an indispensable tool for achieving a smooth batter; regular blenders were deemed insufficient.
- The bread can only be baked successfully in a narrow, specific baking pan (though exact measurements were rarely provided).
- Granulated white sugar is the only acceptable sweetener to ensure the recipe “works.”
- Oil is a non-negotiable component, critical for the bread’s success and texture.
Frankly, I wasn’t content to simply take these claims at face value. I needed to conduct my own experiments, to truly understand what was possible and what wasn’t. More importantly, if I was going to share a recipe for this intriguing bread concept, I wanted it to be my very own, thoroughly tested, and optimized creation. This commitment led me to embark on an extensive series of baking trials, challenging each mandate, enduring several “fails,” and ultimately, unlocking my unique version of this truly wonderful bread. Now, after countless batches and careful refinements, I am thrilled to share my findings and the definitive recipe with you!
Brown Rice Triumphs: The Essential Tweak Revealed
Let’s cut straight to one of the most exciting revelations: the rice absolutely does not have to be white rice. Brown rice works beautifully! And not just a specific type either. My tests included short-grain, long-grain, and medium-grain brown rice, and all varieties consistently produced excellent bread. This is fantastic news for those who prefer the nutritional benefits and richer flavor profile of whole grains.
However, there’s one crucial caveat to successfully using brown rice: you must add one additional ingredient to the mixture. Without it, the results can be disappointing.
When brown rice bread is made with yeast alone, a common issue arises: the center of the loaf tends to remain dense and fails to rise adequately. While the sides might show some lift, the carbon dioxide bubbles produced by yeast fermentation simply aren’t robust enough to provide sufficient structural support for the heavier, more fibrous brown rice batter. This often results in a bread with a visibly sunken center, as seen in many early attempts.
Initially, I considered incorporating psyllium gel, derived from either whole husks or powder, as it’s a known binder and structure enhancer in gluten-free baking. However, a core objective for this recipe was to keep it entirely psyllium-free, catering to individuals with sensitivities or preferences against it. I also aimed to keep the ingredient list simple, affordable, and readily accessible. So, the question became: what other common, inexpensive ingredient could provide the necessary lift?
The answer, after extensive experimentation, is baking powder. This humble leavening agent proved to be the missing piece of the puzzle. My inspiration came from classic, old-fashioned bread and biscuit recipes (like the beloved angel biscuits from the American South) that skillfully combine yeast with baking powder and/or baking soda. This dual-action leavening approach provides both the slow, steady rise from yeast fermentation and the immediate, powerful lift from baking powder’s chemical reaction.
After several trials to fine-tune the proportions, the combination worked like a dream! The combined force of CO2 bubbles from the baking powder’s rapid reaction and the sustained fermentation bubbles from the yeast effectively lifts and supports the entire center of the loaf, resulting in a beautifully risen, uniformly textured brown rice bread. This simple addition completely transforms the outcome, ensuring a light and airy crumb even with the density of whole grain brown rice. Hooray for successful baking!
Myth-Busting: Traditional Bread-Making Rules Overturned
Remember those strict “rules” I mentioned earlier, the ones dictating how rice bread “must” be made? I meticulously put each and every one of them to the test, and the results are truly liberating for home bakers. My experiments successfully challenged conventional wisdom, leading to a much more flexible and approachable recipe:
- Drastically Reduced Soaking Time: Forget overnight soaking! With a clever trick (which I’ll share in the instructions), the rice soaking time can be cut down to a mere 30 minutes, saving you precious time without compromising texture.
- Full-Size Sandwich Loaf: This recipe yields a perfect 9×5-inch (22.5×12.5 cm) full-size sandwich loaf, ideal for everyday use. No need for specialized, obscure pan sizes.
- Completely Oil-Free (Optional Inclusion): One of the most significant triumphs is eliminating the need for oil altogether. If you prefer to add a touch for a slightly softer crumb, you certainly can, but it is not essential for success. Detailed notes on this are provided within the recipe card.
- Flexible Sweetener Options: The yeast isn’t picky! While I opted for coconut sugar, you can confidently use almost any sugar to “feed” the yeast – including maple syrup, molasses, or various granulated sugars (just avoid artificial sweeteners, as they won’t activate the yeast).
- Regular Blenders Welcome: Good news for those without high-end kitchen gadgets! A regular blender can absolutely be used to achieve a silky-smooth batter, provided you follow a few minor guidelines to prevent overheating and ensure optimal blending.
Are you excited to ditch the bread-making dogma and try this simplified, delicious approach? I certainly hope so, because this recipe offers such a fun, easy, and rewarding experience, resulting in a fantastic loaf that’s a joy to make and eat!
Unbeatable Recipe Benefits for Every Diet
This hearty, wholesome, and delicious bread isn’t just easy to make; it’s also packed with a myriad of benefits, making it an ideal choice for a wide range of dietary preferences and health needs:
- Psyllium Husk-Free: Perfect for those who are sensitive to psyllium or prefer to avoid it in their diet.
- Budget-Friendly: Made with common, inexpensive ingredients, this recipe offers a frugal alternative to costly store-bought gluten-free breads.
- Flourless: No need for specialty rice flours (white or brown), cornstarch, tapioca starch, arrowroot, or potato starch. You use whole, uncooked brown rice!
- Naturally Gluten-Free: A safe and delicious option for individuals with celiac disease or gluten sensitivity.
- Completely Vegan: Free from eggs and dairy, making it suitable for a plant-based lifestyle.
- Oil-Free (No Added Fats): This recipe proudly contains no vegetable oil, butter, olive oil, safflower oil, or any other added fats, contributing to a lighter profile.
- Gum-Free: You won’t find xanthan gum or guar gum here, often used in gluten-free baking but avoided by some.
- Excellent Source of Fiber: Thanks to the whole brown rice, this bread offers a good amount of dietary fiber, beneficial for digestion.
- Minimal Ingredients: With only four core ingredients, it simplifies your grocery list and pantry needs.
- Effortless Preparation: Designed for ease, from soaking to baking, it fits into even busy schedules.
For those mindful of their intake, detailed nutritional information is conveniently included at the bottom of the recipe card.
Essential Ingredients for Your Brown Rice Bread
The precise measurements for each ingredient are listed in the detailed recipe card at the conclusion of this post. You can easily switch between US Customary (volume) and Metric (weights) units to suit your preferred measurement system.
The best part? Crafting this exceptional gluten-free loaf requires surprisingly few ingredients – just four primary ones, in fact:
- Uncooked (Raw) Brown Rice: I’ve successfully tested this recipe with both medium-grain and long-grain brown rice, proving its versatility. Feel free to use your preferred variety.
- Coconut Sugar: This adds a subtle sweetness and, more importantly, provides the necessary “food” for the yeast. Don’t worry if you don’t have coconut sugar; other excellent options like brown sugar or maple syrup are perfectly suitable. Check the recipe card for more alternatives.
- Instant Yeast: This is a critical component. Look for labels like “rapid rising yeast” or “quick yeast.” A vital note: always ensure your instant yeast is gluten-free. Specifically, avoid Red Star brand platinum yeast, as it contains wheat-derived enzymes and is NOT gluten-free.
- Baking Powder: Yes, you read that right – both yeast AND baking powder! As previously explained, this dynamic duo is key to achieving that perfect, even rise in brown rice bread.
Beyond these four, you’ll also need water for both soaking and blending the rice into a smooth batter. Regular tap water or filtered water works perfectly. Salt is an optional addition, adjustable to your taste and dietary needs. I personally enjoy adding one teaspoon to the batter to enhance the overall flavor.
It is absolutely crucial to use instant yeast, not regular active dry yeast, for this particular recipe. The rapid action of instant yeast is fundamental to its success.
Also, be meticulous in selecting baking powder, rather than baking soda (sodium bicarbonate). Baking powder is a balanced combination of baking soda and an acidic ingredient (like cream of tartar), whereas baking soda is a pure alkaline and is used in much smaller, precise quantities in recipes.
Simple Step-by-Step Directions for Perfect Brown Rice Bread
For your convenience, the complete, detailed instructions are also provided in the recipe card below.
Step One: Fast-Soak the Brown Rice for Efficiency
Begin by placing the measured uncooked brown rice into a large mixing bowl. Pour boiling water over the rice, ensuring it’s covered by approximately 1 inch (2.5 cm). This hot water trick dramatically reduces the required soaking time compared to traditional methods.
Allow the rice to soak for a minimum of thirty minutes. If life happens and you get sidetracked, don’t worry – the rice can comfortably soak for longer without negative effects (for instance, if another task demands your attention or you simply get distracted!).
Traditional Soaking Alternative: Should you prefer, you can opt for a more traditional soaking approach. Place the brown rice in a bowl as described, but cover it with room temperature water. In this scenario, allow the rice to soak for a longer duration, anywhere from six to twenty-four hours.
Step Two: Prepare Your Baking Pan with Care
Ready a standard 9×5-inch (22.5×12.5 cm) loaf pan. If you’re using a nonstick pan, such as a silicone loaf pan, no extra preparation is typically needed. For other types of pans, it’s best to line it with nonstick parchment paper to prevent sticking and ensure easy removal. If you don’t mind using a little fat, you can also lightly spray the pan with nonstick cooking spray, or simply grease it with a bit of oil or butter.
Step Three: Thoroughly Rinse and Drain the Soaked Rice
Once the soaking time is complete, carefully drain the rice using a colander or a fine-mesh sieve. Rinse the soaked rice thoroughly under cold running water. After rinsing, gently shake the colander or sieve to remove any excess water. This step is important for achieving the right batter consistency.
Step Four: Blend the Batter (Reserve Yeast & Baking Powder for Now)
Transfer the soaked, rinsed, and drained rice into the container of a high-speed blender. Add the specified amount of room temperature water, coconut sugar, and the optional salt. Blend on high speed for approximately 90 to 120 seconds, or until the batter achieves a perfectly silky-smooth consistency. Crucially, the batter should be noticeably warm after blending. This warmth is absolutely essential for effectively activating the instant yeast in the next step, ensuring a proper rise.
Tip for Regular Blender Users: If you’re using a standard blender, start with warm water instead of room temperature water. Blend in shorter intervals, around 30 seconds each, pausing briefly between blends to prevent the motor from overheating. Continue this process until your batter is completely smooth and silky, and feels very warm to the touch. It might take a bit longer but the results will be just as good!
Step Five: Incorporate the Yeast and Baking Powder
Once your batter is perfectly smooth and warm, add the instant yeast and baking powder directly into the blender container. Blend for a brief 15 to 20 seconds, just long enough to fully incorporate these leavening agents into the batter. Avoid over-blending at this stage.
Step Six: Pour Batter, Preheat Oven Immediately
Pour the freshly blended bread batter into your prepared loaf pan. Find a warm, draft-free spot for the pan to rest. Here’s a crucial timing tip: immediately preheat your oven to 350°F (180°C). Do not delay! This bread rises remarkably quickly, and your oven needs to be at the correct temperature and ready to go the moment the bread reaches its optimal rise point. Being prepared ensures a perfect loaf.
Step Seven: Monitor the Rapid Rise Closely!
Allow the bread batter to rise for approximately 20 to 25 minutes. This is where patience meets vigilance! The rise happens quite fast, so it’s imperative to stay nearby and observe it closely. Seriously, don’t wander off!
The bread is ready for the oven as soon as the batter is a short, distinct distance from the very top edge of the pan. Aim for the batter to be no closer than 1/4 inch (about 0.6 cm) from the top. If the batter rises all the way to the rim or above, it will likely overflow once it encounters the intense heat of the oven, leading to a messy situation and a compromised loaf. To ensure you catch the perfect moment, I highly recommend performing a brief task or chore directly in front of your rising bread – keep it within sight!
Keep in mind that the exact rising time can vary slightly depending on the ambient warmth and humidity levels in your kitchen.
Step Eight: Bake to Golden Perfection
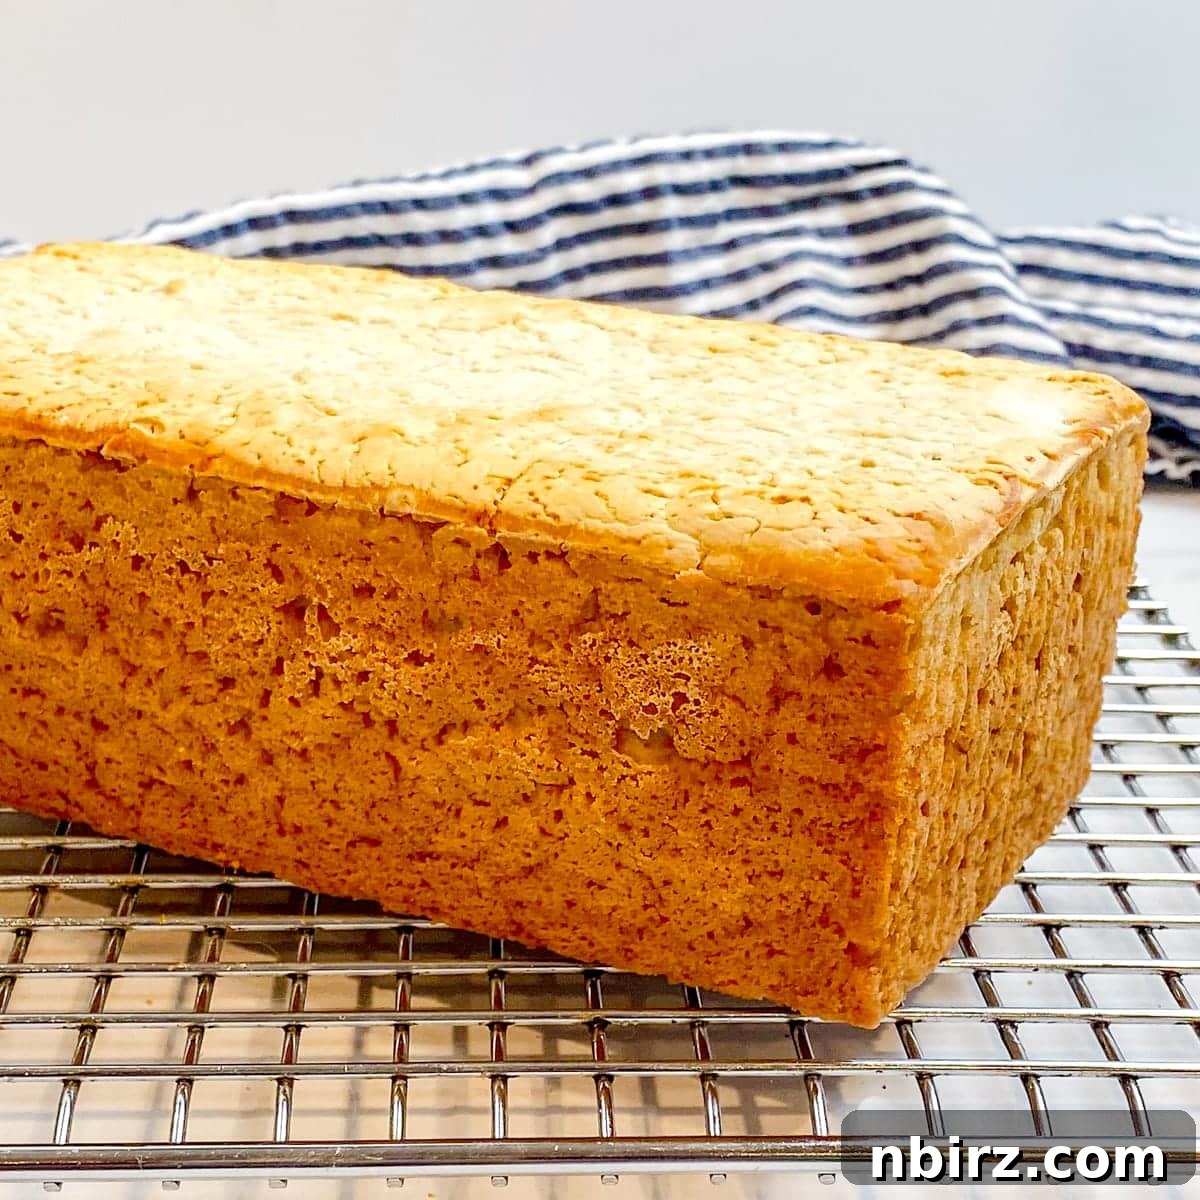
Carefully transfer the risen bread into your preheated oven. Bake for a duration of 45 to 50 minutes. The bread will be perfectly done when it develops a crusty appearance and the edges turn a beautiful deep golden brown. Don’t be concerned if the very top of the loaf appears flat (without a rounded peak in the center) and slightly paler towards the middle, even when fully baked. This is characteristic of this unique flourless bread and does not indicate underbaking.
Step Nine: Cool for Optimal Texture and Structure
Once baked, remove the loaf from the oven. Allow it to cool within its pan, resting on a wire cooling rack, for a period of 15 minutes. This initial cooling period in the pan helps the bread to set and firm up its structure.
After 15 minutes, carefully remove the bread from the pan. Transfer the loaf to a wire rack or other cooling rack to cool completely. Allowing the bread to cool thoroughly is crucial; slicing it while still warm can result in a gummy texture. Patience here will be rewarded with the best possible crumb!
Step Ten: Slice and Savor Your Homemade Bread
Once completely cooled, your homemade brown rice yeast bread is ready to be sliced! This is a robust and sturdy bread, which means it produces minimal crumbs, making slicing a breeze. You have the flexibility to slice it as thick or as (relatively) thin as you prefer, depending on your intended use.
Texture and Taste: A Rustic Delight
Prepare to be delighted by the unique characteristics of this flourless brown rice yeast bread. It boasts a wonderfully firm, crusty exterior that gives way to a satisfyingly rustic texture within. While it might feel somewhat dense as you slice it, don’t let that mislead you; its interior is pleasingly substantial with a distinct, warm, and comforting yeast bread flavor. This isn’t a light, fluffy white bread, but rather a wholesome, hearty loaf that truly satisfies.
This versatile bread is perfect for a myriad of culinary applications. It makes fantastic sandwiches, whether you prefer open-faced creations piled high with toppings or classic two-slice varieties with your favorite sweet or savory fillings. It’s an absolute dream for avocado toast, providing a sturdy base for creamy avocado and your choice of seasonings. Beyond avocado, elevate your toast with a generous spread of homemade nut butter or seed butter, creamy hummus, a dollop of luscious vegan cream cheese, or vibrant fruit preserves.
But its utility doesn’t stop at breakfast or lunch. This bread is also a magnificent accompaniment to your dinners and other meals. Imagine it alongside a steaming bowl of homemade soup, dipped into a rich stew, or as a hearty counterpoint to a fresh, crisp salad. Its robust nature holds up beautifully to moist dishes, making it an excellent choice for soaking up delicious sauces and flavors.
Explore Flavor Variations
While this brown rice yeast bread is delightful on its own, it also serves as a fantastic canvas for creative flavor explorations. Don’t hesitate to experiment with additions to customize your loaf:
- Herbs: Incorporate dried herbs such as rosemary, thyme, oregano, or a blend of Italian herbs into the batter. If using fresh chopped herbs (like fresh basil, parsley, or chives), add them after blending the batter to preserve their vibrant color and prevent the bread from taking on an unappealing green hue.
- Savory Spices: For a more aromatic and savory loaf, try adding dried ground spices like cumin, curry powder, garlic powder, or onion powder. These work wonderfully with savory toppings and meals.
- Sweet Spices: If you lean towards a sweeter bread, consider warm spices such as cinnamon, cardamom, or ground ginger. These pair beautifully with fruit spreads, sweet nut butters, or as a base for French toast.
Frequently Asked Questions (FAQ)
Here are answers to some of the most common questions about baking and enjoying this unique brown rice bread:
- How should I store the flourless brown rice yeast bread? To maintain its freshness, store the completely cooled bread in an airtight container. It will remain delicious at cool room temperature for up to one day, in the refrigerator for up to one week, or you can freeze it for up to six months for longer storage. Freezing sliced bread allows for easy individual portions.
- Can I use brown rice flour instead of soaking whole grain rice? This recipe is specifically developed for whole, uncooked brown rice. I do not currently have tested directions for substituting brown rice flour. Adapting the recipe for flour would likely require significant adjustments to liquid proportions and potentially other ingredients, so experimentation would be necessary.
- Can I use white rice instead of brown rice? Yes, you absolutely can! You are welcome to substitute any variety of white rice (such as long-grain, short-grain, or Calrose) for the brown rice. Simply use the same weight of white rice as specified for brown rice in the recipe. Note that white rice versions may not require the baking powder as brown rice does for the center lift, but it won’t hurt to include it for extra assurance.
- Will this bread work with other uncooked grains? I have only thoroughly tested this specific recipe with brown rice and white rice. I cannot confirm if other uncooked grains, such as quinoa, millet, or oats, would yield successful results without extensive recipe modifications and testing.
- My oven has a convection setting. Should I use it for this bread? I developed and tested this bread recipe exclusively in a conventional oven (using radiant heat). For the most consistent and best results, I recommend using a conventional setting if available. However, if you are accustomed to baking bread in a convection oven, feel free to experiment, keeping in mind that convection baking often requires slight adjustments to temperature or baking time.
- Can I blend the batter in a food processor? No, a food processor is not suitable for this recipe. Achieving the essential silky-smooth batter, which is critical for the bread’s texture and rise, requires the powerful blending action of a blender. A food processor simply cannot break down the rice sufficiently to achieve this fine consistency.
- Can I use cooked or leftover rice to make the bread? Unfortunately, no. This recipe is specifically designed for uncooked, raw rice that is soaked and then blended. Cooked rice will not yield the same batter consistency or structure, and the recipe will not work as intended.
- Can I bake the bread in a toaster oven? Baking this loaf in a toaster oven is not recommended. Even if your loaf pan fits, the close proximity of the bread batter to the heating elements in a small toaster oven will cause the crust to burn and harden long before the interior of the bread is properly baked, resulting in an unevenly cooked and unsatisfactory loaf.
- Can I add oil or other fat to the flourless brown rice yeast bread? While this recipe is designed to be oil-free, you can certainly add fat if you prefer a slightly softer crumb. Simply replace 1 to 4 tablespoons of the room temperature water with your choice of oil or melted fat (e.g., olive oil, vegetable oil, or melted vegan butter). This will subtly alter the texture, making it a bit more tender.
Troubleshooting: Tips for a Perfect Rise
If your flourless brown rice yeast bread doesn’t rise as much as you expected, don’t fret! Here are the most common culprits and how to avoid them:
- **Incorrect Yeast Type:** This is the #1 reason for poor rise. This recipe *demands* instant yeast (also known as rapid-rising or quick yeast). Regular active dry yeast will not work properly due to its different activation requirements and fermentation speed.
- **Insufficient Batter Warmth:** After blending, the batter must be very warm. This warmth is crucial for activating the instant yeast. If the batter is cool, the yeast will be sluggish or won’t activate at all.
- **Sugar Reduction or Omission:** Sugar isn’t just for sweetness; it’s essential “food” for the yeast, fueling the production of carbon dioxide bubbles that make the bread rise. Reducing or eliminating the sugar, or substituting it with artificial sweeteners (which yeast cannot metabolize), will severely impede the rise.
- **Inaccurate Oven Temperature:** An oven that runs too hot can cause the bread to “spring” too quickly and then collapse, leading to a large air bubble under the crust or a dense interior. Regularly check your oven’s accuracy with an inexpensive oven thermometer to ensure it’s heating correctly.
- Can I make the bread without yeast? No, this is fundamentally a yeast bread recipe, relying on yeast for its characteristic texture and flavor. If you’re looking for yeast-free bread options, my site offers a vast array of recipes using various flours like rice flour, sorghum flour, chickpea flour, and teff flour. Simply type “bread” into the search box to explore other delightful, yeast-free alternatives.
- Can I make this flourless brown rice yeast bread in a bread machine? I have not tested this particular recipe in a bread machine. Therefore, I cannot provide specific adaptations or guarantee successful results if attempted in a bread machine. Its unique batter consistency and quick rise might not be compatible with standard bread machine cycles.
- Can I leave out the sugar? As mentioned, no. Sugar is indispensable for activating and feeding the yeast. Without it, the yeast cannot perform its function, and the bread will have minimal to no rise.
- Can I Use another Type of Sweetener in Place of Coconut Sugar? Absolutely! You can substitute an equal amount of maple syrup, agave nectar, molasses, or any granulated sugar of your choice (brown sugar, cane sugar, etc.). However, it’s crucial to reiterate: sugar substitutes will not work because yeast requires real sugar to ferment and produce gas.
Happy baking, and enjoy your delicious, homemade flourless brown rice yeast bread!
Discover More Delicious Recipes
If you loved this recipe, explore these other wholesome and creative options:
- Blueberry Quinoa Oat Muffins {vegan, oil-free, GF}
- Brown Rice Chickpea Flour Breads {4 ingredients, vegan, gluten-free}
- Easy 2-Ingredient Brown Rice Chips (oil-free, V, GF)
- Easy Almond Flour Biscuits with Herbs {vegan, grain-free}
- Vegan Gluten-Free Oat Sandwich Bread {oil-free, yeast-free}
Flourless Brown Rice Yeast Bread (GF, Oil-Free, No Psyllium)
By: Camilla
Grab 4 ingredients to make my cheap, easy, fast, flourless brown rice yeast bread! It is psyllium-free, gluten-free, oil-free & vegan.
Prep Time: 5 minutes
Cook Time: 50 minutes
Additional Time: 1 hour (soaking/rising)
Total Time: 1 hour 55 minutes
Servings: 14 (1 loaf)
Print Recipe
Ingredients
- 1 lb (453 g) uncooked (raw) brown rice (any variety)
- 2 tablespoons coconut sugar (or other options, see notes)
- 2.25 teaspoons instant yeast (MUST be instant/fast rising yeast)
- 2 teaspoons baking powder (certified GF, as needed)
- 1 teaspoon salt (optional/adjustable)
- 1.25 cups WARM water (not cold, for blending)
Instructions
- Place the uncooked brown rice in a large mixing bowl. Add boiling water to the bowl (enough to cover the rice by about 1 inch / 2.5 cm).
- Allow the rice to soak for thirty minutes. (See notes for soaking overnight, instead of a fast soak).
- Prepare a 9×5-inch (22.5×12.5 cm) loaf pan. If using a nonstick loaf pan (e.g., silicone), no preparation is needed. Otherwise, line the pan with nonstick parchment paper. If you do not object to oil, spray the pan with nonstick cooking spray, or lightly oil/grease the pan.
- Drain the soaked rice through a colander or mesh sieve and rinse under cold water. Gently shake off the excess water.
- Scrape the soaked, drained rice into a high-speed blender container (see notes for using a regular blender). Add the 1 and 1/4 cups warm water, coconut sugar, and optional salt. Blend on high speed for 90 to 120 seconds until the batter is silky smooth and very warm (it is very important that the batter be very warm to activate the instant yeast).
- Add the instant yeast and baking powder to the blender container. Blend for 15 to 20 seconds until combined.
- Pour the bread batter into the prepared pan. Place the pan in a draft-free warm place. Immediately preheat the oven to 350F (180C). Do not hesitate (the bread rises very quickly. The oven needs to be hot and ready to go as soon as the bread hits the needed rising mark (see next step).
- Let the bread batter rise for 20 to 25 minutes. It happens quickly, so stay close by. The bread is ready to bake as soon as the batter is a short distance away from the the top edge of the pan (the batter should be no closer than 1/4 inch away from the top). (Note: If the batter is all the way to the top, it will overflow the top of the pan once it hits the heat of the oven).
- Bake the bread in the preheated oven for 45 to 50 minutes until crusty in appearance and deep golden brown at the edges. The loaf will be flat on top (no peaks in the center) and somewhat pale towards the middle (even when it is completely baked).
- Let the loaf cool, in the pan, on a cooling rack for 15 minutes.
- Remove the bread from the pan and cool the loaf completely on a wire rack, or other cooling rack.
- Slice the bread, thick or (relatively) thin, as desired. The bread is wonderful plain, toasted, as part of a sandwich, or any way that you prefer!
Notes
- Bread Storage: Store the cooled bread in an airtight container at cool room temperature for one day, the refrigerator for one week, or the freezer for up to six months.
- Yeast Note: Instant yeast is gluten-free, with the exception of Red Star PLatinum Yeast. It includes enzymes derived from wheat.
- Brown Rice Alternatives: Substitute any variety of white rice for the brown rice. Use the same weight of rice. I have only tested this recipe with brown rice. I do not know if any other grains will work. The recipe does not work, as written, with brown rice flour. The recipe will not work with cooked brown rice, either.
- Rising Time: The timing for the rise will depend, in part, on the warmth and humidity in your kitchen.
- Alternative—Soak Rice Overnight: You are welcome to soak the rice in a more traditional manner. Place the brown rice in the bowl, as described above, but cover with room temperature water. Allow the rice to soak for anywhere from six to twenty four hours.
- Bake in a Conventional (radiant heat) Oven: I tested this bread in a conventional oven (radiant heat, not convection). For best results, I recommend using radiant heat, if possible. If you are used to baking bread in a convection oven, you are welcome to experiment with baking the bread in a convection oven. Do not bake the bread in a toaster oven or air fryer (the outside will burn before the bread is baked).
- Regular Blender Instead of High Speed Blender: Use warm water, instead of room temperature water, to blend the batter. Stop every 30 seconds to let the blender cool down to avoid overheating the blender. Blend until completely smooth and the batter is very warm. A food processor will not work.
- Notes About the Yeast: This particular bread recipe cannot be made without yeast. Also, the bread must be made with instant yeast (also called rapid rise, fast, or quick yeast). It will not work, as written with regular active yeast.
- Bread Machines: I have not tested this in a bread machine so I cannot recommend how to make bread machine adaptations to the recipe, or whether it will work.
- Coconut Sugar Options: Use an equal amount of maple syrup, agave nectar, molasses, or granulated sugar of your choice to replace the coconut sugar. Do not omit the sugar or use sugar substitutes. Sugar is needed in the recipe to activate (feed) the yeast and make the bread rise.
- My bread did not rise as expected. Why? The most likely reasons are the following:
- Regular yeast was used instead of instant yeast. This recipe will not work with regular yeast. You must use instant yeast.
- Batter was not very warm after blending. The batter needs to be very warm after blending to help activate the yeast.
- Sugar was reduced or eliminated. The sugar was left out, reduced, or replaced with artificial sugar. The sugar is essential for “feeding” the yeast (to produce gas bubbles).
- Oven temperature is off. I regularly check my oven temperature setting using an inexpensive oven thermometer. Check to make sure the oven is accurate before baking. If the oven is too hot, it can force a faster rise to the bread, leading to a bubble under the top of the loaf.
Nutrition
Serving: 1 slice | Calories: 98kcal | Carbohydrates: 21g | Protein: 2g | Fat: 1g | Polyunsaturated Fat: 1g | Sodium: 72mg | Fiber: 1g | Sugar: 2g
Like this recipe? Rate and comment below!