
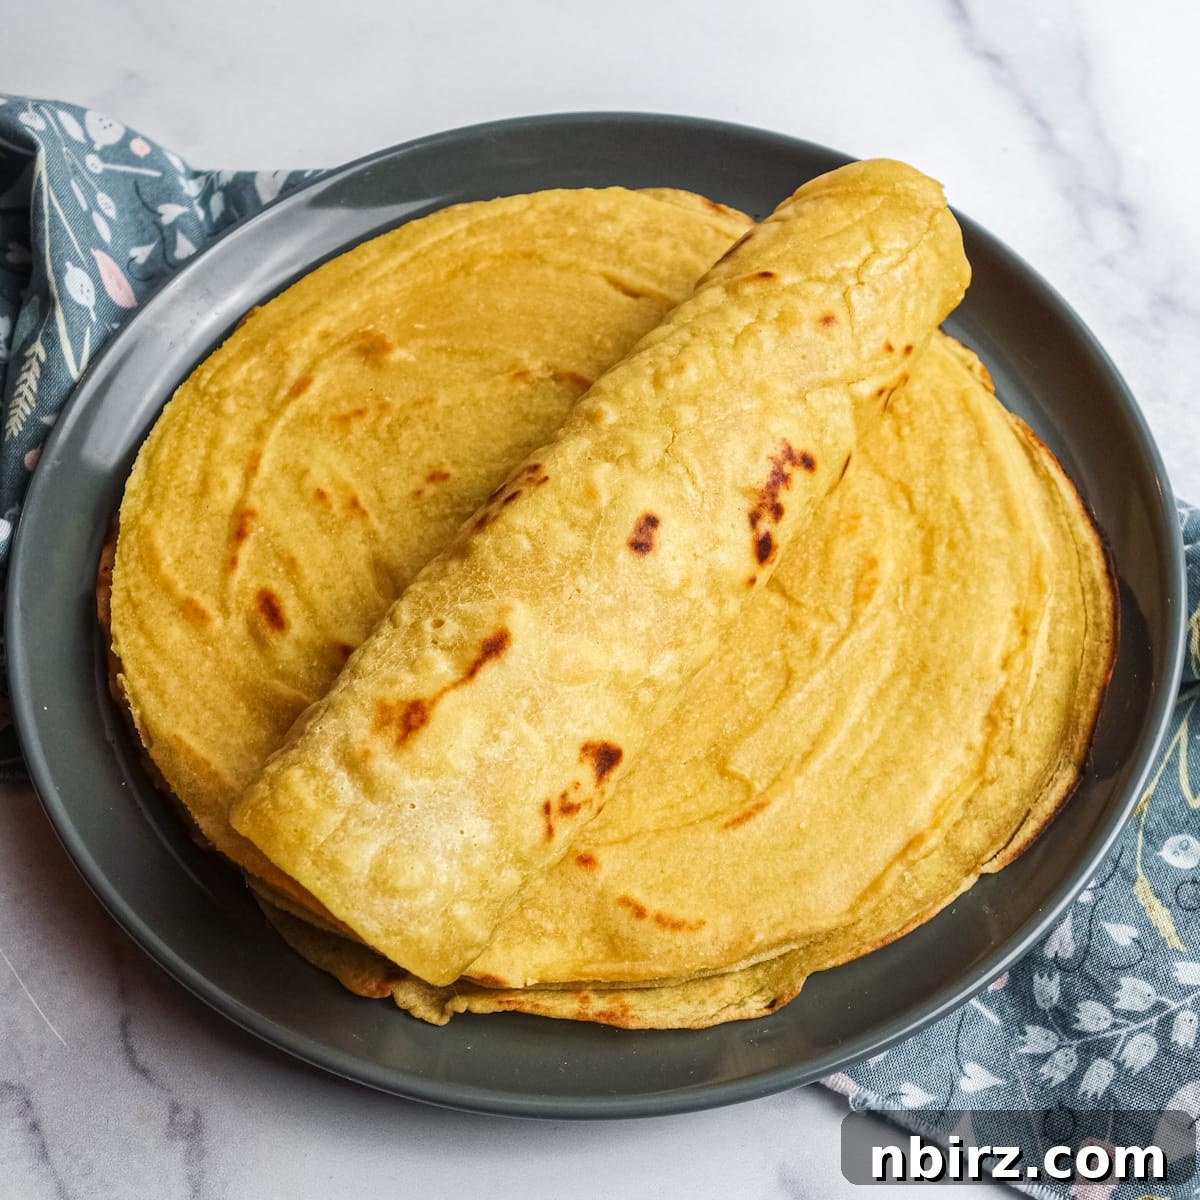
Imagine creating a batch of delicious, sturdy, and flexible tortillas that taste and look remarkably like traditional flour tortillas, all in under 10 minutes. And what if they only required two ingredients? It sounds almost too good to be true, but it’s not! Welcome to the world of my super easy, 2-Ingredient Grain-Free Vegan Tortillas. This revolutionary recipe is designed to simplify your meal prep while catering to a wide array of dietary needs, being completely oil-free, nut-free, seed-free, and gluten-free. Get ready to transform your approach to healthy, versatile eating.
For too long, dietary restrictions have meant compromising on taste and convenience, especially when it comes to versatile staples like tortillas. Many grain-free or vegan options on the market can be expensive, difficult to find, or lack the authentic texture and flavor we crave. That’s where this recipe steps in, offering a homemade solution that is both incredibly simple and utterly satisfying. Forget complicated rolling or messy pressing; our method involves little more than whisking a simple batter and cooking it to perfection in a pan. Let’s dive into how you can make these culinary marvels a staple in your kitchen!
Unbeatable Recipe Features & Benefits
These aren’t just any tortillas; they’re a powerhouse of dietary friendliness and flavor. Beyond their incredible ease of preparation, these 2-ingredient grain-free vegan tortillas are:
- Truly Vegan: Made without any animal products, including eggs or dairy, making them perfect for plant-based diets.
- Completely Grain-Free: Ideal for those avoiding grains, whether due to sensitivity or dietary preference.
- Naturally Gluten-Free: A safe and delicious option for individuals with celiac disease or gluten intolerance.
- Oil-Free: A healthier alternative, reducing fat content without sacrificing texture or flavor.
- Nut-Free: Perfect for school lunches or households managing nut allergies, ensuring everyone can enjoy them.
- Seed-Free: Another allergy-friendly aspect, making them suitable for those with seed sensitivities.
- Excellent Source of Protein: Each tortilla provides approximately 5 grams of protein, contributing to a more satisfying and nutritious meal.
- Sugar-Free: No added sugars, aligning with clean eating principles and offering a guilt-free base for your favorite fillings.
- Hearty & Healthy: Packed with wholesome ingredients that fuel your body without heavy additives.
- Versatile & Delicious: Their neutral flavor profile makes them an ideal canvas for both sweet and savory dishes.
- Sturdy & Flexible: Designed to hold up to generous fillings, rolling, and folding without tearing or crumbling.
These features combine to create a tortilla that not only meets stringent dietary requirements but also excels in taste and usability, proving that healthy eating can be both convenient and delicious.
The Magic Duo: Ingredients for Your Perfect Tortillas
For precise measurements, please refer to the recipe card at the conclusion of this article. You can easily switch between US Customary (volume) and Metric (weights) for your preferred measurement system.
The secret to these sensational tortillas lies in their simplicity, requiring only two core ingredients: chickpea flour and tapioca flour, along with plain tap water. While a touch of salt can enhance the flavor (and I highly recommend it), it’s entirely optional, allowing you to tailor the recipe to your exact preferences or dietary needs.
Delving into the Key Ingredients:
- Chickpea Flour (Besan/Gram Flour): This nutrient-dense flour, made from ground dried chickpeas, is a staple in many cuisines worldwide. It’s naturally gluten-free, boasts a significant amount of protein and fiber, and contributes to the earthy, slightly nutty flavor and robust structure of these tortillas. Its binding properties are crucial for the integrity of the batter.
- Tapioca Flour (Tapioca Starch): Derived from the cassava root, tapioca flour is a fine, white powder renowned for its thickening and binding capabilities. In these tortillas, it provides the essential elasticity and flexibility that allows them to bend and fold without breaking, mimicking the texture of traditional wheat flour tortillas. It’s also completely grain-free and gluten-free, making it a perfect partner to chickpea flour.
- Water: The humble binder that brings it all together. The right amount of water is critical for achieving the ideal batter consistency, which in turn dictates the tortilla’s texture.
- Salt (Optional): While not strictly necessary for the structure of the tortilla, a small pinch of salt can significantly elevate the overall flavor, making these tortillas even more appealing.
The Advantage of a Neutral Flavor Profile
One of the standout qualities of these 2-ingredient tortillas is their wonderfully neutral flavor. While I personally adore the distinct, nutty undertones of chickpea flour, I understand it’s not everyone’s preference. This recipe skillfully balances the flours to create a tortilla that truly goes with everything, ensuring universal appeal!
The carefully calibrated 2:1 ratio of chickpea flour to tapioca flour is key. This specific proportion results in tortillas that boast both the versatile taste and the desirable texture – firm yet incredibly flexible – reminiscent of classic white flour tortillas. This means you can confidently use them in any recipe where you’d typically reach for a wheat tortilla, from savory tacos to sweet dessert wraps. It’s truly an “amazeballs” culinary achievement that opens up a world of possibilities!
(For those who, like me, appreciate the robust flavor of chickpea flour, you might also enjoy my Chickpea Flour Tortillas. They are just as straightforward to prepare and equally delightful!)
Exploring Flour Substitutions: What Works and What Doesn’t?
While this recipe is optimized for chickpea and tapioca flours, understanding potential substitutions can be helpful. However, it’s important to approach substitutions with caution, as alternative flours can significantly alter the texture and consistency of the final product.
Chickpea Flour Alternatives:
When I refer to “chickpea flour,” you can confidently use flours labeled as garbanzo bean flour, gram flour, or besan. These are all essentially the same finely ground flour made from dried chickpeas and can be used in equal proportion. For the most accurate and consistent results, especially with alternative flours, I strongly recommend measuring by weight rather than by volume (cups). Flour density can vary greatly depending on how it’s scooped or packed, leading to inconsistencies.
Tapioca Flour Alternatives:
I have not personally tested this specific recipe with other starches. However, there’s a possibility that other gluten-free starches might work in place of tapioca flour, given its role in providing elasticity. Potential options include:
- Arrowroot Starch: Often a good 1:1 substitute for tapioca flour in terms of binding and thickening.
- Cornstarch: A readily available option, though note that if you are strictly grain-free, cornstarch is derived from corn and would not be suitable.
- Potato Starch: Be sure to use pure white potato starch, not light tan potato flour. Labeling can sometimes be confusing, especially outside of the United States. Potato flour is much denser and behaves differently.
If you choose to experiment with one of these alternatives, it is crucial to use an equivalent weight (e.g., 60 grams) rather than an equivalent cup measure, as different starches have varying densities and weights per cup. Adjusting the water content slightly might also be necessary to achieve the correct batter consistency.
Step-by-Step Directions for Perfect Tortillas
A comprehensive list of directions is also provided in the recipe card located below.
Step 1: Preparing Your Batter to Perfection
Begin by combining the chickpea flour, tapioca flour, and the optional salt in a medium-sized mixing bowl. It’s crucial to ensure your chickpea flour is free of lumps for a smooth batter. Use a whisk, a fork, or even your fingertips to break up any stubborn clumps, creating a uniform dry mixture.
Next, gradually add the water to the dry ingredients, stirring continuously until the mixture is completely blended and smooth. Once combined, let the batter rest for approximately five minutes before proceeding. This resting period allows the flours to fully hydrate, which is essential for developing the ideal texture and flexibility in your finished tortillas. During this brief wait, the batter will thicken slightly, ensuring better cooking results.
The desired consistency for your batter should be akin to a thin pancake batter – not too runny like a crepe batter, nor overly thick and gloopy. This balanced thickness is key to producing tortillas that resemble traditional flour tortillas in both appearance and pliability. If your batter appears too thin, a tiny sprinkle of extra chickpea flour can help. Conversely, if it’s too thick and difficult to spread, add a mere smidge more water, stirring well after each addition, until you reach that perfect pourable consistency. Achieving this balance is crucial for uniform cooking and flexible tortillas.
Step 2: Expertly Cooking Your Tortillas
That’s right, the batter is so straightforward that it’s already time to cook! This speed is one of the recipe’s greatest strengths.
Heat a medium-sized nonstick skillet over medium heat until it’s just hot. The surface should be warm enough to cause a drop of water to sizzle immediately. A critical note here: using a truly nonstick skillet is paramount. Without it, your tortillas are likely to stick, making them difficult to flip and potentially ruining their delicate structure.
Pour approximately one-quarter of your prepared batter into the heated skillet (this typically translates to about 1/3 cup, or roughly 78-80 grams). Working swiftly, tilt and rotate the skillet to gently spread the batter evenly across the entire bottom surface of the pan. The goal is a thin, uniform circle.
Once the batter is spread, increase the heat slightly to medium-high. Cook the tortilla for 1 to 2 minutes on the first side. During this time, you might observe small bubbles forming on the surface, and it may even puff up slightly in a few spots – these are good signs! The edges should begin to turn a light golden brown, and the surface of the tortilla should appear set and mostly dry to the touch.
Once these indicators are met, carefully slide a thin, wide spatula underneath the tortilla and flip it over. Cook the second side for approximately 1 minute longer, or until it is just set and lightly golden. Avoid overcooking, as this can lead to dry, brittle tortillas. The aim is to cook them just enough so they are no longer raw but retain their softness and pliability.
Once cooked, gently transfer the tortilla to a wire cooling rack. Allow it to cool briefly before handling. Repeat this process with the remaining batter, cooking each tortilla individually until your entire batch is complete. For best results and to maintain their flexibility, stack the cooled tortillas and keep them covered.
Versatile Culinary Applications: How to Enjoy Your Grain-Free Tortillas
You’ll quickly fall in love with the sheer versatility of these tortillas. They are designed to be used in all the classic ways you would enjoy traditional flour tortillas, and then some! Their robust yet flexible nature makes them perfect for a wide range of culinary creations.
Think about incorporating them into:
- Tacos: Fill them with your favorite plant-based proteins, fresh salsas, crunchy veggies, and creamy sauces for an unforgettable taco night.
- Burritos: Load them up with rice, beans, guacamole, and a medley of seasoned vegetables for a hearty and satisfying meal.
- Wraps: A fantastic option for quick lunches! Use them for veggie wraps, hummus wraps, or even breakfast wraps with tofu scramble.
- Quesadillas: Press them with vegan cheese and your preferred fillings, then grill until golden and melty.
- Snack Scoopers: Cut them into wedges, lightly toast or bake, and use them to scoop up delicious dips like hummus, guacamole, or your favorite salsa.
- Mini Pizzas: Use them as a thin, crispy base for individual pizzas, topped with marinara, vegan cheese, and vegetables.
- Dessert Wraps: Their neutral flavor makes them surprisingly good for sweet applications! Fill with fruit, vegan cream cheese, or a drizzle of maple syrup.
The key here is their flexibility, especially when warm or at room temperature. This means they can be effortlessly rolled, folded, and filled without any fear of cracking or breaking, offering a delightful and mess-free eating experience.
Happy eating! These tortillas are sure to become a cherished addition to your recipe repertoire, opening up new avenues for delicious and healthy meals.
Frequently Asked Questions About Grain-Free Vegan Tortillas
Why is My Batter So Thick, Even Though I Followed the Recipe?
The most common culprit behind a thick batter, especially when working with alternative flours, is imprecise measurement. Volume measurements (using cups) can be highly inconsistent. For instance, one cup of chickpea flour can weigh anywhere from 100 grams to 180 grams, depending on how lightly or densely it’s packed or spooned into the measuring cup. This dramatic variance can significantly affect the batter’s consistency.
To ensure accurate and consistent results every single time, I cannot stress enough the importance of using a digital kitchen scale. They are inexpensive, easy to use, and provide precise weight measurements for your ingredients. 120 grams of chickpea flour is always 120 grams, regardless of how it’s handled, and the same applies to tapioca flour. Investing in a scale will eliminate guesswork and guarantee perfect batter consistency.
Can I Make Larger Tortillas with This Recipe?
Absolutely! This recipe is adaptable for larger tortillas. Simply use a larger nonstick skillet (10-12 inches works well). You’ll need to use more batter per tortilla – a generous 1/2 cup is usually sufficient for three large tortillas from this batch. When pouring the batter, ensure you spread it quickly and evenly to create a larger, thin circle. Exercise extra care when flipping larger tortillas, as they can be more delicate and prone to tearing. A wide, flexible spatula is your best friend here.
How Can I Store These Tortillas to Keep Them Fresh?
These tortillas store wonderfully! Once they have completely cooled, stack them and store them in an airtight container. At cool room temperature, they will remain fresh for up to 2 days. For longer storage, you can keep them in the refrigerator for up to 2 weeks. For extended preservation, they freeze beautifully for up to 6 months. To reheat, you can gently warm them in a dry skillet, microwave them briefly, or even bake them wrapped in foil until soft.
My Tortillas Aren’t as Flexible as I Expected. What Went Wrong?
Lack of flexibility is almost always due to overcooking. When tortillas are left on the heat for too long, they lose moisture and become dry and brittle. The key is to cook them just until they are set and lightly golden, but still soft. The moment the surface appears dry and the edges are slightly browned, it’s time to flip or remove them from the pan. For future batches, monitor them closely and err on the side of slightly undercooking rather than overcooking.
If you’ve already made a batch that’s a bit too stiff, don’t despair! Tightly wrapping the cooled tortillas in plastic wrap or placing them in a sealed bag can help them regain some moisture and soften slightly over time. You can also try steaming them briefly or warming them in a damp paper towel in the microwave.
Happy cooking!
Discover More Grain-Free & Vegan Tortillas to Explore:
- 2-Ingredient Coconut Flour Tortillas
- 2-Ingredient Almond Flour Tortillas
- 1-Ingredient Red Lentil Tortillas
- 2-Ingredient Chickpea Flour Tortillas
- 3-Ingredient Sweet Potato Tortillas
- 1-Ingredient Black Bean Tortillas
- Grain-Free Spinach Tortillas (2 ingredients)
- 1-Ingredient Split Pea Tortillas
2 Ingredient Grain-Free Vegan Tortillas
Camilla
6 minutes
3 minutes
9 minutes
4
(7-inch/ 17.5 cm) tortillas
Ingredients
-
1
cup
(120 g) chickpea flour -
1/2
cup
(60 g) tapioca flour - Optional: 1/8 teaspoon salt
-
3/4
cup
(175 mL) water
Instructions
-
Whisk the chickpea flour, tapioca flour, and (optional) salt in a medium mixing bowl. Ensure to break up any lumps in the chickpea flour (using a whisk, fork, or fingertips).
-
Add the water, stirring until completely blended into a smooth batter. Let the batter stand for 5 minutes. The batter should have the consistency of a thin pancake batter for tortillas similar to traditional flour tortillas. Add a tiny bit more water if needed to achieve this consistency.
-
Heat a medium-sized nonstick skillet over medium heat until it is just hot.
-
Add 1/4 of the batter (approximately 1/3 cup or 78-80 grams) to the heated skillet. Working quickly, tilt the skillet to evenly cover the bottom with the batter.
-
Increase the heat to medium-high and cook the tortilla for 1 to 2 minutes. The edges should turn light golden brown, and the surface should appear cooked/just dry. Slide a spatula underneath and flip it over. Cook for about 1 minute longer until the other side is just set.
-
Transfer the cooked tortilla to a cooling rack and let it cool. Repeat this process with the remaining batter. Use your freshly made tortillas as you would any other flour tortilla!
Notes
Nutrition Facts
Serving:
1
tortilla
|
Calories:
143
kcal
|
Carbohydrates:
27
g
|
Protein:
5
g
|
Fat:
2
g
|
Polyunsaturated Fat:
1
g
|
Sodium:
15
mg
|
Fiber:
3
g
|
Sugar:
3
g
Like this recipe? Rate and comment below!