
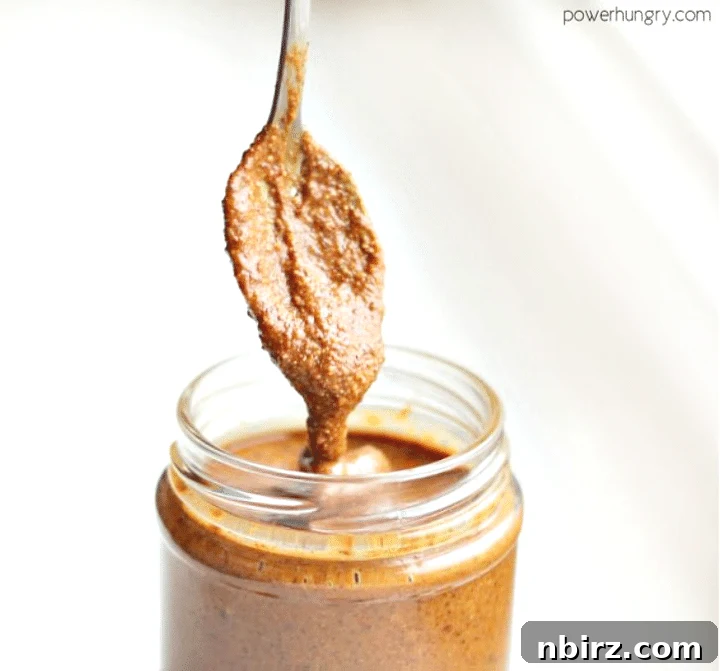
Creamy, dreamy, DIY almond butter made with ease (and only 1 ingredient!). The ingredient is dry-roasted, lightly salted almonds and the results are sensational. Say goodbye to expensive store-bought jars and hello to fresh, homemade goodness.
Unlock the Secret to Affordable, Homemade Almond Butter: A Comprehensive Guide
Do you ever find yourself hesitating at the supermarket aisle, staring down a small jar of almond butter with a hefty price tag? You’re not alone. For many of us, the cost of this beloved spread can be a real deterrent, especially when you consider how quickly a family can go through a single jar. That familiar wave of embarrassment — “Am I really going to shell out more than $10 for a small jar of spread?!” — is a feeling I know all too well.
But let’s be honest, almond butter is more than just a spread for toast. Its rich, nutty flavor and incredibly versatile nature make it a pantry staple for countless recipes and snack attacks. From enhancing smoothies to adding depth to baked goods, or simply enjoyed by the spoonful (my preferred method!), its appeal is undeniable.
That’s why I embarked on a journey to create my own almond butter at home. What I discovered was a revelation: it’s not only significantly more affordable but also incredibly simple to make, requiring minimal effort and just one core ingredient. The days of price-tag shock are over, and I’m never looking back. You, too, can experience the joy and satisfaction of crafting your own fresh, delicious almond butter with this quick, easy, and comprehensive guide.
Why Make Your Own Almond Butter? The Benefits of DIY
Beyond the undeniable cost savings, making your own almond butter offers several compelling advantages:
- Unbeatable Freshness & Flavor: Store-bought almond butter can sit on shelves for months. Homemade almond butter, on the other hand, is made right when you need it, ensuring the freshest, most vibrant flavor possible. The difference in taste is truly remarkable.
- Ingredient Control: Many commercial brands add extra oils (like palm or sunflower oil), sugars, and preservatives to their nut butters. When you make it yourself, you control exactly what goes in – in this case, just almonds! This is ideal for those managing dietary restrictions or simply seeking a cleaner eating approach.
- Customization Options: While our base recipe is one-ingredient, the homemade approach opens up a world of customization. Want a hint of cinnamon? A touch of vanilla? A pinch of sea salt? You can easily add these to tailor the flavor precisely to your liking.
- Dietary Purity: For individuals following specific diets like paleo, vegan, or gluten-free, knowing the exact ingredients ensures your almond butter is compliant and free from unexpected additives. Our recipe is naturally oil-free and suitable for many dietary needs.
- Empowerment & Satisfaction: There’s a unique sense of accomplishment that comes from making something from scratch. Whipping up a batch of creamy almond butter in minutes is incredibly satisfying and adds a valuable skill to your culinary repertoire.
Essential Tools and Ingredients for Homemade Almond Butter
You might be surprised by how little you actually need to transform humble almonds into a luxurious spread. This process is truly a testament to culinary simplicity. Here’s a breakdown of the minimal requirements:
The Star Ingredient
The exact amounts for this single ingredient are provided in the recipe card at the end of this post. You can toggle between US Customary (volume) and Metric (weights) for your preferred measurement option.
- Dry-Roasted Almonds (lightly salted or salted): The key here is “dry-roasted.” Roasting brings out the almonds’ natural oils and deepens their flavor, making them ideal for butter. Lightly salted versions add a perfect balance, but unsalted roasted almonds work too (you can always add salt to taste). If you only have raw almonds, don’t worry – I’ve included instructions for roasting them yourself in the recipe notes!
Necessary Equipment
While the ingredients list is short, the right equipment is crucial for success.
- High-Speed Blender or Food Processor: This is the workhorse of your almond butter-making endeavor. A powerful motor is essential to break down the almonds and extract their natural oils efficiently. While a high-speed blender can work wonders, a sturdy food processor is often preferred for its larger bowl capacity and consistent processing.
- Rubber/Silicone Spatula: Indispensable for scraping down the sides of your appliance bowl during processing. This ensures all the almond bits are incorporated, leading to a smooth, uniform butter.
- Jars or Other Lidded Containers: For storing your delicious creation. Glass jars are excellent as they don’t absorb odors and are easy to clean.
What You Do Not Need (The Beauty of Simplicity)
One of the greatest joys of making almond butter from scratch is the absence of unnecessary additives:
- Sweeteners: No added sugar, maple syrup, or honey needed (unless you choose to add them for flavor variations, which we’ll discuss later).
- Oils: Absolutely no extra oils like coconut, avocado, or vegetable oil are required. The almonds release their own healthy fats.
- Fillers/Starches: No thickeners or stabilizers whatsoever. Pure, unadulterated almond goodness.
- An Oven (if using pre-roasted almonds): If you start with dry-roasted almonds, there’s no cooking involved! Just blend and enjoy.
The Transformation: How to Make Your Own Almond Butter (Step-by-Step)
Ready to embark on this incredibly rewarding culinary adventure? You will not regret it! The process is mesmerizing, watching whole almonds transform into a creamy spread. Let’s get started:
- Gather Your Almonds: First and foremost, secure your dry-roasted, lightly salted almonds. These are readily available at most supermarkets, natural foods stores, bulk sections of superstores, or online. If raw almonds are your only option, refer to the recipe notes for instructions on how to easily dry-roast them at home. Proper roasting is critical, as it enhances the flavor and helps the almonds release their natural oils more readily during processing.
- Initial Grind: Carefully place the almonds into the bowl of your food processor or high-speed blender. Begin processing. If using a high-speed blender, start on a low speed to prevent overheating and ensure a uniform chop. Process until the almonds are finely chopped, resembling coarse crumbs. This initial stage is crucial for breaking down the nuts before they start releasing their oils.
- The Crumbly Stage: Pause your machine. Using your rubber or silicone spatula, meticulously scrape down the sides of the bowl, paying extra attention to the corners where almond pieces often get stuck. Resume processing (you might increase the speed slightly if using a blender). Continue for another 60 to 90 seconds. At this point, the finely chopped almonds will begin to pull together, resembling a crumbly topping or a thick meal. You’ll notice the texture becoming slightly more cohesive.
- Forming the Dough: Scrape down the bowl once more, ensuring all particles are pushed towards the blades. Process for an additional 1 to 3 minutes, stopping to scrape again as needed. During this phase, the crumbly meal will miraculously transform. The almonds will begin to release more of their natural oils, and the mixture will start to clump together, forming a homogenous, thick “dough” or a very stiff, cohesive ball. Congratulations, this is essentially your almond butter in its early, thicker form!
- Achieving Creamy Perfection: If you prefer a thick, stiff nut butter, you can stop here. However, if you’re like me and crave a luxurious, smooth, and drippy consistency, one more spin is all it takes! Scrape the bowl thoroughly one last time. Fire up the processor for another 1 to 2 minutes. The friction and continuous blending will coax out the remaining oils, transforming the thick mixture into a wonderfully smooth, pourable, and utterly gorgeous almond butter. Keep an eye on your machine to prevent overheating; brief pauses can help.
Hello, gorgeous! Your homemade almond butter is now ready to enjoy!
Troubleshooting Your Homemade Almond Butter
While making almond butter is generally straightforward, you might encounter a few common issues. Here are some tips:
- My Almonds Are Not Turning into Butter: Patience is key! It can take longer than expected, especially if your machine isn’t super high-powered or if your almonds aren’t warm enough (roasting them helps here). Keep scraping the sides and continue processing. The friction from the blades generates heat, which helps release the oils.
- The Mixture is Too Dry/Crumbly: Ensure you’ve scraped the sides diligently. Sometimes, the dry bits just need to be brought back into the main churning mass. If after a significant amount of processing (5-10 minutes) it’s still too dry, your almonds might be unusually dry, or your machine might not be generating enough heat. A tiny, tiny drizzle of a neutral oil (like grapeseed or avocado) could help, but generally, it’s unnecessary if your almonds are adequately roasted.
- The Machine is Overheating: If your food processor or blender starts to feel hot or smells like it’s struggling, give it a break! Turn it off for 5-10 minutes to cool down, then resume processing. Pushing it too hard can damage the motor.
Customizing Your Almond Butter: Flavor Variations
While pure almond butter is fantastic, one of the best parts of DIY is the ability to customize! Once your basic almond butter is formed, consider these additions:
- Sweet Touches: Add a tablespoon of maple syrup, honey, or a few pitted dates for a naturally sweet spread.
- Spice It Up: A dash of cinnamon, nutmeg, or even pumpkin pie spice can create a warm, inviting flavor.
- Chocolate Lover’s Dream: Stir in a tablespoon of unsweetened cocoa powder or cacao powder for a rich chocolate almond butter.
- Vanilla Bliss: A teaspoon of vanilla extract can enhance the overall flavor beautifully.
- Extra Crunch: For a chunky almond butter, reserve a small handful of chopped roasted almonds and stir them in at the very end.
Remember to add these additions in small amounts and blend briefly to combine, tasting as you go to achieve your desired flavor profile.
How to Store Your Fresh Homemade Almond Butter
Once your glorious almond butter is perfectly blended, it’s time for storage. Properly stored, your homemade creation will last surprisingly long.
Carefully scrape the almond butter into clean, airtight jars or other lidded containers. Glass jars are an excellent choice as they prevent any flavor absorption and allow you to easily see the contents. Store your almond butter in the refrigerator. In theory, it will keep for up to 6 months, but in most households, it gets devoured much, much faster than that! Over time, some natural oil separation might occur; simply stir it back in before serving.
Happy blending, and even happier eating!
The Nutritional Powerhouse: Benefits of Almond Butter
Beyond its delicious taste and versatility, almond butter is packed with health benefits that make it a smart addition to your diet. Almonds are naturally rich in:
- Healthy Fats: Primarily monounsaturated fats, which are known to be heart-healthy and can help lower bad cholesterol levels.
- Protein: A great source of plant-based protein, essential for muscle repair, growth, and satiety.
- Fiber: Promotes digestive health, helps regulate blood sugar, and keeps you feeling full.
- Vitamin E: A powerful antioxidant that protects cells from damage and supports skin health.
- Magnesium: Important for muscle and nerve function, blood sugar control, and blood pressure regulation.
- Calcium: Contributes to strong bones and teeth.
By making your own, you ensure these nutrients come without unwanted added sugars or unhealthy oils, maximizing the health benefits of every spoonful.
Beyond the Spoon: Creative Ways to Enjoy Your Homemade Almond Butter
Now that you have a fresh batch of incredible homemade almond butter, it’s time to explore its endless possibilities! Here are some fantastic recipes and serving suggestions to get you started:
- Almond Butter Stuffed Dates: A simple yet decadent treat. Just pit dates and fill them with a dollop of almond butter. So easy and satisfying!
- Almond Butter Coconut Flour Energy Balls: Perfect for a quick, wholesome snack or a pre-workout boost.
- Flourless Oatmeal Raisin Cookies: Almond butter often acts as a binder and flavor enhancer in gluten-free and flourless baked goods.
- Pumpkin Baked Oatmeal Cups: Incorporate almond butter into your breakfast routine for added protein and healthy fats.
- Healthy Chocolate Chip Skillet Cookie: A delicious, healthier dessert option that benefits from the richness of almond butter.
- Smoothie Booster: Add a tablespoon or two to your morning smoothie for extra creaminess, protein, and healthy fats.
- Dipping Sauce: Thinned with a little water or lemon juice, almond butter can be the base for savory dressings for salads or dipping sauces for vegetables and spring rolls.
- Overnight Oats or Yogurt Topping: Swirl into overnight oats or drizzle over a bowl of yogurt with granola and fruit.
DIY Almond Butter (Oil-Free, 1-Ingredient, So Easy)
By: Camilla
Creamy, dreamy, DIY almond butter made with ease (and only 1 ingredient!). The ingredient is dry-roasted, lightly salted almonds and the results are sensational.
Prep Time: 5 minutes
Total Time: 5 minutes
Yields: 2 cups (16 oz / 500 mL)
Ingredients
- 1 pound (454 g) dry-roasted, lightly salted almonds (see notes below for roasting your own or adjusting salt)
Instructions
- Place the almonds in your high-speed blender or food processor. Process on low speed (if using a blender) until the almonds are finely chopped. Use a rubber spatula to scrape down the sides of the bowl/container, especially the corners, ensuring all almond pieces are brought into the blades’ path.
- Continue to process (you may increase speed for a blender) for an additional 60 to 90 seconds. At this stage, the almonds will begin to clump together and resemble a coarse, crumbly topping. Scrape down the bowl thoroughly.
- Blend again for 1 to 2 minutes, stopping to scrape down the bowl as needed, until the crumbs coalesce into a cohesive, thick “butter” or dough-like consistency.
- You can stop at this point if you prefer a thicker, stiffer almond butter. For a more luxurious, smooth, and drippy consistency, scrape the bowl one final time and blend for another 1 to 3 minutes until the desired fluidity is achieved.
- Scrape the finished almond butter into your chosen storage container(s) and store it in the refrigerator until you are ready to use it.
Notes
- Storage: Store the homemade almond butter in a sealed container (glass jars are recommended) in the refrigerator for up to 6 months. A small amount of oil separation is natural; simply stir it back in.
- Almond Notes:
- One pound of almonds is roughly equivalent to 3 dry cups.
- If you use unsalted roasted almonds, you can add salt to taste during the processing, or leave it out entirely based on your dietary needs or preferences.
- How to Dry-Roast Your Own Almonds: If you only have raw almonds, spread them in a single layer on a large, rimmed baking sheet. Bake in a preheated 350°F (175°C) oven for 10 to 12 minutes, or until they turn golden brown and become fragrant. Allow them to cool completely before using them to make almond butter. Add your desired amount of salt to taste when processing.
Nutrition Information (per 2 tablespoons serving)
Serving: 2 tablespoons | Calories: 169 kcal | Carbohydrates: 6g | Protein: 6.1g | Fat: 14.8g | Saturated Fat: 1g | Sodium: 114mg | Fiber: 3g | Sugar: 1g