
The Ultimate Gluten-Free Buckwheat Sandwich Bread: Perfectly Vegan, Yeast-Free & Oil-Free
Experience the joy of baking a truly exceptional gluten-free buckwheat sandwich bread that boasts a wonderfully crusty exterior, a high rise, and an exquisitely fine texture. This recipe is not just easy to follow; it’s also entirely vegan, oil-free, sugar-free, and yeast-free, making it a delightful and healthy option for everyone. Prepare to be amazed by its perfectly delicious results.
Crafting the Best Gluten-Free Vegan Bread
The quest for truly great gluten-free and vegan bread can often feel like an endless journey, filled with dense loaves, crumbly textures, and a general lack of the satisfying qualities found in traditional wheat bread. Yet, this recipe stands apart, offering a solution that consistently delivers outstanding results. We’ve dedicated countless hours in the kitchen, experimenting through cold, gray, and drizzly days – the perfect backdrop for baking endeavors – to perfect an easy, gluten-free, and vegan bread that is remarkably close to foolproof.
Our primary goal was to create a gluten-free bread that not only rises beautifully but also maintains its lofty structure. And we aimed to achieve this without relying on common gluten-free bread additives like eggs, yeast, xanthan gum, or even aquafaba. The vision was a loaf with a fine, dry texture reminiscent of classic wheat bread, paired with a neutral flavor profile that complements virtually any topping or spread. Crucially, it needed to pass the ultimate test: approval from my “regular bread”-loving husband and son. It was a significant undertaking in terms of brainstorming, testing, and meticulous tweaking, but the results were unequivocally worth every effort. Introducing the absolutely fabulous, family-approved Gluten-Free Buckwheat Sandwich Bread! It truly deserves all the praise it receives.
Unveiling the Incredible Benefits of This Recipe
This bread isn’t just a recipe; it’s a revelation for anyone who cherishes a delectable, wholesome slice of whole-grain goodness. It effortlessly ticks all the right boxes, making it a standout choice for health-conscious individuals and those with specific dietary needs. Beyond its incredible taste and satisfying texture, this bread offers a multitude of benefits:
- Gluten-Free: Perfect for individuals with celiac disease or gluten sensitivity, ensuring a safe and delicious bread option.
- Vegan: Completely free of eggs and dairy, making it suitable for a plant-based diet without compromising on flavor or texture.
- Yeast-Free: An excellent choice for those sensitive to yeast or looking for an alternative leavening agent, simplifying the baking process without long proofing times.
- Xanthan Gum-Free: Many gluten-free recipes rely on xanthan gum for structure, but this recipe achieves a superior texture naturally.
- Oil-Free: Prepared without added oils, contributing to a lighter and healthier profile.
- Sugar-Free: Contains no added sugars, making it ideal for those monitoring their sugar intake.
- Nut-Free: A safe option for individuals with nut allergies, broadening its appeal.
- High in Fiber: Each slice provides a significant 4.1 grams of fiber, promoting digestive health and satiety.
- Minimal Ingredients: Simple ingredients mean less fuss and a more natural product.
- Easy to Make: Designed for straightforward preparation, even for novice bakers.
This carefully crafted bread not only meets diverse dietary requirements but also delivers on the promise of a delicious, nutritious, and incredibly satisfying culinary experience.
Key Ingredients for Your Buckwheat Bread
Like many beloved traditional breads, this simple recipe relies on a handful of core ingredients: flour, water, and leavening. The magic, however, lies in the specific combination and the quality of these components. Here’s what you’ll need to create this exceptional loaf:
- Buckwheat Flour: This forms the foundational flavor and structure, offering a unique earthy note.
- Brown Rice Flour: Acts as a neutral counterpoint to buckwheat, contributing to the fine texture without overpowering the flavor.
- Whole Psyllium Husks: Crucial for binding and providing the necessary structure and rise in this gluten-free, yeast-free recipe. It’s important to use *whole* husks, not powder.
- Baking Powder: A key leavening agent, ensuring a good rise and light crumb.
- Baking Soda: Works in conjunction with the acid (vinegar) to create a robust lift.
- Salt: Enhances all the flavors and balances the bread. Adjust to your preference.
- Water: The liquid base that brings the dough together.
- Cider Vinegar: An essential acidic component that activates the baking soda, contributing significantly to the bread’s rise and texture.
For an added touch of visual appeal and subtle crunch, a sprinkle of sesame seeds and rolled oats on top is a wonderful, yet entirely optional, enhancement.
Pro Tip: Grind Your Own Flour for Superior Freshness
Elevate your baking with freshly ground flour. If you own a high-speed blender, you can effortlessly grind your own buckwheat flour from whole groats or brown rice flour from brown rice in approximately 60 seconds. The process is incredibly simple: just toss the whole grains into your blender, secure the lid (don’t forget this crucial step, as I sometimes do!), and blend on high speed until a fine flour is achieved. Grinding your own flour ensures unparalleled freshness, which can significantly impact the flavor and texture of your bread. Any leftover flour can be stored in an airtight bag or container and frozen, ready for your next batch – because once you try this bread, you’ll definitely be making it again!
Exploring Vinegar Alternatives
While cider vinegar is recommended for its balanced acidity, feel free to substitute it with any other light or dark vinegar you have on hand. Should you prefer not to use vinegar, either for taste or dietary reasons, an equal amount of fresh lemon or lime juice will serve as an excellent alternative, providing the necessary acidity to activate the leavening agents.
Step-by-Step Baking Instructions
Crafting this gluten-free buckwheat bread is surprisingly simple, though it involves a unique step that might differ from your usual bread-making routine. Get ready, because “squishing” is involved, and it’s key to perfect results! The complete, detailed directions are also available in the comprehensive recipe card below.
Step One: Prepare Your Dry Ingredients
In a large mixing bowl, thoroughly whisk together the buckwheat flour, brown rice flour, baking powder, baking soda, and salt until they are well combined. This initial step is straightforward and consistent with most baking preparations.
Step Two: Combine Wet Ingredients and Activate Psyllium
In a separate medium mixing bowl, whisk the water, vinegar, and whole psyllium husks together until blended. Allow this mixture to stand undisturbed for approximately 5 minutes. This crucial pause allows the psyllium husks to absorb the liquid and begin to thicken into a loose, pale gel. If you’re new to using whole psyllium husk, you’ll observe this fascinating transformation almost immediately – it will resemble flax or chia gels but be notably less sticky.
Step Three: The “Squish” Technique for Perfect Dough
Now, for the unique part: it’s time to squish! First, ensure your hands are clean, as they will be your most effective tools for this stage. Add the psyllium gel mixture to the dry flour mixture. Use your hands to thoroughly mix and squish the ingredients together. This method, rather than stirring, is the most efficient way to achieve a cohesive dough. Resist the urge to add more liquid; the dough will come together into a consistent ball after just a minute or two of vigorous squishing. Once combined, roughly shape the dough into a ball while it’s still in the bowl. If you prefer not to use your hands, a standing mixer equipped with a paddle attachment can also effectively combine the ingredients.
Step Four: Shape and Prepare for Baking
After squishing, rinse any excess dough from your hands. With slightly moist hands, gently shape the dough ball into a neat loaf that fits snugly into a 9×5-inch (22.5 x 12.5 cm) loaf pan. Ensure your pan is already prepared by lining it with parchment paper and/or lightly spraying or greasing it. Place the loaf into the prepared pan, then use your moist hands to smooth the top surface and gently round the corners and sides for a perfect presentation. If you wish, this is the ideal moment to sprinkle your optional toppings, like rolled oats or sesame seeds, onto the surface of the loaf.
Step Five: Bake to Golden Perfection
Bake the bread in your preheated 325°F (160°C) oven for approximately 90 minutes. Keep an eye on it; it should achieve a significant rise, and the surface will turn a beautiful golden brown, appearing dry and wonderfully crusty. To confirm it’s fully baked, gently tap the bottom of the loaf – it should sound hollow. Once removed from the oven, allow the bread to cool in its pan on a wire cooling rack for a solid 15 minutes. This initial cooling period is vital for the bread to set properly and prevent it from collapsing.
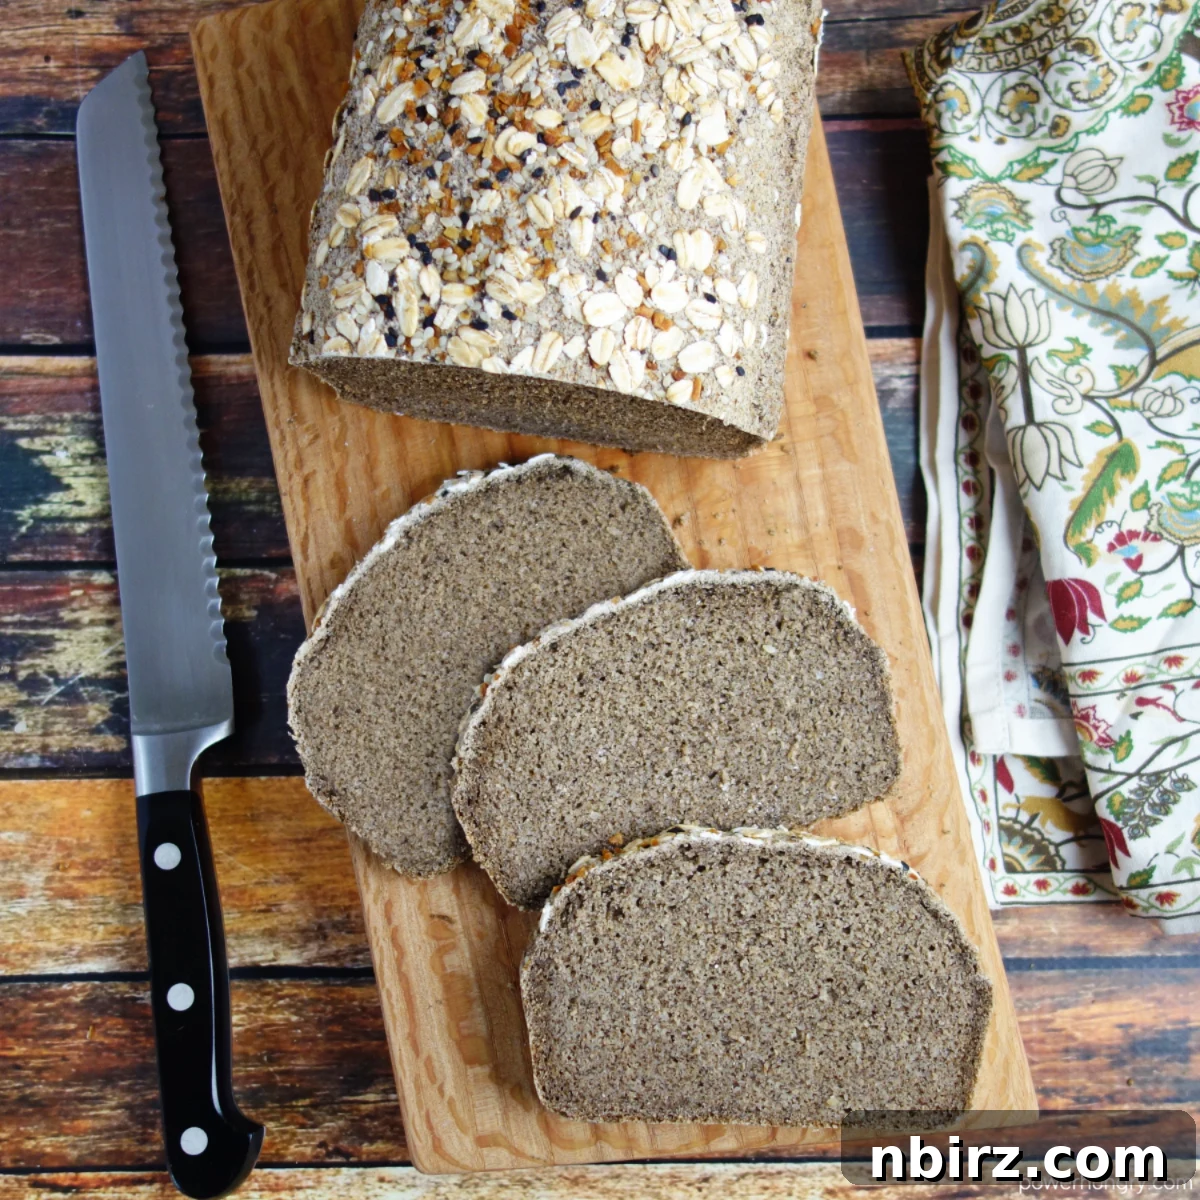
After 15 minutes, carefully remove the bread from the pan (peeling off the parchment paper if used) and transfer it to the cooling rack to cool completely. This final cooling stage is critical for achieving the perfect texture and preventing a gummy interior. Just look at this magnificent loaf – truly a sight to behold!
Slice It Your Way: Thick or Thin
Once completely cooled, this sturdy loaf is ready to be sliced to your preference. Whether you prefer thick, hearty slices for robust sandwiches or thinner cuts for delicate toast, this bread holds its shape beautifully – no crumbling here! Its firm yet pliable structure makes it a versatile choice for any meal or snack, enduring various toppings and fillings with ease.
The Remarkable Texture & Taste Profile
Prepare to be delighted by the sensory experience of this buckwheat bread, which challenges common preconceptions about gluten-free alternatives.
Texture: This bread boasts a wonderfully fine and firm texture, completely devoid of any gumminess – a common issue with many gluten-free loaves. Its crust is notably pleasant, becoming even more pronounced and satisfyingly crisp a day after baking. When toasted, each slice transforms into a delightfully crunchy and filling bite, offering a texture remarkably akin to traditional wheat flour bread.
Taste: The flavor is delicately mild with a warm, whole-grain toastiness, closely resembling a good whole wheat bread. The inherent robust flavor of buckwheat is expertly mellowed by the neutral profile of brown rice flour, creating a harmonious and broadly appealing taste. This versatile bread serves as the perfect canvas for an array of culinary creations, whether you crave savory spreads, sweet jams, or hearty sandwich fillings.
Storage Guidelines for Optimal Freshness
To keep your freshly baked bread at its best, ensure it is completely cooled before storing. Store the cooled loaf in an airtight container at a cool room temperature for up to 2 days. For extended freshness, it can be kept in the refrigerator for up to 1 week or frozen for up to 6 months. When freezing, it’s often best to slice the loaf first, allowing you to thaw individual slices as needed.
Frequently Asked Questions (FAQ)
Here are answers to some common questions about this unique gluten-free bread recipe:
Can I substitute other flours for buckwheat and brown rice flour?
Unfortunately, I do not recommend substituting other flours. The precise proportions of wet and dry ingredients, along with the specific quantity of whole psyllium husks, are carefully calibrated for this particular combination of buckwheat and brown rice flour. These flours interact uniquely to create the desired texture and rise. The one potential exception could be quinoa flour, which sometimes works as a suitable substitute for brown rice flour in certain recipes. I am continuously experimenting with other flour combinations and ratios, and I promise to share any successful adaptations in the future!
Can I use something other than whole psyllium husks?
Regrettably, for this specific recipe, whole psyllium husks are non-negotiable. Other gelling agents like flaxseed meal or chia seeds will not function as direct substitutes. While they might work in other contexts, incorporating them into this recipe would require significant experimentation to determine their efficacy and adjust ratios accordingly. Furthermore, I strongly advise against using psyllium powder. Although psyllium powder can sometimes replace whole husks in certain recipes, its properties and absorbency are vastly different, making it unsuitable for achieving the desired results in this particular bread.
Happy baking! We’d love to hear about your experience if you give this recipe a try. Share your success in the comments!
Related Gluten-Free & Vegan Recipes
If you loved this buckwheat bread, explore these other delicious and healthy recipes:
- 4-Ingredient Buckwheat Flax Chia Bread {vegan, GF, oil-free}
- Oil-Free Buckwheat Granola {Vegan, Oat-Free, GF}
- 1-Ingredient Flourless Buckwheat Bread {vegan, gluten-free}
- Healthy No-Bake Buckwheat Granola Bars {vegan, gluten-free}
- Buckwheat Almond Shortbread Cookies {vegan, gluten-free}
- Fruit & Cinnamon Buckwheat Cereal {Gluten-free, Vegan}
- Buckwheat Flour Carrot Muffins (Vegan, Oil-Free, GF)
Recipe Card: Gluten-Free Buckwheat Sandwich Bread
By: Camilla
My crusty, high-rising, fine-textured gluten-free buckwheat sandwich bread will please everyone! Easy to make, it is also vegan, oil-free, sugar-free, yeast-free and perfectly delicious.
- Prep Time: 10 minutes
- Cook Time: 1 hour 30 minutes
- Total Time: 1 hour 40 minutes
- Servings: 1 large loaf (approximately 14 slices)
- User Rating: 4.88 out of 5 stars from 72 votes
Equipment
- 1 9×5 inch loaf pan
- Large mixing bowl
- Medium mixing bowl
- Whisk
- Cooling rack
Ingredients
- 1.5 cups buckwheat flour (light or dark)
- 1.5 cups brown rice flour
- 2 teaspoons baking powder (certified GF, if needed)
- 3/4 teaspoon salt
- 1/2 teaspoon baking soda
- 2.5 cups water
- 1 tablespoon cider vinegar (see notes for options)
- 1/3 cup whole psyllium husks (not psyllium husk powder)
- Optional Toppings: rolled oats, sesame seeds, poppy seeds, hemp hearts
Instructions
- Preheat your oven to 325°F (160°C). Lightly spray or grease a 9×5-inch (22.5×12.5 cm) loaf baking pan. For easier removal, you can optionally line it with parchment paper.
- In a large mixing bowl, whisk together the buckwheat flour, brown rice flour, baking powder, salt, and baking soda until all dry ingredients are thoroughly blended.
- In a medium bowl, whisk the water, vinegar, and psyllium husks until fully combined. Let this mixture sit for approximately 5 minutes to allow the psyllium to thicken into a gel.
- Add the thickened psyllium mixture to the dry flour mixture. Use clean hands to “squish” and mix the ingredients until they are completely combined into a cohesive dough. Alternatively, you can use the paddle attachment on a stand mixer. Once combined, roughly shape the dough into a ball.
- Rinse any excess dough off your hands. With slightly moist hands, shape the dough into a loaf that fits your prepared loaf pan. Place the dough into the pan, then use your moist hands to smooth the top and gently round the sides. If desired, sprinkle the top with your chosen optional toppings.
- Bake in the preheated oven for 90 minutes, or until the surface is golden brown, dry, and crusty. The bread should sound hollow when tapped. Let the bread cool in the pan, on a cooling rack, for 15 minutes.
- After 15 minutes, remove the bread from the pan and transfer it to the cooling rack to cool completely before slicing. This step is crucial for achieving the perfect texture.
Notes
- Storage: Store the cooled bread in an airtight container at cool room temperature for 2 days, in the refrigerator for 1 week, or in the freezer for up to 6 months.
- Vinegar Options: An equal amount of any other vinegar, or fresh lemon or lime juice, can be used in place of the cider vinegar.
- Psyllium Tip: It is crucial to use whole psyllium husks, not psyllium powder. The measurements and absorption rates are very different. Whole psyllium husks appear as small, pale tan flakes.
Nutrition
Serving: 1 slice (1/14 of loaf) | Calories: 106kcal | Carbohydrates: 21.2g | Protein: 2.8g | Fat: 1g | Sodium: 242.5mg | Fiber: 4.1g | Sugar: 0.4g