
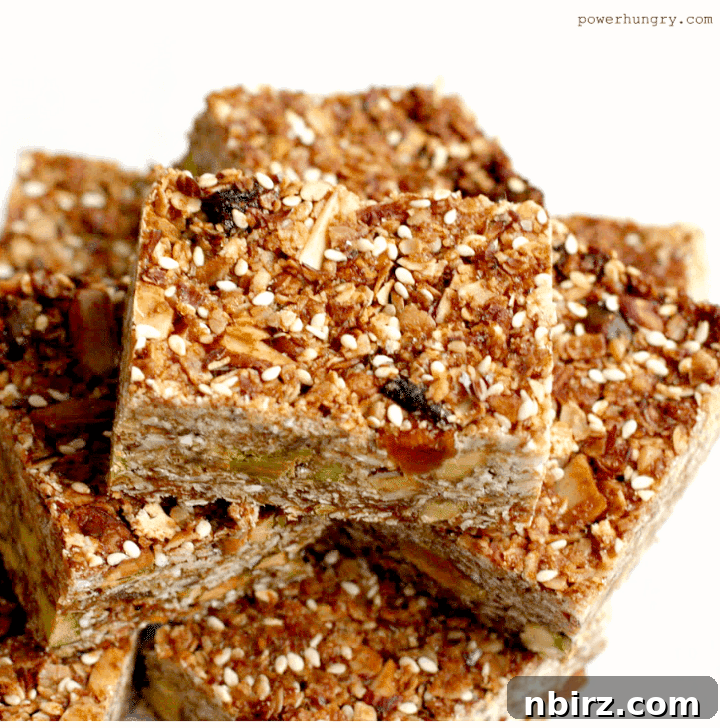
Welcome to a culinary adventure where convenience meets nutrition! We’re thrilled to share a game-changing recipe for cheap & easy vegan protein bars. Crafted with a medley of wholesome, natural ingredients, these bars prove that you don’t need expensive protein powders to boost your energy and nutrient intake. Perfect for busy individuals and families, they are not only naturally gluten-free and oil-free but also incredibly versatile, allowing for endless customization to suit your taste and dietary needs.
As summer winds down and the crisp air of autumn approaches, there’s a certain energy in the air that always feels like a fresh start. Whether you’re a student heading back to school, a parent preparing lunch boxes, or simply looking to refresh your routine, late summer invariably inspires a renewed focus on organization and healthy habits. For many, this means tidying up, setting new goals, and, of course, revamping meal plans with nutritious options that are both delicious and easy to prepare. This sentiment deeply resonates with us, fueling our continuous search for practical, nourishing recipes that fit seamlessly into busy lives.
While we’ve recently shared a variety of delightful, vegetable-focused spreads—ideal for crafting vibrant, veggie-centric sandwiches or delightful dip, vegetable, and cracker combinations—today, our focus shifts to a robust and fulfilling snack. We’re celebrating this season of new beginnings with a recipe that is truly a lifesaver: a budget-friendly and straightforward protein bar that brings joy to your packed lunch routine and makes healthy eating effortless.
These super-filling protein bars are wonderfully dense and satisfyingly delectable, making them an ideal choice for a quick breakfast on the go, a post-workout refuel, or a wholesome snack to combat midday slumps. Their rich texture and natural sweetness ensure that every bite is a delightful experience, proving that healthy can indeed be incredibly tasty. Prepare to make these a staple in your kitchen!
Exceptional Recipe Benefits: Why These Vegan Protein Bars Stand Out
Beyond their incredible taste and ease of preparation, these homemade vegan protein bars offer a wealth of nutritional advantages that make them a superior choice for anyone seeking a healthier snack option. Here’s a closer look at what makes them so beneficial:
- High in Protein: Each bar boasts approximately 9.4 grams of protein, a significant amount for a snack of its size. This protein content contributes to satiety, muscle repair, and sustained energy levels throughout your day. The exact protein value may vary slightly depending on the specific nuts and seeds you incorporate, but the base remains robustly protein-rich.
- Rich in Fiber: Packed with dietary fiber, these bars support digestive health, help regulate blood sugar, and enhance the feeling of fullness, preventing overeating and unnecessary snacking.
- Completely Vegan: Made without any animal products, these bars are 100% egg-free and dairy-free, making them suitable for vegan diets and those with related allergies or intolerances.
- Gluten-Free: By using certified gluten-free rolled oats, this recipe is safe for individuals with celiac disease or gluten sensitivity, ensuring everyone can enjoy a delicious and wholesome snack.
- Oil-Free: We’ve purposefully omitted added oils, relying on the natural fats from nut/seed butter and the moisture from bananas to achieve a perfect texture. This makes them a lighter option without compromising on flavor or richness.
- Excellent Source of Vitamin B6: These bars are a good source of Vitamin B6, a crucial nutrient with numerous health benefits. B6 is especially vital for cognitive function, aiding in proper brain development and function, which is particularly beneficial for students. Moreover, it plays a key role in the body’s production of melatonin, a hormone essential for regulating sleep cycles, helping you to “rise and shine” feeling refreshed.
Incorporating these bars into your diet means choosing a snack that not only tastes great but also actively contributes to your overall well-being, providing sustained energy, supporting mental clarity, and promoting healthy sleep patterns. They are truly an all-around winner!
Simple, Wholesome Ingredients for Your Homemade Protein Bars
True to their “cheap and easy” nature, these vegan protein bars rely on a short list of accessible and affordable ingredients. You won’t find any expensive protein powders or other pricey additives here. Instead, we focus on pantry staples that are readily available at any grocery store. The beauty of this recipe lies in its simplicity and the power of natural, whole foods.
The precise quantities for each ingredient are detailed in the comprehensive recipe card located at the conclusion of this article. For your convenience, you can easily switch between US Customary (volume) and Metric (weights) measurement options within the recipe card.
Here’s what you’ll need to gather:
- Canned Chickpeas (Garbanzo Beans): The unexpected hero of this recipe, chickpeas provide a fantastic plant-based protein boost and contribute to the bars’ dense, chewy texture without imparting a bean flavor. They are also incredibly cost-effective.
- Peanut Butter (or Any Nut/Seed Butter): This acts as a primary binder and a source of healthy fats and additional protein. Feel free to use almond butter, cashew butter, or for a nut-free option, sunflower seed butter (sunbutter) or tahini. Choose a natural variety with minimal added sugars and oils.
- Maple Syrup: Our chosen natural sweetener, maple syrup adds a lovely depth of flavor and just the right amount of sweetness without being overpowering. Agave nectar or date syrup can also be used as alternatives.
- Nondairy Milk: Options like almond milk, oat milk, or cashew milk work perfectly, adding moisture and helping to achieve the ideal consistency. If not strictly vegan, dairy milk can also be used.
- Rolled Oats: The foundation of these bars, old-fashioned rolled oats provide essential fiber and a hearty texture. Ensure they are certified gluten-free if you require a gluten-free diet. Do not use quick-cooking or instant oats as they will yield a different texture.
- Assorted Chopped Nuts or Seeds: This is where you can add extra crunch, flavor, and nutrients. Think chopped almonds, walnuts, pecans, pumpkin seeds (pepitas), sunflower seeds, or a mix of your favorites. Toasting them lightly before adding enhances their flavor significantly.
- Vanilla Extract: A touch of vanilla extract rounds out the flavors beautifully, adding warmth and depth to the bars.
- Salt: A pinch of salt is crucial to balance the sweetness and enhance all the other flavors, making the bars taste even better. Adjust to your preference.
With these simple yet powerful ingredients, you’re well on your way to creating a batch of delicious, healthy, and satisfying protein bars that will become a go-to in your snack rotation. They highlight how nutritious eating can be both accessible and incredibly flavorful.
Crafting Your Own Wholesome Protein Bars Without Protein Powder
Making these vegan protein bars is surprisingly straightforward, requiring minimal effort and standard kitchen equipment. The process is designed to be quick and efficient, ensuring you can whip up a batch even on your busiest days. Here’s a detailed guide to creating these nutritious delights:
Please refer to the complete, step-by-step directions, including precise measurements, in the recipe card found at the end of this post.
Step One: Prepare Your Workspace
Begin by preheating your oven to 350°F (180°C). This ensures the oven is at the correct temperature when your batter is ready. Next, prepare a 9-inch (22.5 cm) square baking pan. For easy removal and cleanup, we highly recommend lining the pan with parchment paper, leaving a slight overhang on the sides. If you don’t have parchment paper and don’t mind a touch of oil, you can lightly grease the pan with a nonstick cooking spray or a thin layer of your preferred oil. This step is crucial for preventing the bars from sticking and making them easy to slice once cooled.
Step Two: Create the Wet Base Mixture
In a food processor or a high-speed blender, combine the core wet ingredients: the drained and thoroughly rinsed canned chickpeas, plant-based milk (such as almond, oat, or cashew milk), ripe peeled bananas, your chosen nut or seed butter, maple syrup, and vanilla extract. Process this mixture until it is completely smooth and creamy. It’s important to ensure there are no lumps of chickpeas remaining, as this will affect the texture of your finished bars. The bananas will contribute natural sweetness and moisture, while the chickpeas and nut butter provide the protein and binding power. Take your time to achieve a consistently smooth base.
Step Three: Incorporate Dry Ingredients and Assemble Batter
Once your wet mixture is perfectly smooth, transfer it into a large mixing bowl. Now, add the old-fashioned rolled oats and your coarsely chopped nuts or seeds to the bowl. Stir everything together thoroughly until all the dry ingredients are completely blended into the wet base. Ensure the oats and nuts are evenly distributed throughout the batter. Once combined, scrape the entire batter into your prepared baking pan, spreading it out evenly with a spatula or the back of a spoon. Press the top gently to create a smooth, level surface, which will result in uniformly baked bars.
Step Four: Bake to Golden Perfection
Carefully place the baking pan into your preheated oven. Bake for approximately 40 to 45 minutes. The bars are ready when they turn a deep golden brown, and the edges appear slightly crispy. The aroma filling your kitchen will be an excellent indicator! Baking time may vary slightly depending on your oven, so keep an eye on them towards the end. A slight give in the center is fine, as they will firm up further upon cooling.
Step Five: Allow for Complete Cooling
Once baked, remove the pan from the oven and immediately transfer it to a wire cooling rack. It is crucial to allow the bars to cool completely in the pan before attempting to slice them. This cooling period allows the bars to set properly and firm up, making them much easier to cut into clean, defined shapes. Patience here will be rewarded with perfectly structured bars.
Step Six: Slice and Customize
Once completely cooled, carefully lift the parchment paper (with the cooled slab of bars) out of the pan. Place it on a cutting board and cut the large slab into 16 equal bars or squares. And just like that, you’re done! Your homemade vegan protein bars are ready to enjoy. For an extra touch, consider adding some chopped dried fruit like cranberries or apricots, or even some dairy-free chocolate chips to the batter before baking. A teaspoon of your favorite spice, such as cinnamon or nutmeg, can also add a delightful warmth. The possibilities for variation are truly vast, allowing you to tailor each batch to your preference.
Optimal Storage for Your Homemade Protein Bars
Proper storage is key to maintaining the freshness and deliciousness of your homemade protein bars. After they have completely cooled and been cut into individual portions, transfer them to an airtight container. They will remain fresh and delightful at room temperature for up to five days. For extended freshness, store them in the refrigerator for up to two weeks. If you’re looking to meal prep far in advance or simply want to have a stash of healthy snacks on hand, these bars freeze beautifully for up to three months. Simply thaw them at room temperature or in the refrigerator before enjoying.
Important Option: Crafting Nut-Free Protein Bars for All
For those navigating school-wide nut restrictions or managing nut allergies within the household, adapting this recipe to be entirely nut-free is straightforward and highly recommended. Simply replace the peanut butter with an equal amount of sunflower seed butter (often labeled as “sunbutter”) or tahini. When it comes to the chopped nuts or seeds, opt for a combination of seeds only, such as pepitas (pumpkin seeds), sunflower seeds, sesame seeds, or hemp hearts. These substitutions ensure the bars retain their delicious flavor, satisfying texture, and nutritional benefits, making them a safe and inclusive snack for everyone to enjoy.
Enjoy these incredibly versatile, nutritious, and easy-to-make vegan protein bars! They’re proof that healthy eating can be both simple and utterly delicious. Whether you need a quick breakfast, a satisfying snack, or a wholesome treat, these bars have got you covered. Happy snacking!
Discover More Wholesome & Easy Recipes
If you loved making these cheap and easy vegan protein bars, you’re in for a treat! Explore more of our favorite recipes that prioritize health, simplicity, and incredible flavor. These dishes are perfect for complementing your healthy lifestyle:
- Roasted Carrot Fries {Fast, Fit, Easy & Cheap}: A delicious and healthy alternative to traditional fries, packed with nutrients.
- Grain-Free Powdered Sugar {gluten-free, corn-free}: Learn how to make your own gluten-free and corn-free powdered sugar for all your baking needs.
- Chopped Winter Salad: A vibrant and hearty salad packed with seasonal ingredients, perfect for a refreshing meal.
- No-Bake Cookie Dough Protein Bars {Gluten-Free, Vegan}: Craving something sweet but healthy? These no-bake bars are quick, easy, and taste like cookie dough!
- Easy Vegan Vanilla Buttercream {no cornstarch}: A simple and luscious vegan buttercream recipe, perfect for decorating cakes and cupcakes without cornstarch.
Cheap & Easy Vegan Protein Bars (No Powders!)
Camilla
10 minutes
45 minutes
55 minutes
16 bars
Ingredients
- 1 can, 15-oz/425 g chickpeas, rinsed and drained
- 2/3 cup 150 mL almond milk (or nondairy/dairy milk of choice)
- 2 medium-large, very ripe bananas (peeled)
- 2/3 cup 165 g peanut butter (or nut/seed butter of choice)
- 1/4 cup 60 mL maple syrup
- 2 teaspoons 10 mL vanilla extract
- 4 cups 400 g old-fashioned rolled oats (certified GF, as needed)
- 1 cup 125 g coarsely chopped, toasted nuts or seeds (use any combination you like!)
Instructions
-
Preheat oven to 350F (180C). Line a 9-inch (22.5 cm) square baking pan with parchment paper, leaving an overhang on the sides for easy lifting. Optionally, you can lightly grease the pan.
-
In a food processor or blender, combine the rinsed and drained chickpeas, nondairy milk, peeled bananas, peanut butter (or chosen nut/seed butter), maple syrup, and vanilla extract. Process until the mixture is completely smooth and creamy, ensuring no chickpea lumps remain.
-
Transfer the smooth wet mixture into a large bowl. Add the rolled oats and chopped nuts/seeds, stirring vigorously until all ingredients are thoroughly combined and the oats are fully incorporated. Scrape the batter into the prepared baking pan, spreading it evenly and smoothing the top surface with a spatula.
-
Bake the bars in the preheated oven for 40 to 45 minutes, or until they are a deep golden brown and the edges appear somewhat crispy.
-
Remove the pan from the oven and place it on a cooling rack. Allow the bars to cool completely in the pan before attempting to remove them. This step is crucial for the bars to set and firm up properly.
-
Once completely cooled, lift the bars out of the pan using the parchment paper. Place on a cutting board and cut into 16 equal bars or squares. Enjoy your wholesome homemade protein bars!
Notes
Nutrition
Serving:
1
bar
|
Calories:
229
kcal
|
Carbohydrates:
28.7
g
|
Protein:
9.4
g
|
Fat:
10.5
g
|
Saturated Fat:
1.4
g
|
Cholesterol:
0.2
mg
|
Sodium:
218
mg
|
Fiber:
4.7
g
|
Sugar:
6.1
g
Like this recipe? Rate and comment below!