
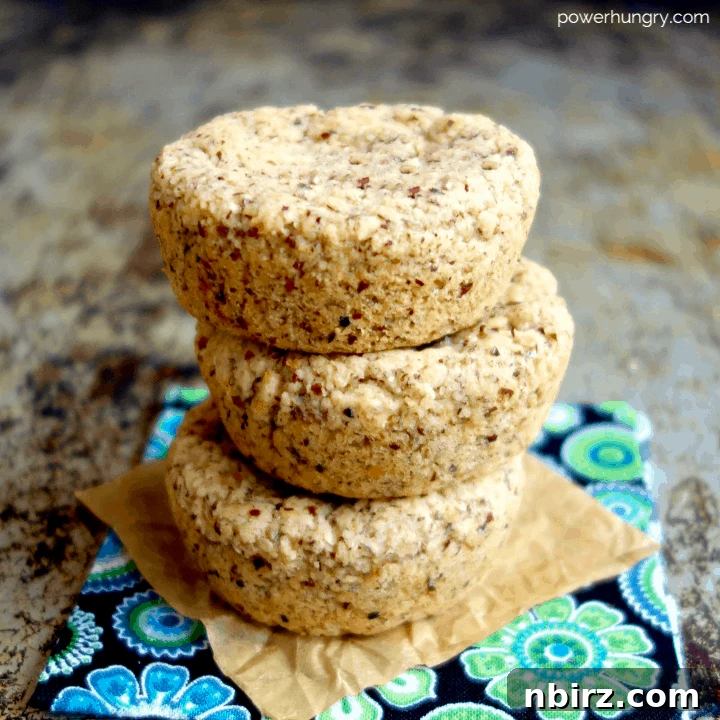
3-Ingredient Keto Vegan Almond Bread: Your Easy Grain-Free, Gluten-Free Solution
Are you navigating the world of dietary restrictions or simply seeking a simpler, healthier approach to your favorite baked goods? Look no further than this incredibly versatile and quick-to-prepare 3-Ingredient Keto Vegan Almond Bread. This innovative recipe delivers individual bread rounds that are not only delicious but also perfectly aligned with multiple dietary needs. Imagine a bread that’s soft, tender, and ideal for everything from a morning toast to a base for savory mini sandwiches – all while being exceptionally healthy and ready in under 30 minutes, from start to finish!
Our goal was to create a bread recipe that simplifies healthy eating without compromising on taste or texture. This particular creation has quickly become a favorite due to its effortless preparation and delightful soft crumb. It’s a testament to the idea that fewer ingredients can often lead to more wholesome and enjoyable results. Whether you’re an experienced baker or new to the kitchen, you’ll appreciate how easily this bread comes together, making fresh, homemade bread an accessible luxury for everyone.
Exceptional Benefits of This 3-Ingredient Almond Bread Recipe
The inspiration for this recipe stemmed from a desire to make grain-free baking as straightforward as traditional bread making. We believe that a healthy alternative shouldn’t require a dozen obscure ingredients or complex techniques. This simple almond bread perfectly embodies that philosophy, offering a wealth of benefits:
- Keto-Friendly: Formulated with a low carbohydrate count, this bread is an excellent choice for individuals adhering to a ketogenic diet, supporting ketosis and metabolic health.
- Grain-Free: Free from grains, making it suitable for paleo lifestyles and those who experience digestive sensitivities or prefer to avoid grains for other health reasons.
- Vegan: Entirely plant-based, containing no animal products whatsoever. This ensures it’s perfect for vegans, vegetarians, and anyone seeking dairy-free and egg-free bread options.
- Oil-Free: Prepared without any added oils, this contributes to a lower-fat profile, making it a lighter and heart-healthier choice without sacrificing moisture or texture.
- Sugar-Free: This recipe contains no added sugars, making it an ideal option for managing blood glucose levels, for those with diabetes, or anyone looking to reduce their sugar intake.
- Gluten-Free: Naturally devoid of gluten, this bread is safe and delicious for individuals with celiac disease, gluten intolerance, or those simply choosing a gluten-free diet.
- Quick & Easy: From prep to plate in under 30 minutes, this bread fits seamlessly into busy schedules, providing a convenient way to enjoy fresh, homemade goodness.
- Individual Portions: Baked in a muffin tin, these breads offer perfectly portioned servings, making them excellent for meal planning, grab-and-go breakfasts, or controlled snacking.
This almond bread isn’t just a simple recipe; it’s a foundation for a healthier, more inclusive diet, proving that delicious and versatile bread can be enjoyed by almost everyone, regardless of dietary restrictions.
The Simple Yet Powerful Ingredients You’ll Need
For the exact measurements of each ingredient, please refer to the detailed recipe card at the conclusion of this article. You’ll find options to toggle between US Customary (volume) and Metric (weights) for your preferred measurement system.
The magic of this bread truly lies in its minimalist ingredient list. With just three core components (plus water and an optional touch of salt), we craft a bread that stands up to its more complex counterparts. Let’s explore each ingredient and its crucial role in this extraordinary recipe.
Unlocking the Power of Psyllium Husk: The Essential Binder
Psyllium husk is an unsung hero in gluten-free and vegan baking. It’s derived from the seeds of the Plantago ovata plant, specifically the outer layer of the seed, which is incredibly rich in both soluble and insoluble dietary fiber. This unique fiber composition gives psyllium husk its remarkable ability to absorb liquids and form a viscous gel, known as mucilage.
In this recipe, psyllium husk acts as the primary binder and structural agent. It replicates the elasticity and binding properties that gluten provides in traditional wheat flours, and it effectively replaces eggs in vegan baking. When mixed with cold water, it forms a strong, cohesive gel that holds the almond flour together, giving the bread its soft, tender, yet stable texture. It’s a truly ingenious natural ingredient that makes gluten-free and vegan baking not only possible but also exceptionally good!
Having experimented extensively, I can confidently say that psyllium husk is indispensable for the success of this bread. It creates a flexible matrix that traps air and moisture, resulting in a lighter crumb. If you’re new to using psyllium husk, you’ll find it typically comes in a flaky, light brown form, as shown in the image below:
Psyllium Husk vs. Psyllium Powder: Understanding the Conversion
Yes, you can substitute psyllium husk powder for whole psyllium husks, but it’s important to adjust the quantity. Psyllium powder is much more finely ground and therefore denser and more potent than the whole husks. While the weight might be similar, the volume required will be significantly less.
As a general rule of thumb, 1 tablespoon (approximately 5 grams) of whole psyllium husks is roughly equivalent to 1 teaspoon (also about 5 grams) of psyllium husk powder. For this recipe, which calls for 2 teaspoons of whole psyllium husks, you would use a little less than 3/4 teaspoon of psyllium husk powder. Always remember that conversion ratios can vary slightly between brands due to differences in processing, so observing the dough’s consistency is key.
The Indispensable Role of Psyllium in Structure and Texture
In the realm of vegan and gluten-free baking, psyllium husk performs a truly unique function that is difficult, if not impossible, to substitute effectively. It provides the crucial structural integrity that gluten proteins offer in conventional wheat breads, and the binding capabilities typically provided by eggs in other recipes.
Unlike other egg replacers, psyllium creates a robust, yet flexible, gel that helps the bread rise, prevents crumbling, and contributes to a remarkably light and cohesive crumb. Because of these distinct properties, I do not recommend any substitutes for psyllium husk in this particular recipe to ensure optimal results. For the best gel formation, always mix the psyllium husk with *cold* water, as this accelerates the gelling process. Observe the transformation below, showing the ideal consistency of the gel after mixing 2/3 cup of water with 2 teaspoons of whole psyllium husks:
Almond Meal vs. Almond Flour: A Clarification
One of the beauties of this recipe is its adaptability: it performs beautifully with either almond meal or almond flour. However, it’s helpful to understand the distinctions between the two to predict the final appearance and subtle texture variations in your bread.
Almond Meal: This product is made from grinding whole, unblanched almonds, meaning the skins are left intact. As a result, almond meal has a slightly coarser texture and a visibly speckled, brownish appearance. The presence of the skins can also contribute to a slightly more robust, rustic flavor. If your baked bread has small brown flecks, you’ve likely used almond meal, just as in the photographs accompanying this article.
Almond Flour: In contrast, almond flour is produced by grinding blanched almonds (almonds from which the skins have been removed) very finely. This results in a much finer, powdery texture and a pale, uniform, off-white color. Almond flour typically yields a slightly lighter, more delicate crumb in baked goods.
While product labels can sometimes be confusing, often using terms like “almond flour/meal” interchangeably, a simple visual inspection is your best guide. If it’s pale and uniformly fine, it’s almond flour. If it has noticeable brown specks and a slightly coarser feel, it’s almond meal. Both work perfectly for this recipe, so use whichever you have on hand or prefer for its subtle textural differences.
Baking Powder: Your Leavening Partner
Our final essential ingredient is baking powder, which provides the crucial lift and airy texture to these individual bread rounds. To ensure your bread remains 100% grain-free, it’s important to select a baking powder that uses tapioca starch or arrowroot as its base, rather than cornstarch. This small but significant detail helps maintain the integrity of the grain-free claim. Otherwise, baking powder functions as a reliable leavening agent, creating the perfect rise and a tender crumb in every bite.
Easy Step-by-Step Baking Instructions
For precise measurements and detailed timings for this recipe, please refer to the complete recipe card found at the bottom of this page.
Making these delightful almond breads is a straightforward process. Follow these simple steps to ensure perfect results every time, and enjoy fresh, warm bread in less than half an hour!
- Preheat Oven & Prepare Muffin Tin: Begin by preheating your oven to 350°F (180°C). Prepare a standard 9-cup muffin tin. For an oil-free preparation, line 9 of the cups with silicone, foil, or paper liners. If using a small amount of oil is acceptable for your dietary needs, you may alternatively lightly grease or spray each muffin cup with a nonstick cooking spray.
- Prepare Psyllium Gel: In a small bowl or cup, combine the measured cold water and whole psyllium husks. Stir briefly to ensure the husks are submerged, then let the mixture stand undisturbed for a full 10 minutes. This critical step allows the psyllium to fully hydrate and form a thick, gelatinous binder, which is essential for the bread’s structure.
- Combine Dry Ingredients: While the psyllium gel is setting, take a medium-sized mixing bowl. Add the almond flour (or almond meal), baking powder, and the optional fine sea salt. Whisk these dry ingredients together thoroughly to ensure they are well combined and the leavening agent is evenly distributed.
- Form the Dough: Once the psyllium mixture has transformed into a thick gel, add it to the bowl with your combined dry ingredients. Stir vigorously with a spoon or spatula for about 10 to 15 seconds. The mixture will quickly come together to form a light, springy, and easy-to-handle dough. Avoid overmixing once it’s cohesive.
- Shape the Patties: Divide the prepared dough evenly into nine portions. Each portion should be roughly 3 tablespoons in size. Gently shape each portion into a small, flattened patty, making sure it’s sized to fit comfortably into each prepared muffin cup. Carefully place one patty into each of the nine prepared cups.
- Bake: Place the muffin tin into your preheated oven and bake for approximately 27 to 30 minutes. The breads are perfectly baked when their centers are just set and feel firm to the touch. A light golden-brown color is also a good indicator of doneness.
- Cool & Serve: Once baked, remove the muffin tin from the oven and transfer it to a wire rack. Allow the breads to cool in the tin for 10 minutes. This resting period helps them firm up and makes them easier to remove without breaking. After 10 minutes, carefully take the individual breads out of their cups and place them directly on the wire rack to cool completely. Serve them warm, at room temperature, or chilled.
You’ve now successfully baked a batch of delicious, healthy, and incredibly versatile almond breads! Their light texture makes them perfect for slicing and enjoying in numerous ways.
These delightful almond bread rounds are specifically designed for baking in a standard muffin tin, which ensures consistent results and convenient individual portions. While we are continuously exploring and testing larger loaf options, these mini breads offer immediate gratification and unmatched convenience for everyday enjoyment. We encourage you to savor these lovely individual breads, and happy baking!
Tips for Success & Creative Serving Suggestions
Achieving Perfect Almond Bread Every Time:
- Accurate Measurement is Key: Especially for psyllium husk, precise measurements are paramount. Use level measuring spoons and cups to ensure the correct ingredient ratios, which directly impact the final texture and binding of your bread.
- Allow Psyllium to Fully Gel: Do not shorten the 10-minute resting time for the psyllium husk and water mixture. This duration is crucial for the psyllium to fully hydrate and form the necessary thick gel, which acts as the primary binder for the bread.
- Avoid Overmixing the Dough: Once you add the psyllium gel to the dry ingredients, mix just until a cohesive dough forms, typically within 10-15 seconds. Overmixing can develop toughness, leading to a less tender bread.
- Ensure Consistent Portions: For even baking and uniform bread rounds, divide the dough into nine equal portions. Using a kitchen scale can help achieve precision, but eyeballing it is usually sufficient.
- Know Your Oven: Oven temperatures can vary significantly. If your breads are browning too quickly or seem undercooked in the center, consider investing in an oven thermometer or adjusting your oven’s temperature slightly based on past baking experiences.
Inspiring Serving Ideas for Your Almond Bread:
These versatile individual almond breads are delightful on their own, but they truly shine when paired with various toppings and fillings. Get creative with how you enjoy them:
- Classic Toasted Perfection: Slice them in half and toast until golden and slightly crispy. They make an excellent base for creamy avocado, your favorite nut or seed butter, or a dollop of sugar-free fruit jam.
- Gourmet Mini Sandwiches: Their convenient individual size is perfect for creating slider-style sandwiches. Fill them with plant-based cheese and deli slices, or a vibrant mix of hummus and fresh vegetables.
- Savory Enhancements: Elevate your bread by spreading it with dairy-free cream cheese and a sprinkle of everything bagel seasoning. These rounds also make a wonderful accompaniment to hearty soups or fresh salads.
- Sweet Breakfast or Snack: For a subtly sweet treat, add a dash of cinnamon to the dough or drizzle the baked bread with a touch of sugar-free maple syrup. They pair wonderfully with a cup of coffee or tea.
- Portable Power Snack: Grab one as a quick, energizing snack on your way out the door, perfect for pre- or post-workout fuel.
Optimal Storage and Meal Prep Tips
These keto vegan almond breads are an absolute dream for meal preparation, allowing you to enjoy healthy, homemade bread throughout the week with minimal effort. Here’s how to store them to maintain maximum freshness:
- Refrigerator Storage: Once completely cooled, place the individual bread rounds in an airtight container. They will stay fresh and retain their lovely texture in the refrigerator for up to 5 days, making them perfect for weekday lunches or breakfasts.
- Freezer Storage: For extended preservation, these breads freeze beautifully. Arrange the cooled breads in a single layer on a baking sheet to freeze solid, then transfer them to an airtight freezer-safe bag or container. They can be stored in the freezer for up to 3 months. To enjoy, simply thaw them at room temperature or reheat gently in a toaster, oven, or microwave.
Frequently Asked Questions (FAQs)
Can I substitute psyllium husk with other binders like flaxseed meal or chia seeds?
While flaxseed meal and chia seeds can act as binders in some recipes, they do not possess the same unique gelling and structural properties as psyllium husk. Psyllium is crucial for achieving the light, cohesive, and non-crumbly texture of this almond bread. Therefore, we highly recommend sticking to psyllium husk for this particular recipe.
What should I do if my dough is too sticky or too dry?
The absorption rate of psyllium husk can sometimes vary slightly depending on the brand and how finely it’s ground. If your dough feels excessively sticky, you can try adding a very small amount of almond flour (start with 1 tablespoon) until it’s more manageable. Conversely, if the dough appears too dry and crumbly, add a teaspoon or two of cold water until it becomes pliable and easy to handle. The ideal consistency is light and springy.
Is it possible to bake this recipe as a larger loaf instead of individual rounds?
This particular recipe is specifically formulated and optimized for baking in individual portions within a muffin tin. This method ensures even baking and helps maintain the bread’s delicate structure. We are currently developing and rigorously testing recipes for larger, full-sized loaves using similar ingredient profiles. Until those are perfected, we recommend enjoying the convenience and consistent results of these delicious individual bread rounds.
Can I add extra flavorings or seeds to the dough?
Absolutely! This almond bread provides a wonderful neutral canvas for customization. Feel free to experiment with various additions to suit your taste. For a savory twist, consider incorporating a tablespoon of dried herbs like rosemary or thyme, a pinch of garlic powder, or some Everything Bagel seasoning. For a touch of sweetness (while remaining sugar-free), a dash of cinnamon or a tiny amount of your favorite keto-friendly sweetener could be added.
More Easy, Grain-Free & Vegan Breads to Love:
- 2-Ingredient Lentil-Flax Bread (Vegan, Oil-Free, Grain-Free)
- Chickpea Flour Beer Bread (3 Ingredients, Oil-Free, Vegan)
- Coconut Flour Bread (4 Ingredients, Oil-Free, Vegan, Keto, Paleo)
- Almond Flour Soda Bread (Oil-Free, Grain-Free, Vegan, Paleo)
- 2-Ingredient Flax Sandwich Bread (Vegan, Keto, Grain-Free)
- 5-Ingredient Lentil Sandwich Bread (Grain-Free, Vegan)
- Fluffy Red Lentil Bread (Grain-Free, Vegan)
- Chickpea Flour Sandwich Bread (Vegan, Grain-Free, 5 Ingredients)
3-Ingredient Keto Vegan Almond Bread {Grain-Free, Gluten-Free, Easy}
By: Camilla
Individual grain-free, vegan, and oil-free bread rounds crafted with almond meal or almond flour. This simple recipe requires no other flours, starches, or flax, delivering versatile and delicious bread in about half an hour.
Prep Time: 5 minutes
Cook Time: 25 minutes
Total Time: 30 minutes
Servings: 9 individual breads
Print Recipe
Ingredients
- 2/3 cup cold water
- 2 teaspoons whole psyllium husks
- 1 2/3 cups almond flour (or almond meal)
- 2 teaspoons baking powder (ensure certified GF if needed)
- Optional: 1/4 teaspoon fine sea salt
Instructions
- Preheat oven to 350°F (180°C). Prepare 9 cups of a standard size muffin tin by lining them with silicone, foil, or paper liners. For non-oil-free baking, you may alternatively grease or spray the cups with nonstick cooking spray.
- In a small bowl or cup, combine the water and psyllium husks; let stand for 10 minutes to thicken and form a gel.
- In a medium bowl, whisk together the almond flour, baking powder, and salt. Stir in the water-psyllium mixture until a uniform dough is blended.
- Divide the dough into 9 equal portions (approximately 3 tablespoons each) and shape each into a patty about the size of the muffin cup. Place these patties into the prepared muffin cups.
- Bake in the preheated oven for 27 to 30 minutes, or until the centers are just set and firm to the touch.
- Transfer the muffin tin to a wire rack and let the breads cool in the tin for 10 minutes. Then, carefully remove the breads from the cups. Serve warm, at room temperature, or chilled.
Notes
Storage: Store these individual breads in an airtight container in the refrigerator for up to 5 days, or freeze for up to 3 months for longer preservation. They thaw beautifully and can be reheated gently.
Nutrition Information (per serving)
- Serving: 1 bread round
- Calories: 122 kcal
- Carbohydrates: 5.3g
- Protein: 4.5g
- Fat: 10.4g
- Saturated Fat: 0.7g
- Sodium: 173mg
- Fiber: 2.7g
- Sugar: 0.7g
Loved this recipe? Share your thoughts and rate it below! Your feedback helps us create more amazing content for healthy, simple baking.