
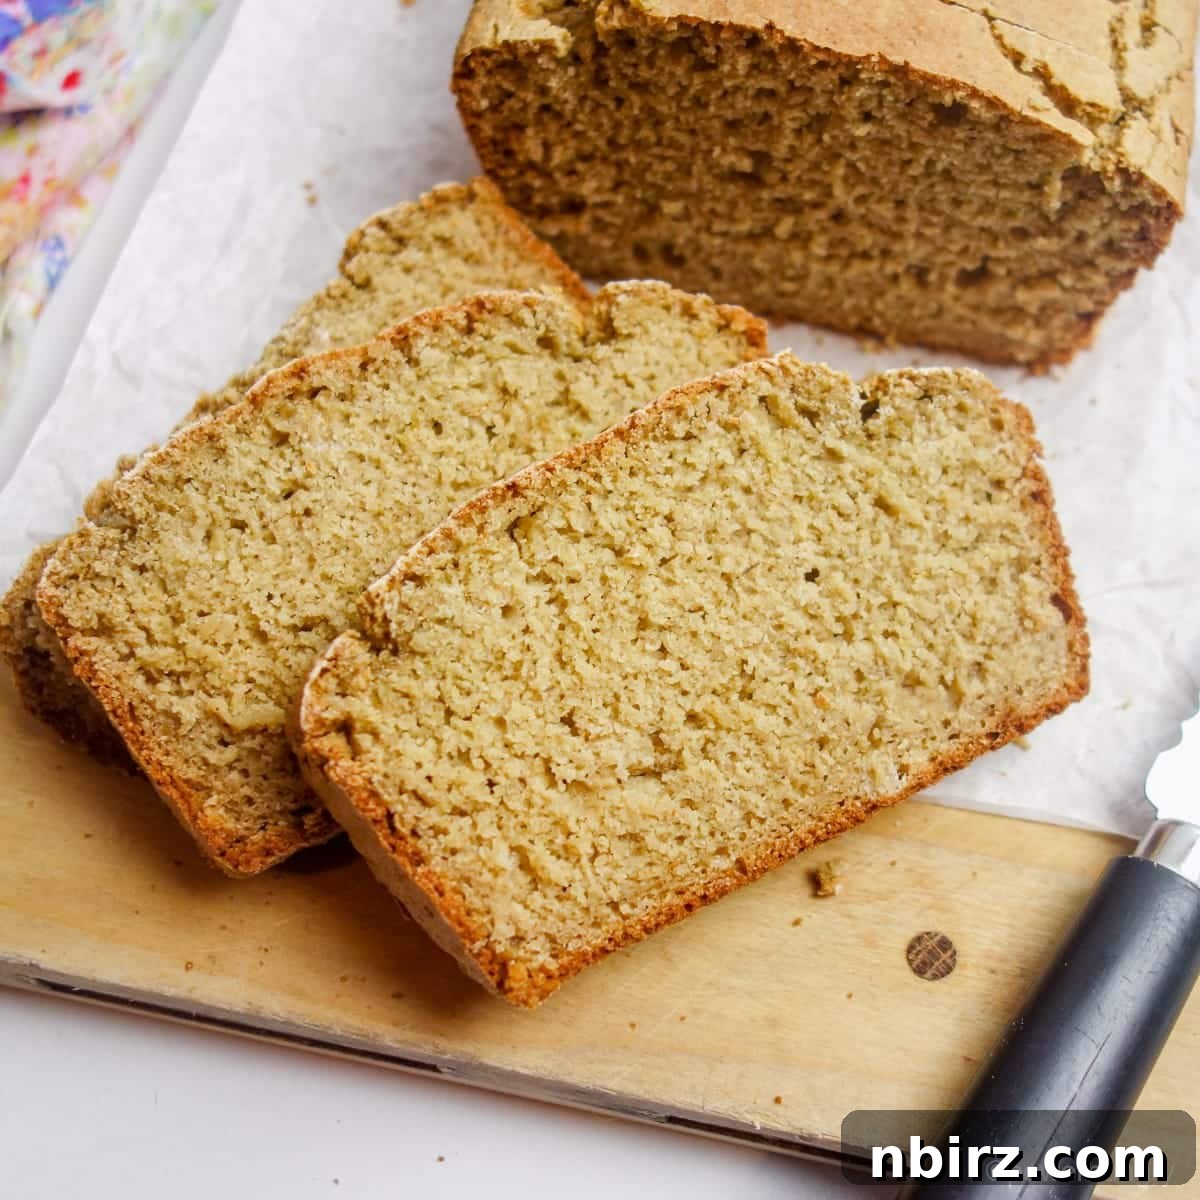
Welcome to the easiest and most delicious journey into homemade bread! Introducing a truly remarkable 4-ingredient 100% oat flour bread that will revolutionize your kitchen. This recipe is a testament to simplicity and flavor, delivering a hearty, wholesome loaf that caters to a wide range of dietary needs without compromising on taste or texture. Forget the complexities often associated with bread baking; this recipe is designed for effortless success, making it perfect for both novice bakers and seasoned enthusiasts alike.
Crafted with just four basic ingredients, this oat flour bread is a culinary marvel. It’s naturally vegan, free from eggs and dairy, ensuring everyone can enjoy a slice. For those with sensitivities, it proudly stands as gluten-free, oil-free, yeast-free, and nut-free, making it an incredibly inclusive option. There’s no need for complicated steps or specialized equipment. Whether you prefer to use readily available pre-made oat flour or wish to effortlessly grind your own in mere seconds using rolled oats and a blender, this recipe has you covered.
Imagine a warm, rustic loaf, fresh from the oven, filling your home with an inviting aroma. This isn’t just a simple quick bread; it’s a versatile foundation for countless meals and snacks. Enjoy it plain, savor it in robust sandwiches, toast it for a delightful morning treat, or serve it as a wholesome accompaniment to your favorite dinner. Its hearty texture and subtly nutty flavor make it satisfying on its own, yet perfectly adaptable to any topping or spread you desire. If oat flour isn’t a pantry staple for you yet, don’t worry—we’ll guide you through making your own from ordinary rolled oats, turning a simple grain into a superfine flour ideal for baking. Get ready to bake a loaf that will quickly become a beloved staple in your home!
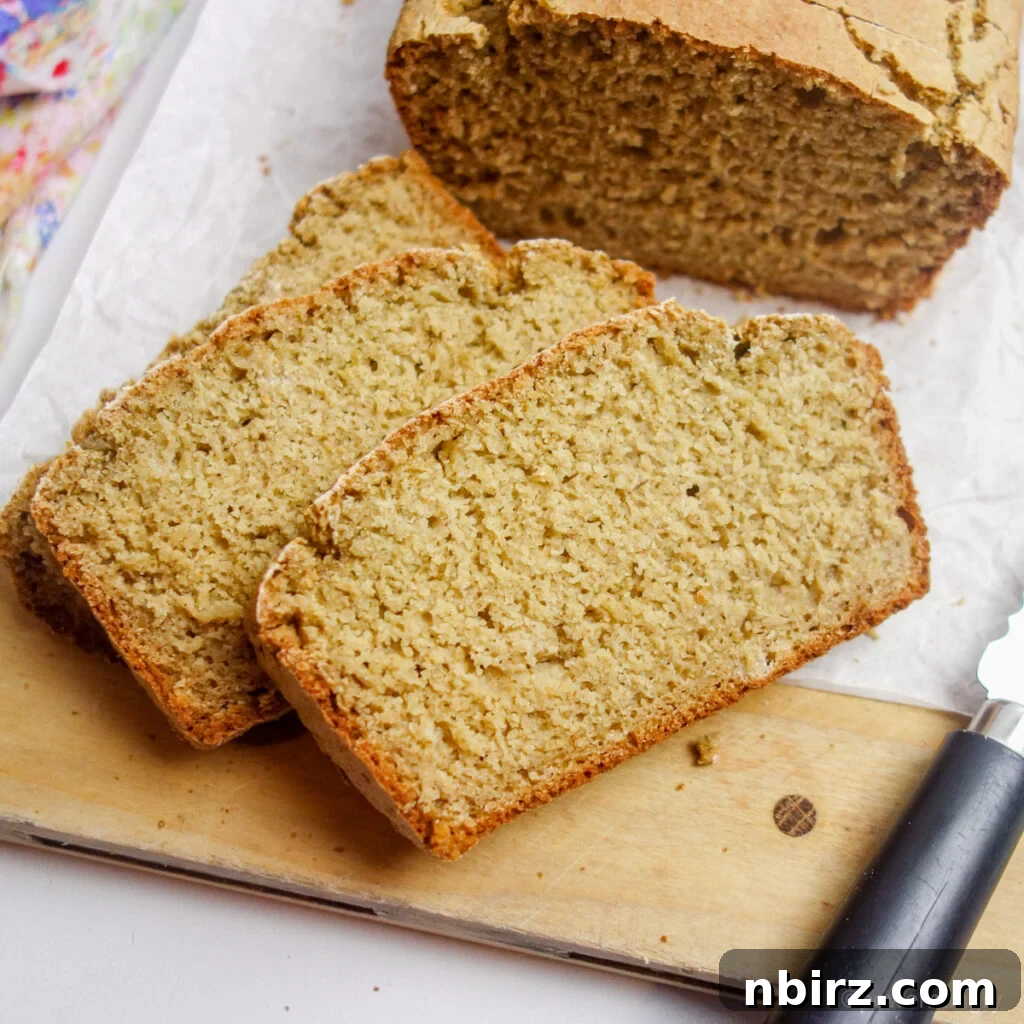
Why You’ll Love This Oat Flour Bread: Recipe Benefits Unpacked
This vegan oat flour bread isn’t just delicious and satisfying; it’s packed with an array of benefits that make it an exceptional choice for any lifestyle. Here’s a closer look at what makes this recipe truly special:
- Minimalist 4 Humble Ingredients: Who knew such a delicious loaf could be made with so few ingredients? This simplicity means less shopping, less fuss, and a more straightforward baking process. It proves that wholesome food doesn’t require a long ingredient list.
- Vegan (Egg-Free, Dairy-Free): Perfect for those following a plant-based diet or managing egg and dairy allergies. This bread achieves its wonderful texture and flavor entirely from plant-derived components.
- Gluten-Free: Made with 100% oat flour, this bread is naturally gluten-free. Just ensure you use certified gluten-free oats or oat flour if cross-contamination is a concern for severe gluten sensitivities. Oats are a fantastic, nutrient-dense alternative to traditional wheat.
- Oil-Free: By omitting added oils, this recipe keeps things light and heart-healthy without sacrificing moisture or tenderness. The natural fats in the oat flour provide ample richness.
- Yeast-Free: Say goodbye to long proofing times and the need for active yeast! This quick bread uses baking soda and an acid (vinegar) for its rise, meaning you can mix the batter and have it in the oven almost immediately, making it incredibly time-efficient.
- Nut-Free: A safe option for individuals with nut allergies. This bread relies solely on oat flour, making it a great choice for school lunches or gatherings where nut-free options are essential.
- Free of Added Sugar: Enjoy the pure, natural sweetness of oats without any refined or added sugars. This makes it a healthier choice for those monitoring sugar intake.
- Super Easy to Make: With straightforward instructions and minimal steps, even beginners can achieve a perfect loaf. It’s designed to be stress-free and rewarding.
- Made in One Bowl: Simplify cleanup! All the mixing happens in a single bowl, cutting down on dishes and making the baking process even more convenient.
- No Added Starches (e.g., Tapioca Starch, Potato Starch): Many gluten-free breads rely on a blend of starches for texture. This recipe uses only oat flour, allowing the wholesome goodness of oats to shine through.
- No Added Binders (e.g., Psyllium Husk or Xanthan Gum): Achieving a cohesive gluten-free loaf without traditional binders can be challenging, but this recipe masterfully does it. The natural properties of oat flour, combined with the right liquid-to-dry ratio, create a perfectly structured bread.
- Nutrient-Rich: Each slice offers a good dose of fiber and protein, contributing to a feeling of fullness and supporting digestive health. Oats are known for their beneficial soluble fiber.
Essential Ingredients for Your 4-Ingredient Oat Flour Bread
The precise measurements for each ingredient are provided in the recipe card at the end of this article. You can easily switch between US Customary (volume) and Metric (weights) for your preferred measurement system.
Each of the four core ingredients plays a vital role in creating this remarkably simple yet delicious loaf:
- Oat Flour: This is the star of our bread! It’s what gives the loaf its wholesome, slightly nutty flavor and tender crumb.
- If you require a gluten-free loaf, it is crucial to use certified gluten-free oat flour. This prevents any cross-contamination that might occur during processing in facilities that also handle wheat.
- You can purchase pre-packaged oat flour, which is convenient, or you can easily make your own from rolled oats (see our detailed tip below for instructions). Making your own is often more economical and ensures freshness.
- Measuring Tip: For the most accurate results, especially when dealing with gluten-free flours, we highly recommend weighing your oat flour. If you don’t have a kitchen scale, spoon the oat flour very lightly into your dry measuring cups and level it off without compacting it, as compacting can lead to too much flour and a dry, dense bread.
- Non-Dairy Milk: The liquid base for our bread, providing moisture and helping to create the right batter consistency.
- Options like oat milk, soy milk, almond milk, or rice milk work beautifully. Choose your favorite unsweetened variety.
- If you do not adhere to a vegan diet, an equal amount of dairy milk can be used as a direct substitute. The key is to have an acidic liquid to react with the baking soda.
- Vinegar: This acidic ingredient is essential for activating the baking soda, creating the lift needed for the bread.
- Apple cider vinegar is my go-to choice due to its mild flavor, but any light-colored vinegar such as white vinegar or distilled vinegar will work equally well without imparting a strong taste.
- Alternatively, you can substitute an equal amount of fresh lemon juice or lime juice for the vinegar. Their acidity will achieve the same leavening effect.
- Baking Soda: Our sole leavening agent. When combined with the vinegar and moisture, it produces carbon dioxide bubbles that cause the bread to rise.
- It is critical to use baking soda, not baking powder. These are distinct ingredients with different chemical compositions and strengths. Baking soda requires an acid to activate fully, which is why the vinegar is so important in this recipe.
Salt is an optional but highly recommended ingredient. A small amount of salt enhances the natural flavors of the oats and balances the overall taste profile of the bread. Add 1/2 teaspoon for optimal flavor.
Pro Tip: Effortlessly Grind Your Own Oat Flour at Home
While ready-made oat flour is perfectly acceptable for this recipe, I find immense satisfaction in making my own from rolled oats. It’s not only significantly more cost-effective but also incredibly quick and easy, taking mere seconds with the right tools. Plus, it ensures you have the freshest oat flour possible!
To make your own oat flour, you’ll need the same weight of rolled oats as the amount of oat flour called for in the recipe (typically around 360 grams for this loaf). For those measuring by volume, this translates to approximately 3 and 2/3 lightly packed cups of old-fashioned rolled oats. Ensure you are using old-fashioned rolled oats, as quick oats can result in a slightly different texture, and steel-cut oats are too hard to grind finely enough.
The process is remarkably simple:
- Load Your Blender: Place the measured rolled oats into a high-speed blender. Make sure your blender jar is completely dry.
- Blend to Perfection: Secure the lid and process the oats on high speed. It typically takes less than 30 seconds for the oats to transform into a super-fine, powdery flour. You’ll know it’s ready when it has a consistency similar to all-purpose wheat flour.
- Food Processor Option: If you don’t have a high-speed blender, a food processor can also be used. While it might take a little longer—about a minute or two—to achieve the desired fineness, it will still yield excellent results. Pulse the oats, then process continuously, scraping down the sides as needed, until you have a smooth, fine flour.
Using freshly ground oat flour can often contribute to a wonderfully tender and moist bread, adding an extra touch of homemade goodness to your loaf.
Simple Step-by-Step Instructions to Bake Your Oat Flour Bread
Please refer to the recipe card below for the complete and detailed directions, including precise measurements.
Step One: Preheat Your Oven & Prepare Your Baking Pan
Before you begin mixing, preheat your oven to 350°F (180°C). This is a crucial step for quick breads like this oat flour loaf. Prepare a standard 9×5-inch (22.5×12.5 cm) loaf pan by spraying it thoroughly with nonstick baking spray. If you prefer not to use spray, opt for a nonstick baking pan, or line a regular loaf pan with parchment paper, leaving an overhang on the longer sides to easily lift the baked bread out.
Immediate Baking is Key: It is paramount to have your oven fully preheated and your pan ready *before* combining the wet and dry ingredients. This recipe is essentially an oat flour soda bread. The chemical reaction between the vinegar (acid) and baking soda (base) begins as soon as they mix. This reaction produces the carbon dioxide bubbles responsible for the bread’s rise. For the best lift and texture, the batter needs to get into the hot oven immediately after mixing to capture the full strength of this leavening action.
Step Two: Curdle the Milk with Vinegar
In a small measuring cup or a separate small bowl, combine the non-dairy milk and vinegar. Give it a gentle stir. Allow this mixture to stand for five minutes. During this time, the milk will visibly curdle slightly, thickening and developing tiny clumps. This “homemade buttermilk” effect enhances the bread’s texture and ensures an optimal reaction with the baking soda.
Step Three: Whisk the Dry Ingredients Together
In a large mixing bowl, combine the oat flour, baking soda, and the optional (but recommended) salt. Use a whisk to thoroughly blend these dry ingredients together. Ensure the baking soda is evenly distributed throughout the flour, as this is critical for a consistent rise and texture in the final loaf. Whisking also helps to aerate the flour, contributing to a lighter bread.
Step Four: Combine Wet and Dry Ingredients
Pour the milk-vinegar mixture into the large bowl containing your whisked dry ingredients. Using a sturdy spoon or a rubber spatula, stir the ingredients just until they are completely blended and no streaks of dry flour remain. Avoid overmixing, as this can develop gluten-like properties in oats and lead to a tougher texture. The resulting consistency will be more like a thick, pourable batter rather than a traditional bread dough.
Step Five: Transfer Batter to Pan and Bake
Immediately pour the batter into the prepared loaf pan. Use your spatula to spread the batter evenly and smooth out the top surface. As emphasized earlier, speed is important here: get the pan into the preheated oven without delay to maximize the leavening power of the baking soda and vinegar reaction.
Bake the gluten-free oat bread in the preheated oven for approximately 55 to 60 minutes. Look for visual cues of doneness: the top of the loaf should be a deep golden brown and will likely have some appealing cracks across its surface. To confirm it’s fully baked, insert a toothpick into the center of the loaf. It should come out with only a few moist crumbs attached, or completely clean.
Step Six: Cool the Bread Properly
Once baked, remove the loaf pan from the oven. Allow the bread to cool in the pan for about 15 minutes. This allows the loaf to firm up slightly before you attempt to remove it, preventing it from breaking or crumbling. After 15 minutes, carefully invert the pan to release the bread onto a wire cooling rack. Let the bread cool completely on the rack before attempting to slice it.
Important Tip: Always Cool Bread Completely Before Slicing
This tip is crucial for achieving perfect slices! While it’s tempting to cut into a warm, fragrant loaf, allowing the bread to cool completely is essential, especially for gluten-free breads. Cooling allows the internal structure of the bread to fully set, making it much easier to slice cleanly without crumbling. You’ll find that this oat flour bread is incredibly easy to cut—even into very thin slices—once it has fully cooled. In fact, it often becomes even easier to slice a day after baking, once the crust has softened slightly. Thin slices are ideal for all kinds of sandwiches, showcasing the versatility of your homemade loaf.
Frequently Asked Questions & Smart Substitutions for Your Oat Flour Bread
Here are answers to common questions and useful substitution tips to help you master this delicious oat flour bread:
- How Should This 4-Ingredient 100% Oat Flour Bread Be Stored?
- For optimal freshness, store the completely cooled bread in an airtight container at cool room temperature for up to 2-3 days.
- To extend its shelf life, transfer it to the refrigerator, where it will keep well for up to one week.
- For longer storage, this bread freezes beautifully! Slice the loaf first, then store the slices in a freezer-safe bag or container for up to six months. You can toast individual slices directly from the freezer.
- What is the Taste & Texture of the Bread?
- This oat flour bread boasts a distinct wholesome, nutty flavor that is incredibly appealing. It’s delightful on its own, but truly exceptional when toasted, which brings out even more of its inherent richness.
- The texture is tender and slightly dense, yet surprisingly light for a 100% oat flour loaf, without being crumbly. It has a satisfying chew that makes it perfect for substantial sandwiches.
- Does the Bread Slice Easily?
- Yes, absolutely! Once fully cooled, the bread slices remarkably well. In fact, you might find it even easier to achieve very thin, clean slices after a day of storage, as the crust softens slightly. These thinner slices are perfect for crafting all sorts of sandwiches, from savory to sweet.
- Can I Use Something Other Than Oat Flour?
- This recipe has been specifically developed and tested using 100% oat flour. Oat flour has unique absorption and binding properties that are crucial for the success of this particular loaf, especially since it doesn’t use additional starches or binders.
- Therefore, I cannot recommend substituting other gluten-free flour blends or single gluten-free flours (like almond flour, rice flour, or tapioca starch) as they would drastically alter the texture and outcome. If you are seeking bread recipes that utilize different flours, I encourage you to explore other options on PowerHungry® using the site’s search function.
- Can I Use Water in Place of Non-Dairy Milk?
- Yes, you can substitute water for the non-dairy milk. The bread may turn out marginally tougher or have a slightly less rich flavor profile, but it will still be delicious and rise correctly.
- It is vital to remember that even if you use water, you must still add the vinegar (or lemon/lime juice), as the acid is essential for activating the baking soda and achieving the necessary rise.
- What Can I Use in Place of the Vinegar?
- If you don’t have vinegar on hand, an equal amount of fresh lemon juice or lime juice will work perfectly as a substitute in this oat bread. Their acidity will provide the necessary reaction with the baking soda.
- Is This a High-Rising Bread?
- No, this is not a high-rising loaf. As you can observe in the photos of the finished bread, it produces a rustic, relatively low-profile loaf. The beauty of this bread lies in its simple ingredients, quick preparation, and wholesome texture, rather than achieving a dramatically tall rise.
- Chopped Nuts or Seeds: Enhance the texture and add healthy fats by mixing in a handful (about 1/4 to 1/2 cup) of your favorite chopped nuts or seeds. Great options include walnuts, pecans, sunflower seeds, pumpkin seeds (pepitas), hemp hearts, sesame seeds, or poppy seeds. These add a satisfying crunch and extra nutritional value.
- Dried Fruit: Introduce a touch of natural sweetness and chewiness with dried fruits. Stir in a handful (about 1/4 to 1/2 cup) of dried currants, dark or golden raisins, dried cranberries, finely chopped dried apricots, dried blueberries, or dried cherries. This is particularly wonderful for a breakfast or snack bread.
- Chocolate: For a decadent twist, fold in 1/2 cup of chocolate chips (dairy-free for vegan option) or chopped chocolate. The warmth of the bread will slightly melt the chocolate, creating pockets of gooey goodness.
- Herbs, Spices, or Extracts: Infuse your bread with aromatic flavors. Add about a teaspoon of ground cinnamon, a hint of vanilla extract, a teaspoon of caraway seeds for a classic rye-like essence, or finely grated citrus zest (such as lemon zest, orange zest, or lime zest) for a bright, fresh note. For a savory loaf, consider dried rosemary or a blend of Italian herbs.
- Sweetener: If you desire a slightly sweeter bread, you can incorporate a tablespoon or two of a natural sweetener into the batter. Options include coconut sugar, brown sugar, maple syrup, or molasses. This will make it even more delightful for breakfast or dessert.
- Rustic Irish Oat Scone Bread (Vegan, Gluten-Free, Oil-Free)
- Vegan Gluten-Free Oat Sandwich Bread (Oil-Free, Yeast-Free)
- Vegan Chickpea Flour Soda Bread (Oil-Free, Grain-Free)
- Quinoa Flour Almond Flour Soda Bread (Vegan, Oil-Free, GF)
- 3-Ingredient Vegan Oat Muffins (Gluten-Free, Oil-Free, Sugar-Free)
- 4-Ingredient Vegan Power Bread (Oil-Free, GF)
- 1.5 cups non-dairy milk (or dairy milk, if not vegan)
- 1.5 tablespoons light colored vinegar (such as apple cider vinegar, or fresh lemon/lime juice)
- 3 cups oat flour (certified gluten-free, as needed, see notes for DIY option)
- 1 teaspoon baking soda
- Optional: 1/2 teaspoon salt (for enhanced flavor)
- Preheat oven to 350F (180C). Lightly spray a 9×5-inch (22.5×12.5 cm) loaf pan with nonstick cooking spray, or line it with parchment paper for easy removal.
- In a small bowl or measuring cup, combine the non-dairy milk and vinegar. Let it stand for 5 minutes to curdle slightly.
- In a large mixing bowl, whisk together the oat flour, baking soda, and optional salt until well blended and lump-free.
- Add the curdled milk-vinegar mixture to the dry ingredients. Stir with a spoon or rubber spatula until the batter is completely blended and smooth. Do not overmix.
- Immediately pour the batter evenly into the prepared loaf pan, smoothing the top with your spatula.
- Bake in the preheated oven for 55 to 60 minutes, or until the loaf is deep golden brown, has some cracks on top, and a toothpick inserted near the center comes out with only a few moist crumbs attached (or clean).
- Remove the pan from the oven and let the bread cool in the pan for 15 minutes. Then, carefully remove the loaf from the pan and transfer it to a wire cooling rack. Allow it to cool completely before slicing.
- Storage: Store cooled oat bread in an airtight container at room temperature for up to 3 days, in the refrigerator for up to 1 week, or in the freezer for up to 6 months.
- DIY Oat Flour: To make your own oat flour, simply blend 360 grams (approximately 3.67 lightly packed cups) of old-fashioned rolled oats in a high-speed blender or food processor until it reaches a super-fine, powdery consistency.
- Vinegar Options: Any light-colored vinegar (e.g., white vinegar) can be used, or an equal amount of fresh lemon juice or lime juice.
Happy baking!
Delicious Flavor Variations for Your Oat Flour Bread
While this humble oat flour bread is absolutely fantastic on its own, it also serves as an excellent canvas for creativity. Feel free to add some “fanciness” and personalize your loaf with these delightful additions. Remember to fold them into the batter just before transferring it to the loaf pan:
Related Quick Bread Recipes You Might Enjoy
4-Ingredient 100% Oat Flour Bread (Vegan, Gluten-Free, Oil-Free)
By: Camilla
Easy-as-can-be 4 ingredient 100% oat flour bread! It is vegan, oil-free, gluten-free, yeast-free, and nut-free. Use pre-made oat flour or grind your own, in seconds, with your blender (using rolled oats).
Prep Time: 8 minutes
Cook Time: 1 hour
Total Time: 1 hour 8 minutes
Servings: 1 loaf (approximately 14 slices)
Print Recipe
Ingredients
Instructions
Notes
Nutrition
Serving: 1 slice | Calories: 96kcal | Carbohydrates: 16g | Protein: 3g | Fat: 2g | Polyunsaturated Fat: 2g | Sodium: 95mg | Fiber: 2g | Sugar: 1g