
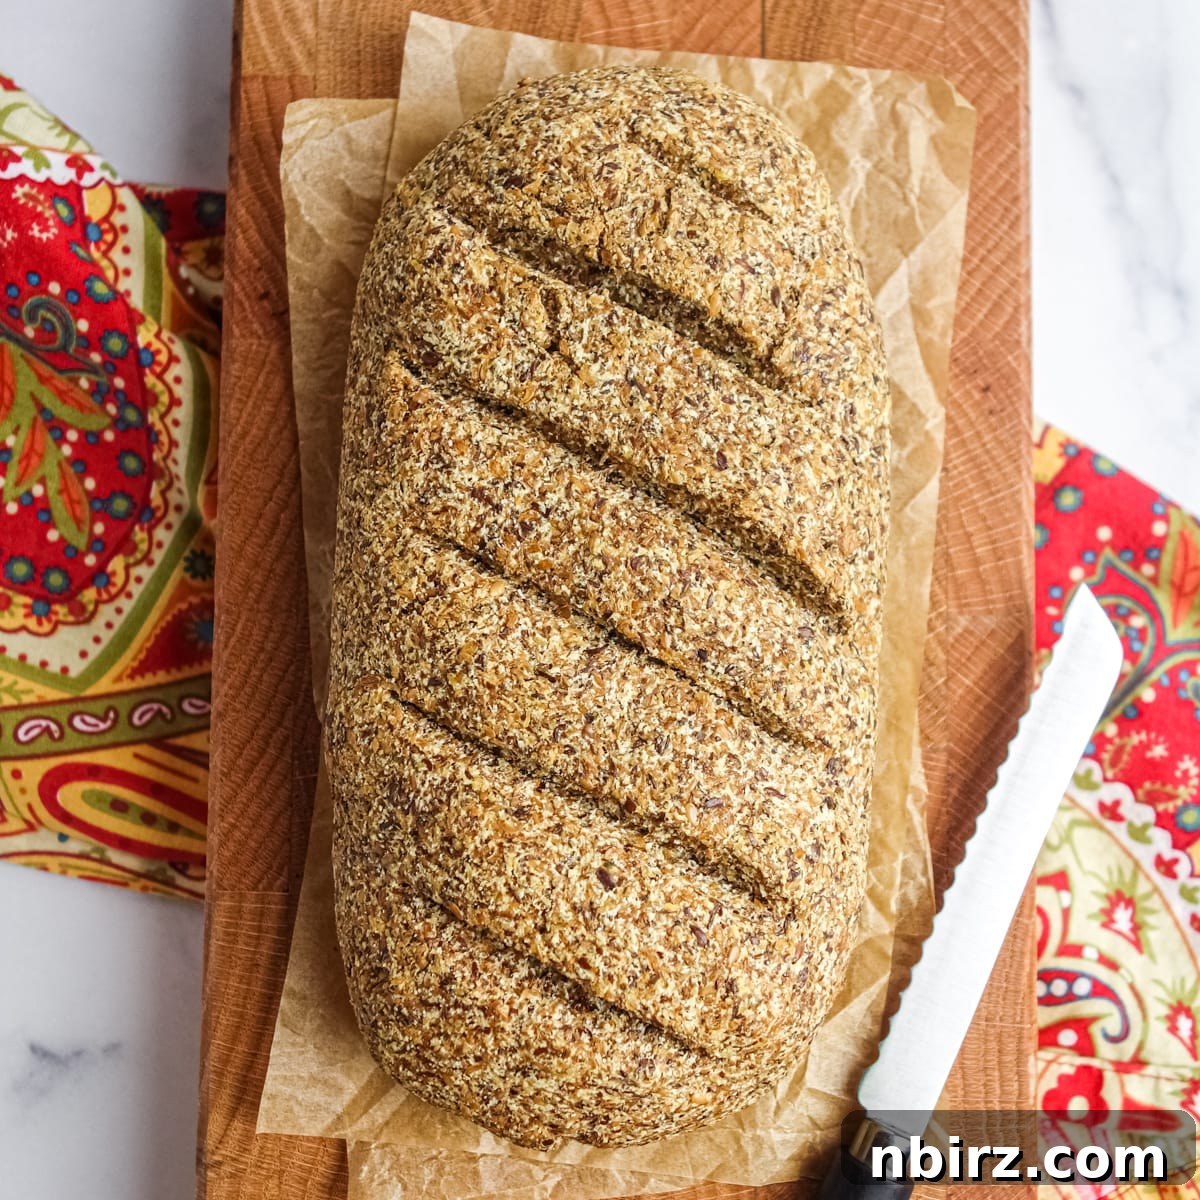
Embark on a delightful baking journey to create the **BEST loaf of gluten-free, vegan bread** you’ve ever tasted. This recipe promises ease, affordability, and results that will truly impress. Our signature vegan coconut flour flax bread achieves a wonderfully soft, tender, and authentic “bready” texture, reminiscent of traditional wheat bread, but without any of the common allergens or dietary restrictions. What’s more, this remarkable loaf is entirely oil-free, yeast-free, and sugar-free, offering a wholesome option with a generous 4 grams of protein and 5 grams of fiber per slice. Say goodbye to dense, crumbly gluten-free alternatives and welcome a truly satisfying bread into your kitchen!
Bake the Best Vegan & Grain-Free Gluten-Free Bread You’ll Ever Taste
Are you tired of settling for gluten-free, vegan bread that’s merely “acceptable” at best? Many commercial and homemade versions often fall short, resulting in loaves that are either too dense, too crumbly, or lacking the classic texture we all crave. But what if we told you there’s a simple, straightforward recipe that yields a loaf destined to dazzle, amaze, and delight your taste buds? We mean it. This humble, yet incredibly beautiful, loaf of bread is designed to become your ultimate go-to, everyday bread. It’s not just good; it’s truly GREAT!
Beyond its exceptional taste and texture, this satisfying loaf is also a dream to prepare. With approximately 5 minutes of active effort for mixing and shaping, it requires absolutely no previous baking experience. Following the tradition of classic bread making, this is also an incredibly **frugal** recipe. It calls for minimal, readily available ingredients, allowing you to bake it day in and day out without straining your budget. Experience the joy of fresh, homemade bread that truly feels like a culinary triumph!
Unveiling the Remarkable Benefits of This Recipe
There are countless compelling reasons to whip up a loaf of this vegan coconut flour flax bread as soon as humanly possible. This isn’t just any bread; it’s a powerhouse of nutritional benefits and a testament to simple, delicious baking. Here’s why this recipe stands out:
- **100% Vegan:** Completely free from eggs and dairy, making it perfect for plant-based diets and those with related allergies.
- **High Protein Content:** Each slice delivers 4 grams of protein, contributing to satiety and muscle health, an often-missing component in gluten-free bread.
- **Grain-Free & Gluten-Free:** Ideal for individuals following paleo, keto-friendly, or specific allergy diets, offering a safe and delicious option.
- **Oil-Free:** Achieves a wonderful texture without any added oils, making it a lighter, heart-healthy choice.
- **Nut-Free:** A safe bet for those with nut allergies, broadening its accessibility for many households.
- **Yeast-Free:** No need to fuss with yeast activation or long proofing times, simplifying the baking process immensely.
- **Sugar-Free:** Contains no added sugars, making it suitable for managing blood sugar levels and promoting a healthier diet.
- **Rich in Fiber:** With 5 grams of fiber per slice, it supports digestive health and keeps you feeling fuller for longer.
- **Quick & Easy Preparation:** Requires minimal effort – just one bowl and approximately 5 minutes of total hands-on prep time.
- **Minimal Ingredients:** Made with just 5 core ingredients, plus water and optional salt, proving that incredible taste doesn’t require complexity.
This bread slices beautifully, whether you prefer thick, hearty cuts or thin, delicate pieces, making it incredibly versatile. It also transforms into exceptional toast, perfect for complementing any breakfast or snack.
Key Ingredients for Your Vegan Coconut Flour Flax Bread
The brilliance of this loaf lies in its minimal and cost-effective ingredient list. Each component plays a crucial role in achieving the desired texture and flavor. The exact amounts for each ingredient are provided in the recipe card at the end of this post, where you can easily toggle between US Customary (volume) and Metric (weights) for your preferred measurement option.
Here’s a closer look at what you’ll need:
- **Coconut Flour:** This is a uniquely absorbent, delicately sweet, and naturally gluten-free flour derived from the coconut fiber that remains after coconut milk extraction. It’s then dried and finely ground. Its high fiber content and low fat make it an incredible ingredient for baking, especially in gluten-free recipes where it provides structure and a subtle, pleasant sweetness. Due to its exceptional absorbency, coconut flour cannot be directly substituted with other flours; it requires very specific ratios of liquid.
- **Flaxseed Meal:** Also known as ground flaxseeds, this ingredient is vital for creating the perfect binding and structure in this vegan, egg-free bread. Flaxseed meal, when combined with water, forms a gel-like consistency that acts as a natural binder. You can use any variety you prefer; golden flaxseed meal tends to produce a lighter-colored and milder-flavored loaf, while darker (regular) flaxseed meal offers a slightly more robust, wholesome taste. The neutral, subtly sweet flavor of coconut flour beautifully balances the earthy notes of flax.
- **Baking Soda:** This is our primary leavening agent. It reacts with an acidic component (like the cider vinegar) to produce carbon dioxide bubbles, which are essential for the bread’s rise and tender crumb. It is crucial to use baking soda, and *not* baking powder, as they have vastly different strengths and react differently. Using an equal amount of baking powder will not yield the same excellent rise and texture.
- **Whole Psyllium Husks:** These are the outer layers of psyllium seeds, renowned for their incredible absorbency and ability to form a thick gel when mixed with water. In gluten-free and egg-free baking, whole psyllium husks are indispensable. They provide critical structure, elasticity, and moisture retention that would otherwise be lacking without gluten or eggs. Without them, the bread would likely be crumbly and fall apart. It is imperative to use *whole psyllium husks*, not psyllium powder, as the powder behaves differently and will not yield the correct results.
- **Cider Vinegar:** We recommend apple cider vinegar, but any light-colored vinegar will work just as effectively. Alternatively, an equal amount of fresh lemon juice can be used. The vinegar acts as an acid, which is essential to activate the baking soda and initiate the chemical reaction that causes the bread to rise. It also subtly enhances the flavor profile.
You will also need some regular tap water to bring the dough together. We like to add a touch of salt to the dough (about 1/4 teaspoon is just right for most palettes), but it is entirely optional and can be adjusted to suit your personal dietary needs and taste preferences.
The Secret to a Fine Texture: Double Grind Your Flaxseed Meal
When you purchase flaxseed meal, it typically comes as a somewhat coarse product—whole flax seeds ground to an irregular consistency. While this gives some loaves a rustic, wholesome texture, similar to a dense whole wheat bread, we’re aiming for something more refined and tender here.
Achieving an extra-fine textured loaf is surprisingly simple: give your flaxseed meal an additional grind. You can easily do this in a high-speed blender or a dedicated clean coffee grinder. Process the meal until it transforms into a light, fluffy, and uniformly fine flour. This step is absolutely crucial for the final texture of your bread, ensuring it’s tender and not gummy.
**Important Note on Measuring:** If you are using cup measures, make sure to measure the amount of flaxseed meal needed for the recipe *before* you grind it further. Grinding significantly increases its volume, so a cup of pre-ground flaxseed meal will be much less dense than a cup of finely ground flaxseed flour. For the utmost accuracy, especially with gluten-free baking, we highly recommend using a digital kitchen scale to weigh your ingredients. This ensures consistent results every time.
**Do not skip this step.** It might seem like a minor detail, but the success of this bread recipe hinges on finely ground flax. If the flax is not ground into a fine flour, the bread will not form correctly and will likely turn out gooey or overly dense.
Step-by-Step Instructions for Baking Perfection
Baking this phenomenal bread is straightforward and rewarding. Follow these detailed instructions to ensure a perfect loaf every time. Remember, the complete and precise directions are also available in the recipe card at the bottom of this page.
Step One: Prepare Your Oven & Baking Pan
Before you even begin mixing, preheat your oven to 350°F (180°C). Allowing your oven to fully preheat ensures that the bread starts baking at the correct temperature immediately, which is vital for proper rise and crust development. Next, prepare a large baking sheet. Line it with parchment paper for easy removal and cleanup. If you don’t have parchment paper, you can lightly spray the baking sheet with a nonstick cooking spray.
Step Two: Whisk the Dry Ingredients
In a medium or large mixing bowl, combine all of your dry ingredients: the finely ground flaxseed meal, coconut flour, whole psyllium husks, and baking soda. Whisk them thoroughly until they are completely blended and evenly distributed. If you are including salt, whisk it in at this stage as well. Proper whisking ensures that the leavening agent and other key ingredients are dispersed throughout the dough, guaranteeing a consistent texture and rise.
Step Three: Incorporate the Wet Ingredients
Now, add the measured water and cider vinegar (or lemon juice) to the bowl with your dry ingredients. Using a sturdy rubber or silicone spatula, or a wooden spoon, mix vigorously until all the ingredients are completely combined and form a cohesive dough. It’s important to note that this dough will be very thick and quite stiff. You will need to stir thoroughly, scraping the sides and bottom of the bowl to ensure no dry pockets remain. **It is crucial to avoid the temptation to add more water.** Adding extra water will result in a gooey, unappetizing loaf that won’t hold its shape or texture properly. Trust the recipe; the dough’s thickness is intentional.
Step Four: Shape Into a Loaf
Once your dough is thoroughly mixed, use your clean hands to press and shape it into a smooth, even ball. Then, carefully transfer it to the prepared baking sheet. Gently roll and press the ball into a rounded, oblong loaf. Aim for the following dimensions to ensure even baking and a beautiful artisan look:
- **Length:** Approximately 8 inches (20 cm)
- **Width:** Around 3.5 inches (8.75 cm)
- **Height:** Between 1.5 to 2 inches (3.75 to 5 cm)
Using a sharp knife, make at least 3 distinct diagonal slashes across the top of the bread. These slashes should be about 1/4 inch to 1/2 inch thick. These cuts are not just for aesthetics; they serve a functional purpose by allowing steam to escape as the bread bakes, which prevents the crust from cracking unevenly and helps achieve a better rise.
Step Five: Bake Your Loaf to Perfection
Place the prepared baking sheet with your shaped loaf into the preheated oven. Bake for approximately 75 to 80 minutes. The baking time can vary slightly depending on your oven, so keep an eye on it. The bread is done when its surface appears dry and has developed a deep golden brown color. If you used golden flaxseed meal, the color might be slightly less dark, but it should still be noticeably browned and firm to the touch. The internal temperature, if checked with a thermometer, should register around 200-210°F (93-99°C).
Once baked, carefully remove the bread from the oven. Allow it to cool on the baking sheet for 10 minutes. This initial cooling period allows the bread to set further and makes it easier to handle. After 10 minutes, gently slide the loaf onto a wire cooling rack to cool completely. Cooling on a rack ensures air circulation around the entire loaf, preventing the bottom from becoming soggy and helping to develop a perfect crust. Isn’t this a truly beautiful, artisanal-looking loaf? The modest, yet noticeable, rise coupled with the artfully opened slashes creates an impressive presentation.
Step Six: Slice & Savor Your Homemade Bread
Once the bread has cooled completely, transfer it to a cutting board. Now comes the best part: slicing! Cut the loaf as thick or as thin as you like. We typically cut our loaves into about 14 thick slices, which are perfect for sandwiches or hearty toast, but feel free to customize according to your preference. Enjoy the incredible taste and texture of your freshly baked, homemade vegan gluten-free bread!
Frequently Asked Questions About This Recipe
Here are some common questions about baking and enjoying this delicious vegan coconut flour flax bread:
- **What is the Taste & Texture of the Bread?** The taste and texture are truly what make this bread exceptional. The flavor is wonderfully neutral yet wholesome, reminiscent of a light whole wheat bread. There’s also a delicate hint of sweetness imparted by the coconut flour, which complements the overall profile beautifully. The texture is the real showstopper: incredibly tender, fluffy, and unmistakably *bready*. This is not a compromise loaf or an “ersatz” substitute; it is 100% satisfying bread that will exceed your expectations for gluten-free and vegan baking.
- **How Should I Serve Vegan Coconut Flour Flax Bread?** Consider this your ultimate versatile bread – your new go-to, goes-with-everything loaf! It’s the perfect bread to reach for at breakfast, whether toasted and topped with your favorite spreads (like jam, nut butter, or avocado), or served alongside a savory vegan scramble. At lunchtime, it makes fantastic sandwiches, holding up beautifully to various fillings. Come dinner time, it pairs wonderfully with any and all entrees, from hearty stews to fresh salads. And don’t forget about those between-meal cravings: a single slice is wonderfully satisfying, energizing, and, most importantly, utterly delicious, whether enjoyed plain or topped with hummus, dairy-free cream cheese, or anything else you can imagine.
- **Can I Use Other Ingredients in Place of Coconut Flour & Flaxseed Meal?** No, unfortunately, neither the coconut flour nor the flaxseed meal can be replaced with other ingredients in this recipe. This bread’s unique structure and texture are entirely dependent on the specific properties of these two flours. Coconut flour, in particular, is used in substantially different quantities compared to almost every other flour (gluten-free or otherwise) due to its extremely high absorbency. It has many idiosyncrasies that make direct substitutions impossible without completely re-engineering the recipe. For the best and most reliable results, it is imperative to stick to the ingredients as specified.
- **Can I Make the Dough in Advance?** We do not recommend preparing the dough too far in advance. The baking soda, our primary leavening agent, starts to react as soon as it comes into contact with the acidic vinegar and water. If the dough sits for too long, the baking soda will lose its potency, resulting in a less airy and risen loaf. Thankfully, the dough comes together incredibly quickly – in just about 5 minutes – so there’s really no significant advantage to making it ahead of time.
- **How Should I Store the Vegan Coconut Flour Flax Bread?** To maintain its freshness, store the bread in an airtight container. It will keep well at cool room temperature for up to 2 days. For longer storage, you can keep it in the refrigerator for up to 1 week. If you wish to enjoy it for an extended period, the bread freezes beautifully for up to 3 months. To thaw, simply let it come to room temperature or toast slices directly from frozen.
- **Can I Use Something Other than Whole Psyllium Husks?** As mentioned in the ingredient section, there are no suitable substitutes for whole psyllium husks in this recipe. Whole psyllium husks provide a unique binding and structural component that psyllium powder or other binders cannot replicate effectively. Using psyllium powder, for instance, has been tested and does not yield successful results, often leading to a gummy texture. Please ensure you use whole psyllium husks for the integrity of this recipe.
Expert Tips for Baking Success
To ensure your vegan gluten-free coconut flour flax bread turns out perfectly every single time, keep these essential tips in mind:
- **Preheat Your Oven Thoroughly:** Always make sure your oven is fully preheated to 350°F (180°C) before you even begin mixing the bread dough. While it might take 10 to 15 minutes for your oven to reach the correct temperature, the dough itself only takes about 5 minutes to mix and shape. Starting with a perfectly preheated oven ensures that the leavening agents activate correctly and the crust begins to form immediately, leading to an optimal rise and texture.
- **Measure Your Flours with Precision:** Accurate measurement is paramount in all baking, but especially so with gluten-free flours like coconut flour and finely ground flaxseed meal, which have unique absorbency properties. The best way to measure flours is to lightly spoon them into your measuring cups and then level them off, avoiding packing the flour down. For the greatest accuracy and consistent results, we highly recommend using a digital kitchen scale to weigh your ingredients. The recipe card below provides weights in grams for this purpose.
- **Follow the Recipe Exactly as Written:** This recipe has undergone extensive testing, involving at least a dozen rounds with various ingredient ratios and methods, to achieve its perfect balance and consistent results. While the final recipe is wonderfully simple to follow, it is crucial that all instructions, from ingredient preparation to baking times, are followed precisely as written. Deviating from the recipe may compromise the texture and outcome of your bread.
- **Finely Grind the Flaxseed Meal – This is Critical!** We cannot stress this enough: the flaxseed meal *must* be ground into a fine, flour-like consistency, as instructed in the “Double Grind the Flax” section. This step is absolutely essential for achieving the tender, “bready” texture. If this step is not followed, and the flaxseed meal remains coarse, your bread will almost certainly come out with an unpleasantly gooey and dense interior. Take the extra minute to ensure your flax is properly ground!
Happy Baking! We’re confident you’ll love this recipe.
Related Plant-Based & Gluten-Free Recipes You’ll Love
- Vegan Coconut Flour Flax Focaccia (3 ingredients, grain-free)
- 3-Ingredient Almond Flour-Oat Focaccia {vegan, oil-free, gluten-free}
- 100% Flax Chocolate Cookies {vegan, oil-free, keto option}
- 2-Ingredient Flax Sandwich Bread {vegan, keto, grain-free}
- 3-Ingredient Flax Shortbread Cookies {vegan, GF, keto option}
Vegan Coconut Flour Flax Bread Recipe
Bake the BEST loaf of gluten-free, vegan bread with ease, minimal cost, and incredible results! My vegan coconut flour flax bread has a soft, tender, 100% BREAD texture (like a soft wheat bread). It is also oil-free, yeast-free, sugar-free, and has 4 grams protein and 5 grams fiber per slice.
Prep Time: 5 minutes
Cook Time: 1 hour 15 minutes
Total Time: 1 hour 20 minutes
Servings: 16 slices (from an 8-inch/20 cm loaf)
By: Camilla
Ingredients
- 1.75 cups (240g) finely ground flaxseed meal
- 1/2 cup (60g) coconut flour
- 2 tablespoons (15g) whole psyllium husks (do not use powder)
- 1 teaspoon baking soda
- Optional: 1/4 teaspoon salt
- 1.5 cups (360ml) water
- 1 tablespoon cider vinegar (or any light color vinegar, or lemon juice)
Instructions
- Preheat the oven to 350F (180C). Line a baking sheet with parchment paper (or lightly spray with nonstick cooking spray).
- In a blender or clean coffee mill, grind the flaxseed meal into a fine flour. **Do not skip this step** – the bread will be gooey unless this step is followed.
- In a medium bowl, whisk the finely ground flaxseed flour, coconut flour, whole psyllium husks, baking soda, and (optional) salt until well blended.
- Add the water and vinegar to the bowl and stir thoroughly until completely blended. The dough will be stiff but moist; do not add more water to make it easier to stir, as this will result in a gooey loaf.
- Use your hands to shape the dough into a compact ball. Place it on the prepared baking sheet and shape into a smooth, even, oblong loaf measuring approximately 8 inches (20 cm) long, 3.5 inches (8.75 cm) wide, and 1.5 to 2 inches (3.75 to 5 cm) high.
- Using a sharp knife, make at least 3 large diagonal slashes across the top of the dough (at least 1/4 inch deep). These slashes allow steam to escape during baking.
- Bake in the preheated oven for 75 to 80 minutes, or until the loaf appears dry on the surface and has turned a deep golden brown.
- Remove the bread from the oven and let it cool on the baking sheet for 10 minutes. Then, carefully slide the loaf onto a wire cooling rack and allow it to cool completely before slicing.
- Slice as desired and enjoy!
Notes
- **Storage**: The bread can be stored in an airtight container at cool room temperature for 2 days, in the refrigerator for up to 1 week, or in the freezer for up to 3 months.
- **UPDATE – Psyllium Powder Option**: We previously suggested substituting psyllium powder for whole psyllium husks, but extensive testing has shown that psyllium powder does not work for this recipe. Please use **whole psyllium husks** to ensure successful results.
Nutrition (per slice)
Serving: 1 Slice
Calories: 96 kcal
Carbohydrates: 8g
Protein: 4g
Fat: 8g
Saturated Fat: 1g
Polyunsaturated Fat: 5g
Monounsaturated Fat: 1g
Sodium: 83mg
Potassium: 143mg
Fiber: 7g
Sugar: 1g
Vitamin C: 0.1mg
Calcium: 49mg
Iron: 1mg