
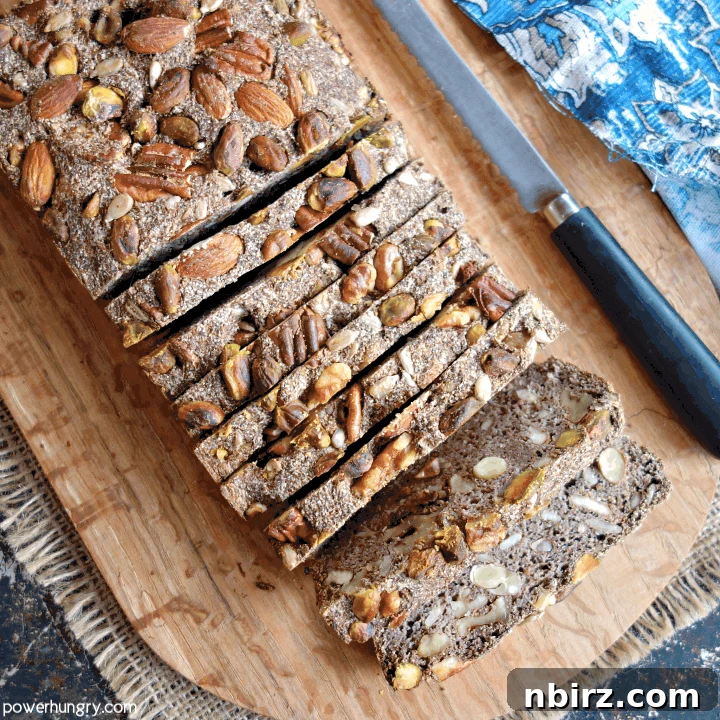
Ultimate Vegan Oil-Free Coconut Flour Bread: Grain-Free, Gluten-Free & Keto-Friendly
Are you searching for a truly versatile and healthy bread option that aligns with your dietary needs? Look no further! This incredible recipe delivers a **Vegan Oil-Free Coconut Flour Bread** that is robust, flavorful, and incredibly easy to make. Crafted with just four core ingredients, this bread is not only packed with nutritious nuts and seeds but is also meticulously designed to be completely grain-free, gluten-free, oil-free, and sugar-free. Whether you follow a vegan, keto, or paleo lifestyle, or simply seek a wholesome alternative to traditional breads, this recipe promises to become a staple in your kitchen.
Dive into the world of guilt-free indulgence with a bread that doesn’t compromise on taste or texture. Imagine perfectly sliced bread, golden-brown and ready to be toasted, topped, or enjoyed plain. This creation is a testament to how simple, clean ingredients can yield extraordinary results, making healthy eating both effortless and delicious.
The Genesis of Grain-Free Vegan Power Bread
The journey to perfecting this remarkable bread began with a common question from many of you: “Is it possible to transform my beloved 4-Ingredient Power Bread – a long-standing favorite featuring oats, nuts, and flaxseed meal – into a keto or paleo-friendly version?” This question resonated deeply with me, especially as I was updating the original recipe photos and meticulously measuring ingredients, pondering the very same challenge.
My initial Power Bread recipe relies heavily on a significant quantity of rolled oats, specifically 1 and 1/2 cups. These oats are crucial, lending vital structure and a familiar texture to the original loaf. Replicating this structural integrity without grains presented an exciting, yet formidable, challenge. Could I find the perfect combination of grain-free alternatives to create a bread that was not only delicious but also wonderfully sturdy? You know my passion for healthy baking challenges, and this was one I wholeheartedly embraced!
After numerous experiments and countless test loaves, I am thrilled to share this innovation. This new iteration maintains all the ease and deliciousness of its predecessor, yet it achieves an even more satisfying texture – especially when toasted to golden perfection. Prepare to be amazed by this all-around amazing creation: our brand new, much-anticipated **Vegan Oil-Free Coconut Flour Bread!** It’s a culinary triumph that I hope you’ll be as excited to try as I am to share.
Unlocking the Health Benefits: Why This Bread Stands Out
The true beauty of this **Vegan Oil-Free Coconut Flour Bread** lies in its remarkable simplicity and exceptional nutritional profile. It’s every bit as straightforward to prepare as the original Power Bread, yet it introduces a host of benefits that make it an outstanding choice for a diverse range of dietary needs. The texture, surprisingly akin to its oat-based counterpart, is arguably even better – particularly when lightly toasted, revealing its exquisite crispness and tender interior. Here’s a detailed look at why this bread is such a standout:
- Vegan (Egg-Free, Dairy-Free): This bread is entirely plant-based, making it perfect for vegans or anyone looking to reduce their consumption of animal products. It achieves its structure and richness without any eggs or dairy, proving that delicious bread can be made with wholesome plant ingredients.
- Grain-Free: Ideal for those following paleo, ketogenic, or specific carbohydrate diets, this bread contains no grains. This can contribute to better digestion, reduced inflammation, and stable blood sugar levels for many individuals.
- Gluten-Free: For individuals with celiac disease or gluten sensitivity, finding a delicious, sturdy bread can be a challenge. Our coconut flour bread offers a fantastic solution, ensuring a safe and satisfying option without any gluten.
- Oil-Free: Minimizing added fats, this recipe uses no oil, relying on the natural oils from nuts and seeds, and the moisture from water to create its delectable texture. This makes it a heart-healthy choice for those monitoring fat intake.
- Sugar-Free: Free from any added sugars, this bread is perfect for managing blood sugar levels and supporting a healthy diet. Its natural sweetness comes from the subtle notes of coconut flour and any nuts or seeds you choose to incorporate.
- High Fiber: Loaded with fiber from coconut flour, flaxseed meal, and psyllium husks, this bread is incredibly beneficial for digestive health. A high-fiber diet can promote satiety, aid in regularity, and contribute to overall well-being.
- Very Easy to Make: Despite its impressive list of benefits, this bread remains remarkably simple to prepare, requiring minimal fuss and straightforward steps. It’s designed for busy individuals who don’t want to compromise on healthy eating.
The Journey to Perfection: Developing a Grain-Free Masterpiece
When I first embarked on the quest for a grain-free version of my beloved Power Bread, it wasn’t a straightforward path. My initial experiments involved significant adjustments to the proportions of psyllium, flax, and water from the original recipe, aiming to find the perfect binder for grain-free flours. I also explored various combinations of alternative flours, hoping to mimic the texture and structure provided by oats.
While many batches came close, they never quite hit the mark. It was the test loaves incorporating coconut flour that truly showed the most promise. Intrigued by its unique properties and absorption capabilities, I incrementally increased the amount of coconut flour, realizing its potential as a primary structural component. The results steadily improved, leading me to a pivotal question: could an all-coconut flour base be the answer?
With renewed focus, I returned to the original proportions of the other key ingredients – flaxseed meal, psyllium husks, and nuts/seeds – and strategically replaced the oats with coconut flour. This was the breakthrough! In what felt like no time at all, the ratios clicked into place, yielding a perfectly balanced, sturdy, and utterly delicious loaf. This extensive testing process ensured that this recipe is not just a substitute, but a truly outstanding bread in its own right.
Essential Ingredients for Your Healthy Loaf
Crafting this incredible **Vegan Oil-Free Coconut Flour Bread** requires a selection of readily available and nutritious ingredients. The beauty of this recipe lies in its simplicity and the power of its few, but mighty, components. You’ll find the precise measurements for each ingredient detailed in the recipe card at the end of this post. For your convenience, you can easily toggle between *US Customary* (volume) and *Metric* (weights) to suit your preferred measurement system.
- Coconut Flour: This low-carb, high-fiber flour is the star of our grain-free bread. It’s incredibly absorbent, providing the dense yet tender crumb characteristic of this loaf. Its subtle natural sweetness complements the other ingredients beautifully.
- Flaxseed Meal: Ground flaxseeds act as a powerful binder and contribute healthy omega-3 fatty acids and fiber. When combined with water, flaxseed meal forms a gel-like consistency that helps hold the bread together, making it an excellent egg substitute in vegan baking.
- Nuts or Seeds (or a combination): This is where you can truly personalize your bread! A generous amount of nuts and/or seeds adds delightful crunch, rich flavor, and essential nutrients.
- Whole Psyllium Husks: Often considered the “secret ingredient” in many gluten-free and keto breads, whole psyllium husks are an indispensable binder. They create a strong, elastic structure that mimics gluten, ensuring your bread holds together perfectly without crumbling.
Beyond these core four, you will also need a precise amount of water to hydrate the ingredients and (optionally, but highly recommended) a touch of salt to enhance all the flavors.
Choosing Your Nuts and Seeds
One of the most exciting aspects of this recipe is the freedom to choose your favorite nuts or seeds. You can opt for a single variety, such as 100% pepitas (pumpkin seeds) for a vibrant green hue and earthy flavor, or 100% almonds for a classic, mild nutty taste. Alternatively, feel free to mix and match whatever combination you have on hand or prefer. Popular choices include walnuts, pistachios, hazelnuts, pecans, and sunflower seeds. Each adds its own unique texture and nutritional benefits.
For an extra layer of depth and aroma, consider lightly toasting your chosen nuts and seeds before adding them to the mixture. Approximately 10 minutes in an oven preheated to 350°F (175°C) will bring out their natural oils and intensify their flavor, adding a delightful, nutty warmth to your finished bread. While optional, it’s a simple step that can elevate your bread from great to extraordinary.
With your ingredients gathered and perhaps a light toasting complete, it’s time to grab a large mixing bowl and begin the straightforward process of creating this wholesome bread. You’ll be surprised at how quickly this comes together!
Effortless Baking: Your Step-by-Step Guide
For a detailed list of ingredients and quantities, please refer to the comprehensive recipe card located at the conclusion of this post.
Step One: Preparing Your Loaf Pan and Combining Dry Ingredients
Before you begin mixing, ensure your 9×5-inch loaf pan is properly prepared. A quick spray with nonstick cooking spray will help prevent sticking and ensure your bread releases cleanly after baking. Unlike some previous bread recipes where lining the pan was recommended, this coconut flour version benefits from direct contact with the pan, which helps it achieve a superior brown crust.
Next, gather all your dry ingredients – the coconut flour, flaxseed meal, whole psyllium husks, and your chosen nuts or seeds – and place them into a large mixing bowl. A wonderful bonus of this recipe is that no tedious chopping of nuts or seeds is required; they can be added whole, saving you valuable time and effort. If you opt for the optional salt, add it at this stage as well. Stir everything together thoroughly until all the dry components are well combined and evenly distributed. This ensures that each slice of your finished bread will have a consistent texture and flavor.
Step Two: Hydrating the Mixture and Forming the Dough
Now it’s time to bring your dry ingredients to life. Add the specified amount of water to the bowl and begin to stir. Initially, the mixture may appear quite loose and watery with the first few turns of your spoon. However, be patient! Within a matter of mere seconds, you’ll witness a fascinating transformation. The highly absorbent coconut flour, combined with the gelling properties of the flaxseed meal and psyllium husks, will rapidly soak up the water.
Continue stirring for less than a minute, and you will quickly observe the mixture coalescing into a thick, stiff, yet perfectly moist dough. It’s truly remarkable how quickly these ingredients bind together to form a cohesive mass. This rapid absorption is a key characteristic of coconut flour and psyllium, so don’t be alarmed by the initial wetness; trust the process, and you’ll have a workable dough in no time.
Step Three: Shaping and Preparing for Baking
Once your dough has reached its thick and moist consistency, it’s time to transfer it to your prepared 9×5-inch loaf pan. Use your hands to firmly press the dough evenly into the pan, ensuring it fills all corners and creates a uniform loaf. To achieve a smooth, appealing surface, it can be helpful to lightly moisten your hands with water before shaping. This prevents the dough from sticking to your fingers and allows for easier sculpting.
For those who, like me, appreciate a visually appealing loaf (perhaps for photo opportunities!), you might consider reserving a small handful of nuts and seeds from the mix to press onto the top of the loaf. This adds a beautiful textural element and a rustic charm. However, if presentation isn’t your primary concern, rest assured that this step is entirely optional and does not affect the taste or structural integrity of the bread.
Step Four: Preheat and Rest
With your loaf perfectly shaped in its pan, the next crucial step is to preheat your oven to 400°F (200°C). While the oven comes up to temperature, allow your prepared loaf to rest on the countertop. This resting period, typically around 15 minutes, is not merely a waiting game; it serves a vital purpose in the baking process. During this time, the coconut flour, flaxseed meal, and psyllium husks continue to absorb any remaining moisture, allowing the dough to further solidify and become more stable. This additional absorption and firming up before baking contribute significantly to the bread’s final structure and texture, ensuring a wonderfully cohesive loaf.
Step Five: Baking to Perfection
Once your oven has reached the target temperature, carefully place the loaf pan inside. Bake the bread for a duration of 55 to 65 minutes. The baking time can vary slightly depending on your oven, so it’s essential to look for specific cues to determine when your bread is perfectly done. The loaf should be beautifully browned on the surface, indicating a delicious crust has formed. When gently tapped near the center, it should emit a hollow sound, signifying that the interior is cooked through. Additionally, the surface should appear dry to the touch, reinforcing that the moisture has been properly baked out. These indicators ensure your bread is fully cooked and ready for the next step.
Cooling for Optimal Texture and Slicing
Once baked, resist the temptation to immediately slice into your fragrant loaf! Proper cooling is paramount for achieving the best texture and preventing the bread from crumbling. Allow the bread to cool in its pan for at least 15 minutes. This initial cooling period allows the internal structure to set further. After 15 minutes, carefully turn the loaf out onto a wire cooling rack to cool completely. This means letting it sit until it reaches room temperature, which can take an hour or more. Slicing warm bread, especially gluten-free and grain-free varieties, often results in a gummy texture or uneven slices. While this bread may not rise as high as traditional yeast breads, it is undeniably **mighty** in its flavor, texture, and nutritional value!
Serving Suggestions: Versatility at Its Best
Once your **Vegan Oil-Free Coconut Flour Bread** has completely cooled, it’s ready to be sliced and enjoyed! You have the freedom to cut it thick, thin, or anywhere in between, depending on your preference and intended use. I personally find that slices about 1/4-inch thick work perfectly, yielding approximately 20 satisfying slices per loaf. This thickness provides a substantial base for toppings while still being easy to manage.
The versatility of this bread is truly one of its greatest assets. Here are just a few ideas for how to enjoy your freshly baked creation:
- Toast It: Pop a slice into the toaster for a delightful crisp exterior and warm, tender interior. Toasted slices are fantastic with avocado, nut butter, or your favorite savory spreads.
- Top It: Use it as a base for open-faced sandwiches. Think cream cheese (vegan, of course!), hummus, sliced vegetables, or even a simple drizzle of olive oil and herbs.
- Sandwich It: While dense, this bread is sturdy enough to hold up to your favorite sandwich fillings. Create a hearty vegetable sandwich, or layer it with plant-based deli slices and fresh greens.
- Gnaw It Plain: Sometimes, the simple pleasure of a wholesome slice of bread is all you need. Enjoy it as a quick snack, perhaps with a cup of tea or coffee, savoring its natural flavors and satisfying texture.
No matter how you choose to enjoy it, this bread is designed to complement a healthy lifestyle, offering a delicious and nutritious option for any meal or snack time.
Frequently Asked Questions About Vegan Coconut Flour Bread
Here are answers to some of the most common questions you might have about baking and enjoying this delicious and healthy bread:
How Should I Store My Vegan Oil-Free Coconut Flour Bread?
Proper storage is key to maintaining the freshness and quality of your homemade bread. Store your **Vegan Oil-Free Coconut Flour Bread** in an airtight container to prevent it from drying out. At cool room temperature, it will remain fresh for up to 2 days. For longer storage, you can keep it in the refrigerator for up to 2 weeks. For maximum longevity, this bread freezes beautifully; simply wrap it tightly and store it in the freezer for up to 6 months. Thaw slices as needed, and consider a quick toast to revive their fresh-baked texture.
What is the Best Way to Measure Coconut Flour?
Coconut flour is exceptionally absorbent, so precise measurement is crucial for the success of this recipe. For the most accurate and consistent results, we highly recommend weighing the coconut flour. You will need exactly 49 grams. If you do not have a kitchen scale and must measure by volume, be sure to lightly spoon the flour into your measuring cup or tablespoon and level it off. Avoid scooping directly with the measuring tool, as coconut flour easily compresses and can lead to overpacking, which will result in a dry, crumbly bread.
Can Chia Seeds Be Used in Place of the Flaxseed Meal?
Absolutely, if you prefer to use chia seeds, you can certainly substitute them for flaxseed meal. However, there’s an important caveat: the chia seeds must first be ground into a fine meal. Whole chia seeds won’t bind as effectively as ground flaxseed. To do this, simply grind the chia seeds in a food processor, a high-speed blender, or a coffee grinder until they reach a meal-like consistency. Once ground, use an equal amount of chia seed meal to replace the flaxseed meal in the recipe. Do note that if you use black chia seeds, the resulting bread might have a slightly darker, less brown hue compared to using brown flaxseed meal. Rest assured, the taste will still be 100% delicious!
Can I Omit the Psyllium from the Recipe?
No, psyllium is an absolutely essential ingredient in this recipe and cannot be omitted. It serves as the super-binder that literally holds this grain-free bread together, providing the necessary structure and elasticity that gluten would typically offer. Without psyllium husks, the recipe simply will not work, and your bread will lack the cohesive texture it needs.
Can I Use Psyllium Powder in Place of Psyllium Husks?
Yes, you can use psyllium husk powder as a substitute for whole psyllium husks, but it’s crucial to adjust the quantity. Psyllium husk powder is much more concentrated than whole husks. The general conversion is: **1 tablespoon of whole psyllium husks is equivalent to 1 teaspoon of psyllium husk powder.** Both measurements equate to approximately 5 grams. Always use a precise measurement for psyllium, whether in husk or powder form, to ensure the best results for your bread’s texture.
Happy baking!
Explore More Healthy & Delicious Bread Recipes
If you’ve enjoyed making this grain-free coconut flour bread, be sure to explore some of our other popular and equally healthy bread creations:
- 3-Ingredient Keto Vegan Almond Bread {grain-free, oil-free}
- 4-Ingredient Vegan Power Bread {oil-free, GF}
- Keto Vegan Coconut Flour Bread {oil-free, grain-free}
- Vegan Gluten-Free Oat Sandwich Bread {oil-free, yeast-free}
- Gluten-Free Buckwheat Sandwich Bread {vegan, no yeast}
Print Recipe
Vegan Oil-Free Coconut Flour Bread (Keto-Friendly)
Camilla
2 minutes
1 hour 5 minutes
15 minutes
1 hour 22 minutes
1 loaf (20 slices)
Ingredients
- 200 grams about 1 and 1/2 cups nuts and/or seeds (see notes for suggestions)
- 3/4 cup 78 g flaxseed meal (regular or golden)
- 7 tablespoons 49 g coconut flour
- 3 tablespoons 15 g whole psyllium husks (or 3 teaspoons psyllium husk powder)
- 3/4 teaspoon fine sea salt, optional or adjustable to preferences
- 2 cups 500 mL water
Instructions
-
Spray a 9×5-inch loaf pan with nonstick cooking spray.
-
In a large bowl, stir together the nuts/seeds, flaxseed meal, coconut flour, psyllium husk, and optional salt. Add the water, stirring until completely combined. The dough will be very thick and stiff.
-
Transfer the dough to the prepared loaf pan and smooth the top with your hands (it helps to moisten them with water).
-
Preheat the oven to 400F (200C). Let the dough stand for 15 minutes while the oven preheats.
-
Bake in the preheated oven for 55 to 65 minutes until the bread is dry to the touch, browned, and sounds hollow when tapped.
-
Cool bread in pan for 15 minutes and then remove bread to a cooling rack. Cool completely before cutting into slices.
Notes
Coconut Flour Tip: For the most accurate results, weigh the coconut flour to measure (you will need 49 grams). If measuring by tablespoon, lightly spoon the flour to measure, as it is easy to overpack otherwise.
Nut and Seed Suggestions: Any nut or seed will work in this recipe, solo, or in combination. For example, almonds, walnuts, pistachios, hazelnuts, pecans, peanuts, pepitas, or sunflower seeds.
Weigh the Nuts and Seeds: I strongly urge the use of a scale to measure 200 grams worth of nuts or seeds. 1 and 1/2 cups is a general guideline for how much you need, but for best results, use a kitchen scale to measure 200 grams.
Chia Seed Option: The flaxseed meal can be replaced by an equal amount of chia seed meal (ground chia seeds).
Nutrition Facts (Per Slice)
Calories: 86kcal |
Carbohydrates: 5.1g |
Protein: 1.3g |
Fat: 6.2g |
Saturated Fat: 0.2g |
Sodium: 92.5mg |
Fiber: 3g |
Sugar: 0.2g
Like this recipe? We’d love your feedback!
Share your thoughts and rate the recipe below!