
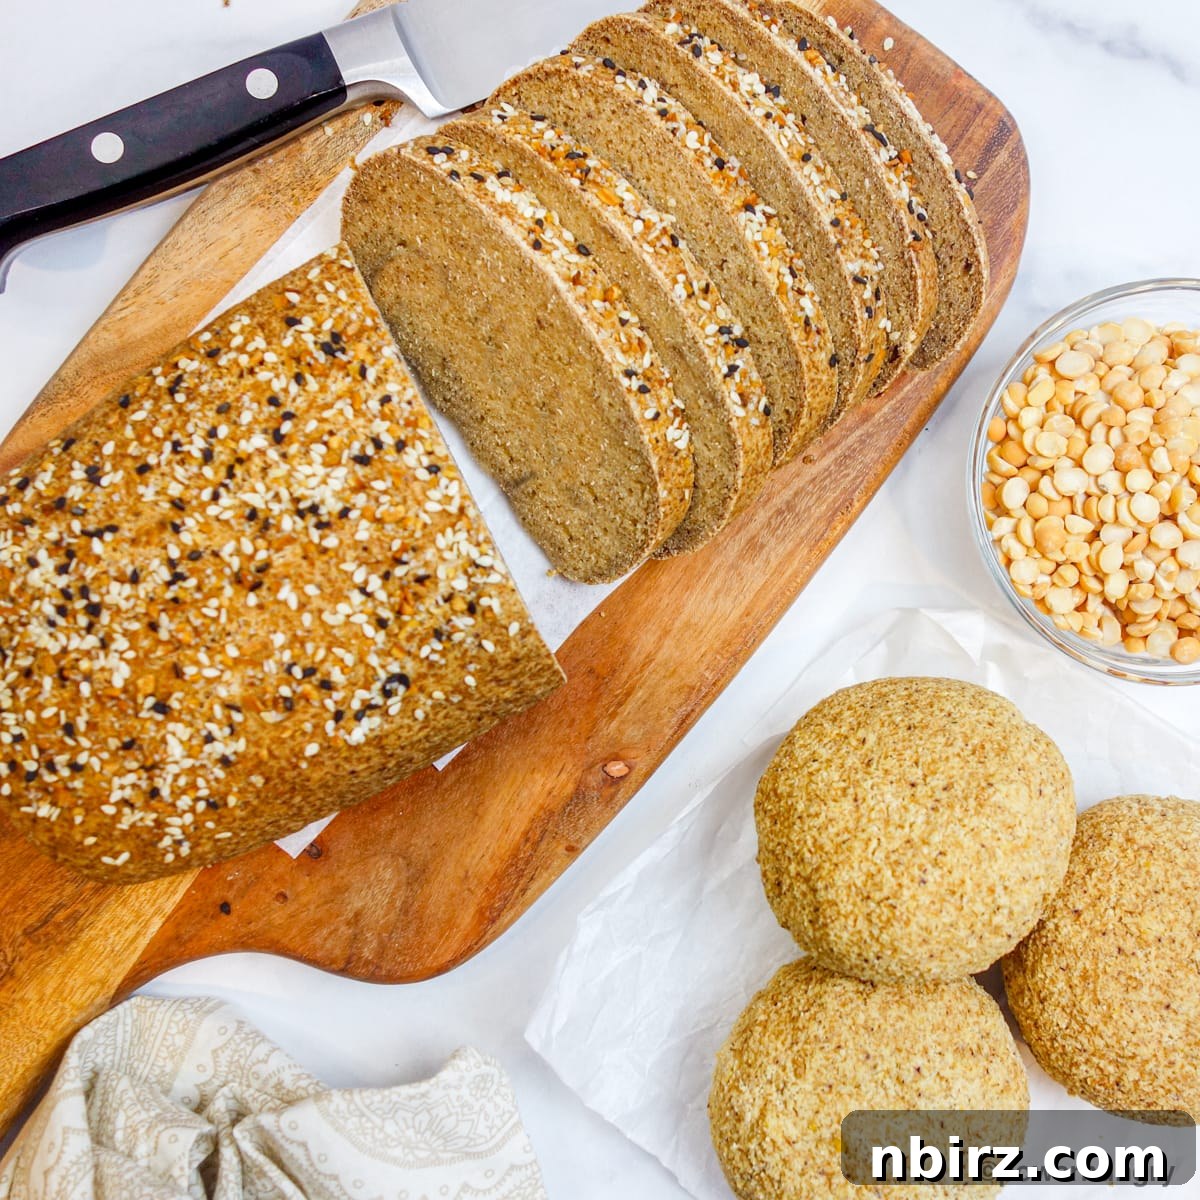
Revolutionize your kitchen with our incredible 4-Ingredient Split Pea Bread! Crafted entirely from uncooked split peas, this innovative recipe delivers a surprisingly delightful bread that’s not only incredibly simple to make but also packed with nutritional benefits. Say goodbye to complicated baking processes and hello to a wholesome, flavorful bread that fits perfectly into a variety of dietary needs. Whether you shape it into a rustic loaf or convenient individual bread rolls, you’ll be amazed by its versatility and delicious taste.
High Protein, Healthy Bread Made From Dried Split Peas
Move over, traditional bread! It’s time to discover a new way to bake that’s both economical and exceptionally nutritious. Forget the nursery rhyme about “peas porridge hot, peas porridge cold,” and instead, prepare to be amazed by a truly delicious, firm, yet tender bread made entirely from humble split peas. This recipe has quickly become a staple for its simplicity and incredible results.
Our split pea bread is remarkably budget-friendly and effortlessly easy to prepare – two qualities we absolutely adore in any recipe. You’ll need less than a pound of dried split peas, complemented by whole psyllium husks, baking soda, and a touch of vinegar or lemon juice. Add some tap water and an optional pinch of salt, and that’s truly all it takes to create a substantial loaf or eight generously sized, satisfying bread rolls. This minimalist ingredient list doesn’t compromise on flavor or texture, proving that wholesome baking can be both accessible and delicious.
While we typically use vibrant yellow split peas for our loaves and rolls, green split peas are an equally excellent choice. Be mindful, however, that green peas will, naturally, yield a loaf with a verdant hue. This can be a fun conversation starter, or if it causes apprehension among household members, simply enhance the green with a handful of fresh chopped herbs like parsley or chives. This not only justifies the color but also adds an extra layer of fresh, aromatic flavor. Get ready to be delighted with every single bite of this extraordinary bread!
Unbeatable Recipe Benefits: Why You’ll Love This Split Pea Bread
This remarkable split pea bread isn’t just easy and delicious; it’s a powerhouse of dietary benefits. It caters to a wide range of preferences and needs, making it a truly inclusive recipe for your table:
- 100% Vegan: Completely free from eggs and dairy, perfect for plant-based diets.
- Gluten-Free: An excellent alternative for those with gluten sensitivities or celiac disease.
- Grain-Free: Ideal for specific dietary protocols or those looking to reduce grain intake.
- Yeast-Free: No active yeast or instant yeast required, simplifying the baking process and eliminating waiting times for rising.
- Oil-Free: Made without any added oils, making it a lighter, healthier option.
- High Fiber Content: Each serving (approximately 1.5 slices or 1 roll) boasts an impressive 16 grams of fiber, promoting digestive health.
- Rich in Protein: With 11 grams of protein per serving, this bread is incredibly satisfying and supports muscle health.
- No Added Sugar: Enjoy the natural flavors without unnecessary sweeteners.
- Flourless Innovation: Truly unique, this bread is made directly from split peas, bypassing traditional flours.
- Incredibly Easy to Make: Minimal steps and straightforward instructions mean baking success for everyone.
- Economical Choice: Split peas are a cost-effective ingredient, making this a frugal addition to your meal plan.
- Minimal Ingredients: Requires only 4 core ingredients, plus water and optional salt, streamlining your pantry needs.
Essential Ingredients for Your Perfect Split Pea Bread
For precise measurements, refer to the detailed recipe card at the end of this article. You can easily switch between US Customary (volume) and Metric (weights) measurements for your convenience.
- Uncooked (Raw) Split Peas: The star of our show! You can choose either yellow or green split peas. Yellow peas offer a milder, slightly sweeter flavor and a beautiful golden color, while green peas provide a slightly earthier taste and a vibrant green hue.
- Whole Psyllium Husks: This is the crucial binder and structure-builder for our grain-free, gluten-free bread. More on this magical ingredient below!
- Baking Soda: Acts as the leavening agent, creating the light and airy texture without the need for yeast.
- Vinegar (or Lemon Juice): An acidic component that reacts with the baking soda, activating its leavening power and contributing to the bread’s rise and tender crumb. Light-colored vinegar like apple cider vinegar or white vinegar is recommended to avoid altering the bread’s color.
Beyond these four core ingredients, you’ll simply need some regular tap water to achieve the right consistency. We also love adding a touch of salt to enhance the overall flavor, but this is entirely optional and can be adjusted to your dietary preferences or needs. Rest assured, omitting the salt will not affect the structural success of the bread.
One of the brilliant aspects of this recipe is that no added fat – whether oil or whole ingredient forms – is necessary. The inherent creamy quality of the processed split peas naturally translates into a tender, moist bread, requiring no additional help from fats.
Demystifying Whole Psyllium Husks: The Gluten-Free Game Changer
For those new to gluten-free, grain-free, and yeast-free baking, whole psyllium husks might seem like an unfamiliar ingredient, but it is absolutely fundamental to the success of this bread. Psyllium is a natural dietary fiber derived from the husks of seeds from the Plantago ovata plant. When combined with liquid, these husks possess an extraordinary ability to swell and form a gelatinous, viscous gel. This unique property makes psyllium an invaluable ingredient in specific baking applications.
In our split pea bread, psyllium husks play a dual role. Firstly, they act as a potent binder, similar to how eggs function in traditional recipes, holding the ingredients together without the need for animal products. Secondly, and perhaps most importantly for gluten-free baking, psyllium expertly mimics the structural properties of gluten. It provides the necessary elasticity and framework that gives bread its characteristic chewiness and prevents it from crumbling. Without psyllium, achieving the desired texture in this flourless recipe would be incredibly challenging.
You can readily find whole psyllium husks online from various reputable purveyors. Simply conduct a quick search, and you’ll find numerous options. Alternatively, check the natural foods section or bulk bins of a well-stocked health food grocery store. Once purchased, store your psyllium husks in an airtight container in a cool, dry place. It has an excellent shelf life, lasting for years, making it a very economical and worthwhile investment for your gluten-free pantry. Plus, once you have it, a world of amazing gluten-free vegan breads opens up, including recipes like our 100% Millet Sandwich Bread, Easy Multigrain Sandwich Bread, Coconut Flour Sandwich Bread, 100% Millet Banana Bread, Buckwheat Sandwich Bread, Oat Sandwich Bread, 4-Ingredient Power Bread, and our 100% Chia Firm Sandwich Bread, among many others!
How to Make This Incredible Split Pea Bread: A Step-by-Step Guide
Please find the comprehensive, detailed instructions in the recipe card provided at the very end of this post.
Step One: Prepare the Split Peas with a Quick Soak
Begin by placing your uncooked (raw) split peas into a generously sized bowl. Pour enough boiling water over the peas to ensure they are covered by at least one inch of water. Allow them to soak for a minimum of 45 minutes. During this time, you’ll observe the peas plumping up and nearly doubling in their original size, absorbing the hot water and softening considerably. This crucial step prepares them for processing, ensuring a smooth dough.
For those who prefer a more hands-off approach, you can alternatively soak the split peas in cold or room temperature water. This longer method requires 8 to 12 hours, typically overnight, to achieve the same plump and softened state. Both methods yield excellent results, so choose what best fits your schedule.
Step Two: Thoroughly Drain and Rinse the Split Peas
Once the split peas are plumped to perfection, carefully drain them through a colander or a fine mesh sieve. It’s important to discard all of the soaking water, as this water may contain starches and compounds that could affect the final taste and texture of your bread. A quick rinse with fresh water after draining can also be beneficial, ensuring the peas are clean and ready for the next step.
Step Three: Prepare Your Oven and Baking Pan
Before proceeding, preheat your oven to 350°F (180°C). This ensures the oven reaches the correct temperature for even baking as soon as your dough is ready. Simultaneously, prepare a baking sheet by lining it with parchment paper. This prevents sticking and makes for easy cleanup, ensuring your bread bakes perfectly without any fuss.
Step Four: Process the Soaked Split Peas into a Smooth Puree
Transfer the drained, soaked split peas to the bowl of a high-powered food processor or a blender. Add 2/3 cup (150 mL) of fresh water and the tablespoon of vinegar (or lemon juice) to the processor. Process the mixture thoroughly, stopping several times to scrape down the sides of the bowl with a spatula. Continue processing until the mixture is incredibly smooth, with no discernible pieces of split pea remaining. The goal is a consistent, creamy puree, which forms the base of your bread.
Step Five: Incorporate the Dry Ingredients for Dough Formation
Once your split pea puree is silky smooth, it’s time to add the remaining dry ingredients. Carefully add the whole psyllium husks, baking soda, and the optional salt to the food processor bowl. Process again, briefly, stopping once or twice to scrape down the sides as needed. Continue until all ingredients are just blended and a soft, cohesive dough forms. Avoid over-processing at this stage; just enough to combine everything thoroughly.
Step Six: Shape Your Split Pea Dough
Now comes the fun part – shaping your bread! You have two delicious options:
Option One: Classic Split Pea Bread Loaf
Gently gather the dough into a ball and place it onto your prepared baking sheet. Using damp hands (this helps prevent sticking and creates a smoother finish), shape the dough into a traditional loaf, approximately 8 x 4 x 2 inches (20 x 10 x 5 centimeters). Take your time to smooth the top and sides, creating an aesthetically pleasing loaf. If you desire, sprinkle the top of the loaf with your favorite seeds, such as sesame seeds, sunflower seeds, or pumpkin seeds, for added texture and flavor.
Option Two: Convenient Split Pea Bread Rolls
If rolls are more your style, gather the dough into a ball and then divide it into eight equal portions. For precision, you can weigh the dough, but eyeballing it or rolling the dough into an even log and cutting it into 8 uniform pieces works just as well. Roll each portion into a smooth ball, then gently flatten and shape each ball into a 3-inch (7.5 cm) diameter round. Arrange these dough rounds on your prepared baking sheet, ensuring they are spaced about 2 inches (5 cm) apart to allow for even baking and slight expansion.
Step Seven: Bake Your Split Pea Creations
Place your shaped bread into the preheated oven and bake according to its form:
- For a Loaf: Bake for approximately 50 to 55 minutes. The loaf is done when it has risen, its surface appears dry and firm to the touch, and the crust has developed a beautiful, deep golden brown color.
- For Rolls: Bake for a shorter duration of 25 to 30 minutes. The rolls should be fully risen, with a dry surface and a lovely light golden brown hue.
Baking times can vary slightly depending on your oven, so always keep an eye on the color and firmness as indicators of doneness. A perfectly baked split pea bread will have a satisfying crust and a tender interior.
Step Eight: Cool the Bread Completely
Once baked, immediately transfer your loaf or rolls from the hot baking sheet to a cooling rack. This is a crucial step that cannot be rushed! Allow the bread to cool completely – ideally for several hours or until it reaches room temperature – before attempting to slice into it. Slicing warm bread, especially gluten-free varieties, can result in a gummy texture or cause it to crumble. Patience will be rewarded with the best possible texture and flavor.
And there you have it – homemade Split Pea Bread, complete and utterly gorgeous! Prepare to impress yourself and your loved ones with this unique and healthy creation.
Frequently Asked Questions About Split Pea Bread
How Should I Store My Split Pea Bread?
Proper storage is key to maintaining the freshness and quality of your homemade split pea bread. Once completely cooled, store the bread in an airtight container. Due to its relatively high moisture content compared to traditional wheat flour breads, it’s best consumed within 1 day if stored at cool room temperature. For longer preservation, transfer it to the refrigerator where it will keep well for up to 2 weeks. For ultimate longevity, this bread freezes beautifully for up to 6 months. To enjoy, simply thaw at room temperature or gently toast from frozen.
What is the Taste and Texture Profile of This Grain-Free Split Pea Bread?
The flavor of split pea bread, especially when made with yellow split peas, is subtly distinct yet pleasantly neutral. You’ll notice a faint, earthy sweetness characteristic of dried peas, but it’s not overpowering. This neutrality makes it incredibly versatile, pairing wonderfully with both savory and sweet toppings and fillings. If you opt for green split peas, the bread will have a slightly more pronounced pea flavor, which some describe as reminiscent of fresh peas.
In terms of texture, a full loaf of this bread offers a satisfying, not-too-thick crust and a denser crumb. It holds up well to slicing and toasting, making it excellent for heartier preparations. However, we personally find that when made into individual rolls, the texture becomes notably lighter and slightly more springy, providing a delightful chew. Regardless of the shape you choose, you’re in for a treat – you simply can’t go wrong with either! Both forms offer a uniquely satisfying experience.
How Can I Best Use This Healthy Grain-Free Bread for Sandwiches?
This firm and hearty grain-free bread is an excellent foundation for a myriad of sandwiches. For delicate closed sandwiches, we recommend slicing the loaf thinly to allow your fillings to shine without overwhelming them. For open-face sandwiches, or when you desire a more substantial bite, thicker slices work wonderfully. The robust texture ensures that even moist fillings won’t make the bread soggy.
The bread rolls are equally perfect for building delicious sandwiches and burgers. Simply split them open, add your favorite plant-based patties, fresh vegetables, or spreads, and enjoy a wholesome, satisfying meal!
My Bread is Gooey Inside. What Went Wrong?
This gluten-free split pea bread should never be gooey in the center; it should have a firm, tender crumb. If your bread turns out gooey or undercooked, it’s most commonly due to one or more of the following critical factors:
- Inaccurate Oven Temperature: Many home ovens are not calibrated precisely. We highly recommend using an inexpensive oven thermometer to regularly check and ensure your oven’s temperature matches the recipe’s requirement.
- Insufficient Baking Time: It can be tempting to pull the bread out early if the exterior looks done. However, for gluten-free breads, it’s crucial to bake for the full recommended time, if not longer, to ensure the interior is thoroughly cooked through. The internal moisture needs adequate time to evaporate and set.
- Slicing Before Cooling: As mentioned in Step Eight, allowing the bread to cool completely on a rack is vital. Slicing warm bread traps steam, leading to a gummy texture.
- Inaccurate Ingredient Measurements: With minimalist recipes like this, precision is paramount. We strongly advise using a kitchen scale to accurately measure the dried split peas and especially the whole psyllium husks, as their exact quantities significantly impact the dough’s consistency and the bread’s final structure.
Can I Replace the Psyllium Husks with Flaxseed Meal?
Unfortunately, no. While flaxseed meal (or ground flaxseeds) can act as a binder in some gluten-free recipes (often called a “flax egg”), it does not possess the same structural capabilities as whole psyllium husks. For this specific high-protein, gluten-free, and grain-free bread recipe, whole psyllium husks are essential to achieve the correct texture and rise. Substituting it with flaxseed meal or other binders will likely result in a very different, and likely less successful, outcome.
Can I Make This Bread with Other Legumes?
Yes, the concept is quite versatile! This recipe was inspired by our High Protein Lentil Bread, which uses a similar method. You can certainly experiment with different types of legumes. We are currently conducting tests with various beans and other pulses to explore new and exciting grain-free bread options. The key is to understand how each legume’s starch and protein content affects the dough, along with the binding power of psyllium.
Can I Make This Gluten-Free Bread in a Bread Maker (Bread Machine)?
We have not yet tested this split pea bread recipe in a bread maker or bread machine. Bread machines operate differently than conventional ovens and often have specific cycles for gluten-free breads. Without testing, we cannot confidently recommend or provide guidelines for using a bread machine for this recipe. If you decide to experiment, please be aware that results may vary.
Can I Bake This Homemade Sandwich Bread in a Loaf Pan?
Absolutely! If you prefer a more conventional loaf shape, you can certainly bake this bread in a loaf pan. Simply shape the dough as directed for a loaf, then place it into an 8×4 inch (20×10 cm) loaf pan that has been lined with parchment paper or lightly greased. The baking time will generally remain similar to baking on a flat sheet, but we recommend starting to check for doneness about 5 minutes earlier than the suggested time, just in case your specific pan or oven requires a slight adjustment.
Can I Sprinkle Seeds on Top of the Bread Before Baking?
Yes, and we highly encourage it! Adding a sprinkle of seeds before baking not only enhances the visual appeal but also adds a lovely crunch and additional flavor. Consider using sesame seeds, vibrant green pumpkin seeds (pepitas), poppy seeds, shelled sunflower seeds, or even nutrient-dense hemp hearts (shelled hemp seeds). These toppings stick beautifully to the dough and toast nicely in the oven.
What are Some Healthy Topping Ideas for This Homemade Bread?
The neutral yet satisfying flavor of this split pea bread makes it an ideal canvas for a wide array of toppings, both savory and sweet:
- Sliced or Mashed Avocado: For a creamy, healthy fat boost, perfect with a sprinkle of everything bagel seasoning.
- Sliced or Mashed Bananas: A simple, naturally sweet topping that’s great for breakfast or a snack.
- Vegan Cream Cheese: Spread a generous layer. Try our easy DIY Cashew Cream Cheese recipe for a homemade touch.
- Nut Butter or Seed Butter: A classic pairing for a protein-packed snack. Experiment with various options like our DIY Sunflower Seed Butter, Pepita Butter, or Almond Butter.
- Hummus or Other Dips: The firm texture of the bread holds up well to thicker spreads.
- Tomato and Basil: A fresh and light option, especially delightful in warmer weather.
- Nutritional Yeast Spread: For a cheesy, savory flavor without dairy.
Happy baking, and enjoy your wholesome, homemade split pea bread!
Related Recipes You Might Enjoy
- Split Pea & Green Pea Soup {4 ingredients, Vegan, High Protein}
- Lemon Garlic Split Pea Dip {Oil-Free, Vegan, 4 Ingredients}
- 1-Ingredient Split Pea Tortillas {Grain-Free, Vegan}
- Baked Split Pea Meatballs {Vegan, Gluten-Free, High Protein}
- Easy Split Pea Curry {Vegan, High Protein, Oil-Free}
Save | Pin | Print
Split Pea Bread (Vegan, Gluten-Free, Oil-Free)
By: Camilla
4-Ingredient Split Pea Bread made with uncooked split peas! It is easy to make, high in protein, and can be made into a loaf or rolls. It is flourless, oil-free, gluten-free, grain-free, and yeast-free, too.
Prep Time: 5 minutes
Cook Time: 50 minutes
Additional Time (Soaking): 45 minutes
Total Time: 1 hour 40 minutes (approx. with quick soak)
Servings: 1 loaf or 8 rolls
Ingredients
- 12 oz (340 g) dried split peas (yellow or green)
- Boiling water for soaking
- 2/3 cup (150 mL) water (for processing)
- 1 tablespoon light-colored vinegar (or lemon juice), (e.g., apple cider vinegar, white vinegar)
- 1/2 cup whole psyllium husks
- 1/2 teaspoon baking soda
- Optional: 1/2 to 3/4 teaspoon salt
Instructions
- Place the dried split peas in a large bowl. Cover with enough boiling water (at least 1 inch above peas). Let soak for at least 45 minutes until plump (alternatively, soak in cold water for 8-12 hours).
- Preheat the oven to 350°F (180°C). Line a large baking sheet with parchment paper.
- Rinse and drain the split peas thoroughly through a colander or fine mesh sieve. Discard the soaking water.
- Place the drained, soaked split peas, 2/3 cup (150 mL) water, and vinegar in a food processor or blender. Process until very smooth, scraping down the sides as needed.
- Add the psyllium husks, baking soda, and optional salt to the food processor. Process briefly until just blended into a soft, cohesive dough, scraping down the sides once or twice.
- Shape the Dough:
- Loaf: Gather the dough into a ball and shape it into an 8x4x2 inch (20x10x5 cm) loaf on the prepared baking sheet, using damp hands to smooth. Optionally sprinkle with seeds.
- Rolls: Divide the dough into eight equal portions. Roll each into a ball, then flatten into a 3-inch (7.5 cm) diameter round. Place on the baking sheet, spaced 2 inches (5 cm) apart.
- Bake the Bread:
- Loaf: Bake for 50 to 55 minutes, or until risen, surface is dry, and crust is deep golden brown.
- Rolls: Bake for 25 to 30 minutes, or until risen, surface is dry, and light golden brown.
- Transfer the baked loaf or rolls to a cooling rack. Let cool completely before slicing or serving to ensure proper texture.
Notes
- Storage for the Bread: Store cooled bread in an airtight container at cool room temperature for 1-2 days, in the refrigerator for up to 1 week, or in the freezer for up to 6 months.
- Split Pea Weight Tip: 12 ounces (340 grams) of dried (uncooked) split peas is approximately 1.75 cups.
- Loaf vs. Rolls: The split pea rolls tend to have a slightly lighter and springier texture than the full-sized loaf.
- Overnight Soak Option: If preferred, you can soak the split peas in cold or room temperature water for 8 to 12 hours until they are plump and nearly double in size.
- Psyllium Husks Tip: This recipe has been developed specifically for whole psyllium husks. While psyllium powder might theoretically work, it has not been tested. If substituting, use an equal weight of psyllium powder, not volume, as powder is much more concentrated.
Nutrition Information (Approximate)
Serving Size: 1 roll or 1.5 slices bread
Calories: 160 kcal
Carbohydrates: 33 g
Protein: 11 g
Fat: 1 g (Polyunsaturated Fat: 1 g)
Sodium: 120 mg
Fiber: 16 g
Sugar: 3 g