
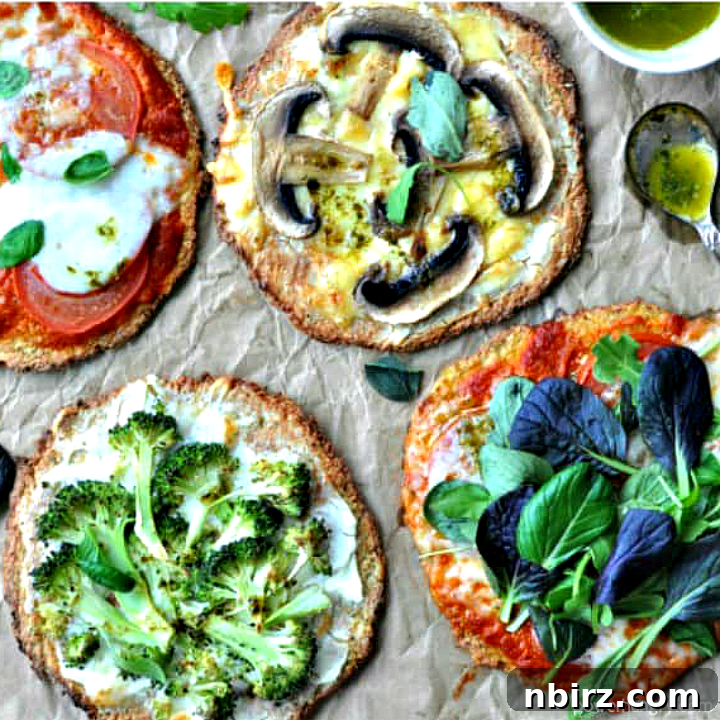
Welcome to the world of revolutionary grain-free baking! If you’ve been searching for a healthy, delicious, and incredibly versatile pizza crust that caters to various dietary needs, your quest ends here. Our **Parsnip Chickpea Flour Pizza Crust** is a game-changer, crafted with only three core ingredients (plus water and salt) to deliver a truly exceptional experience. This recipe is not only **vegan** (egg-free & dairy-free) and **gluten-free**, but also **grain-free**, **nut-free**, and **yeast-free**, making it an inclusive option for almost everyone at your table.
Whether you’re a seasoned chef exploring new culinary horizons or just beginning your journey into grain-free cooking, this original, vegetable-centric approach to pizza crust promises to be a delightful surprise. Forget complicated processes and lengthy preparations; this recipe is designed for ease and enjoyment, proving that healthy can indeed be mouthwateringly good.
This parsnip and chickpea flour pizza crust tastes even better than it looks – a claim I confidently make after devouring one and a half mini pizzas in record time! Its simplicity is astounding; made from two humble, yet powerful ingredients – parsnips and chickpea flour – it can be effortlessly shaped into crusts of any size. Whether you’re planning a full dinner or simply craving a healthy snack, this recipe offers the flexibility to create large pizzas or individual mini ones, perfect for any occasion. Preparation is quick, and the blank canvas of this crust eagerly awaits your favorite toppings, transforming into a culinary masterpiece that is both delicious and nutritious.
The Innovation Behind This Grain-Free Pizza Crust
My inspiration for this unique crust stems from a desire to improve upon two popular grain-free pizza crust options: traditional cauliflower pizza crusts and pure chickpea flour pizza crusts. While both are fantastic in their own right, they each come with certain limitations.
Cauliflower crusts, known for their vegetable-packed goodness, often demand a considerable investment of time and effort. The cauliflower must first be cooked, then meticulously squeezed dry of its abundant excess liquid – a critical step to prevent a soggy crust. While certainly not difficult, this pressing process can be tedious and time-consuming, often deterring home cooks looking for a quicker solution.
Chickpea flour crusts, on the other hand, are remarkably fast to prepare. However, they are typically made from a pourable batter that necessitates cooking in a skillet or a similar dish. This method, while effective, somewhat restricts their versatility, making it challenging to achieve a traditional hand-shaped pizza crust with crispy edges that many pizza lovers crave.
Driven by these observations, I decided to ingeniously merge the best attributes of both approaches. I maintained the commitment to a white vegetable base but made a strategic swap: parsnips instead of cauliflower. The primary reason for this enlightened decision? Parsnips boast a significantly lower water content than cauliflower. This crucial characteristic eliminates the need for any pre-cooking or strenuous squeezing, dramatically cutting down on preparation time and simplifying the entire process. The result is a wonderfully crisp, flavorful, and easy-to-make crust that truly stands out.
Exceptional Benefits of This Recipe
Beyond its incredible taste and simplicity, this parsnip chickpea flour pizza crust offers a plethora of dietary advantages that make it a superb choice for health-conscious individuals and those with specific dietary requirements. Here’s why this recipe deserves a permanent spot in your kitchen:
- Minimal Ingredients: It requires only 3 main ingredients (parsnips, chickpea flour, olive oil), plus water and salt, simplifying your shopping list and prep.
- Completely Vegan: Free from animal products, including eggs and dairy, making it perfect for vegan lifestyles and those with related allergies.
- Gluten-Free: Ideal for individuals with celiac disease or gluten sensitivities, allowing everyone to enjoy delicious pizza without compromise.
- Grain-Free: Suitable for paleo, Whole30 (check other ingredients), or simply those looking to reduce grain consumption in their diet.
- Nut-Free: A safe option for families and individuals managing nut allergies, ensuring everyone can partake in pizza night.
- Yeast-Free: No rising time required, contributing to the quick and easy preparation of this crust.
- Quick & Easy: From mixing to baking, this recipe is designed for efficiency, delivering fresh pizza crusts in minutes.
- Nutritionally Dense: Packed with beneficial vitamins, minerals, protein, and fiber from both parsnips and chickpea flour.
Key Ingredients: Simple & Wholesome
The beauty of this pizza crust lies in its straightforward and wholesome ingredients. Each component plays a vital role in achieving the perfect texture, flavor, and nutritional profile. You’ll find the precise measurements detailed in the recipe card at the end of this article, with options to toggle between US customary (volume) and Metric (weights) for your convenience.
- Chickpea Flour: Also known as besan or gram flour, this ingredient is the heart of our grain-free crust. It acts as an excellent binder, providing structure while contributing a substantial amount of plant-based protein and dietary fiber. Its slightly nutty flavor pairs wonderfully with the subtle sweetness of parsnips.
- Olive Oil: A staple in healthy cooking, olive oil adds richness and helps create a tender yet crispy crust. You can also opt for any neutral-flavored vegetable oil of your choice, such as avocado oil, if preferred.
- Parsnips: The star vegetable of this recipe. Fresh parsnips, finely grated, integrate seamlessly into the dough, imparting a delicate sweetness and earthy flavor. Crucially, their naturally lower water content, compared to vegetables like cauliflower, eliminates the need for any pre-cooking or moisture removal, making the process incredibly efficient. Choose firm, blemish-free parsnips for the best results.
In addition to these core ingredients, you will also need some **water** (filtered tap water works perfectly) and a touch of **salt**. The salt is optional and adjustable to your taste, enhancing the overall flavor of the crust.
Step-by-Step Directions to Your Perfect Pizza Crust
Creating these delightful parsnip chickpea flour pizza crusts is surprisingly simple and swift. Follow these detailed instructions to achieve golden-brown, crispy-edged perfection. Remember, the full, comprehensive directions are also available in the recipe card below for easy reference.
- Prepare Your Workspace: Begin by preheating your oven to 375°F (190°C). Line a large, rimmed baking sheet with parchment paper. This step is crucial for preventing sticking and ensuring easy removal of your crusts.
- Whisk the Wet & Dry Ingredients: In a spacious mixing bowl, combine the water, chickpea flour, olive oil, and salt. Whisk these ingredients together until the mixture is smooth and well-incorporated. Allow this batter to rest for a few minutes while you prepare the parsnips; this brief resting period helps the chickpea flour hydrate properly.
- Prepare the Parsnips: Wash and peel 3 to 4 medium-sized parsnips. Using a box grater or a food processor with a grating attachment, finely grate the parsnips. You should aim for approximately 2 lightly packed cups of grated parsnips. The finer the grate, the better they will integrate into the dough and cook evenly.
- Combine the Mixtures: Add the finely grated parsnips to the chickpea flour mixture. Stir vigorously until the parsnips are evenly distributed throughout the batter and everything is thoroughly blended. The mixture should be thick enough to hold its shape.
- Shape the Crusts: Divide the parsnip mixture into four equal-sized portions. Place each mound onto the prepared baking sheet, ensuring they are evenly spaced. Using your fingertips, gently press and shape each mound into a circular crust, aiming for a diameter of about 5 to 6 inches and a thickness of approximately 1/2-inch. Don’t worry about perfect circles; rustic shapes add charm!
- First Bake: Transfer the baking sheet to your preheated oven. Bake for 14 to 17 minutes, or until the crusts are golden brown and appear firm to the touch. This initial bake is essential for developing flavor and creating a sturdy base for your toppings.
- Add Toppings & Final Bake: Carefully remove the partially baked crusts from the oven. Now is the time to add your favorite toppings. Once topped, return the crusts to the oven and bake for an additional 7 to 11 minutes, or until your toppings are perfectly cooked and any cheese (dairy or non-dairy) is melted and bubbly.
- Serve & Enjoy: Remove the finished pizzas from the oven. If desired, garnish with fresh herbs, crisp greens, or avocado slices for an extra burst of flavor and freshness. Serve immediately and savor every delicious, grain-free bite!
Each bite of this pizza crust delivers not just incredible flavor but also a punch of nutritional benefits. Chickpea flour contributes a generous dose of plant-based protein and dietary fiber, crucial for satiety and digestive health. Meanwhile, parsnips are rich in an array of essential minerals, including potassium, manganese, magnesium, phosphorus, zinc, and iron, alongside a comprehensive profile of vitamins such as B, C, E, and K, and a significant amount of fiber. This isn’t just pizza; it’s a nutrient-packed meal!
Seriously, my friends, this is the pizza you need in your life!
Tips for the Crispiest Edges
One of the most satisfying aspects of a great pizza is those wonderfully crispy edges, and this parsnip chickpea flour crust delivers! To maximize that delightful crunch, I highly recommend dividing the dough into four equal portions, creating individual mini pizzas. This approach not only ensures more crispy surface area per serving but also makes the pizzas easier to handle and eat – no need for forks when you can pick up a perfect, personal slice!
A little watchful eye during the final minutes of baking is your secret weapon. The edges tend to crisp up quickly, so peek, peek, and peek again to avoid over-browning. A perfectly golden-brown crust is the goal, signaling deliciousness without venturing into burnt territory.
Unleash Your Creativity: Topping Ideas Galore!
As you can see from my photos, I often get a little exuberant with my topping choices – pizza just has that effect! The beauty of this versatile crust is that it serves as the perfect foundation for literally any topping combination your heart desires. Whether you prefer classic flavors or crave something wildly creative, this crust is ready for it all. Here are just a few ideas to spark your culinary imagination:
- Classic Comfort: Marinara sauce, your favorite shredded cheese (dairy or non-dairy mozzarella for that classic stretch), and a sprinkle of dried oregano.
- Veggie Extravaganza: Load up on colorful vegetables like bell peppers, red onions, mushrooms, spinach, cherry tomatoes, and broccoli florets. Lightly sauté them beforehand for extra flavor and tenderness.
- Pesto Perfection: A vibrant pesto base (nut-free or traditional), sun-dried tomatoes, artichoke hearts, and a sprinkle of vegan parmesan.
- Mediterranean Inspired: Hummus as a base, topped with Kalamata olives, thinly sliced red onion, fresh oregano, and crumbled vegan feta.
- Spicy Kick: A spicy tomato sauce, jalapeños, red pepper flakes, and plant-based sausage crumbles.
- Gourmet Greens: After baking, top with fresh arugula, a drizzle of balsamic glaze, and thinly sliced avocado for a burst of freshness.
- Protein Power: Add cooked lentils, black beans, or a sprinkle of nutritional yeast for an extra protein boost.
The possibilities are endless! Don’t hesitate to raid your fridge and pantry – choose what you crave, and go for it!
Storage & Make-Ahead Tips
This parsnip chickpea flour pizza crust is not only delightful fresh out of the oven but also surprisingly convenient for meal prepping. Here are some tips to store leftovers or prepare crusts in advance:
- Storing Leftover Pizza: Any leftover pizza slices can be stored in an airtight container in the refrigerator for up to 3-4 days. For reheating, a toaster oven or conventional oven at 350°F (175°C) for 5-10 minutes will bring back some of its crispness. Microwaving is an option, but the crust will soften.
- Make-Ahead Crusts: You can prepare and bake the crusts without toppings in advance. Once fully cooled, stack them with parchment paper in between and store in an airtight container in the refrigerator for up to 3 days. When ready to enjoy, simply add your desired toppings and bake as directed in the recipe (step 7).
- Freezing Crusts: For longer storage, pre-baked, untopped crusts can be frozen. Once completely cooled, wrap each crust tightly in plastic wrap, then place them in a freezer-safe bag or container. They can be stored in the freezer for up to 2-3 months. To use, thaw the crusts in the refrigerator overnight or at room temperature, then proceed with adding toppings and baking.
Frequently Asked Questions (FAQ)
Can I use other root vegetables instead of parsnips?
While parsnips are specifically chosen for their low water content and subtle sweetness, other grated root vegetables might work. However, results may vary. If using a higher-moisture vegetable like zucchini or carrots, you might need to lightly salt and drain them first, or adjust the amount of chickpea flour to achieve the right dough consistency. The flavor profile will also change. Parsnips offer a unique balance that’s hard to beat for this specific recipe.
Can I make this crust thicker or thinner?
Yes, you can adjust the thickness. A thicker crust will yield a softer, chewier texture, while a thinner crust will be crispier. Be mindful that baking times will need to be adjusted accordingly. Thicker crusts will require a longer initial bake, and thinner crusts will cook faster.
What if my dough is too wet or too dry?
The consistency of the dough is key. If your mixture feels too wet and doesn’t hold its shape when pressed, you can add a tiny bit more chickpea flour (1 tablespoon at a time) until it reaches a manageable consistency. If it’s too dry and crumbly, add a teaspoon of water at a time until it comes together. Factors like the moisture content of your parsnips or humidity can subtly affect the mix.
Is this recipe suitable for those with digestive sensitivities?
Yes, for many! Being gluten-free, grain-free, and yeast-free, this crust can be easier on the digestive system for individuals sensitive to these ingredients. Both chickpea flour and parsnips are good sources of fiber, which aids digestion. Always listen to your body and consult with a healthcare professional if you have specific dietary concerns.
More Delectable Parsnip Recipes to Try:
If you’ve fallen in love with parsnips through this pizza crust, you’ll be thrilled to discover their versatility in other recipes:
- Lemony Roasted Parsnip Hummus (no beans, no tahini)
- Roasted Carrot Parsnip Hash {Vegan, Paleo}
- Vegan Creamy Mashed Parsnips {easy, 3 ingredients}
Parsnip Chickpea Flour Pizza Crust {Vegan, Grain-Free, 3-Ingredients}
By: Camilla
Parsnip chickpea flour pizza crust is the grain-free recipe you have been looking for! Only 3 ingredients (plus water and salt) it is vegan (egg-free & dairy-free), gluten-free and versatile.
Cook Time: 25 minutes
Total Time: 40 minutes
Servings: 4 mini pizzas
Ingredients
- 1/2 cup water
- 1/4 cup chickpea flour
- 1 1/2 tablespoons olive oil
- 1/2 teaspoon salt (optional, adjust to taste)
- 3 to 4 medium-size parsnips, washed and peeled (enough for 2 lightly packed cups grated)
Instructions
- Preheat oven to 375°F (190°C). Line a large rimmed baking sheet with parchment paper.
- In a large bowl, whisk together the water, chickpea flour, olive oil, and salt. Let stand while preparing the parsnips.
- Finely grate the parsnips (you should have enough to measure 2 lightly packed cups).
- Add the grated parsnips to the chickpea flour mixture, stirring until well blended.
- Evenly space 4 equal-sized portions of parsnip mixture on the prepared baking sheet. Using fingertips, press each mound into a circle (about 5 to 6 inches in diameter and about 1/2-inch thick).
- Bake in the preheated oven for 14 to 17 minutes or until golden brown.
- Remove from oven and add toppings of choice.
- Return crust to oven and bake for 7-11 minutes longer until toppings are cooked/melted.
- Serve with any additional fresh toppings (e.g., herbs, greens, avocado slices). Enjoy!
Nutrition (per 1 mini pizza crust – crust only)
Serving: 1 mini pizza crust (crust only) |
Calories: 152 kcal |
Carbohydrates: 23.6g |
Protein: 3g |
Fat: 5.6g |
Saturated Fat: 1.3g |
Sodium: 225mg |
Fiber: 5.3g |
Sugar: 6.1g