
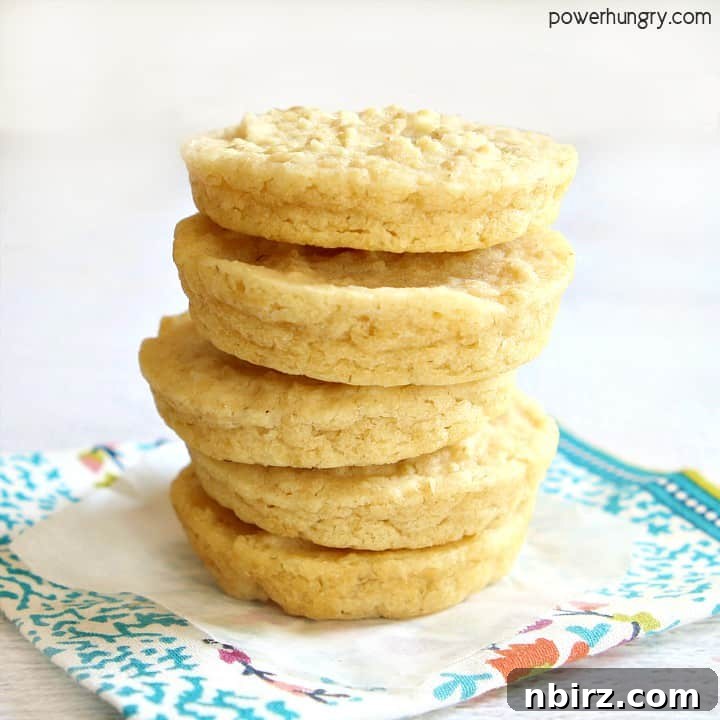
Learn how to make easy chickpea flour brown rice breads in a muffin tin, with only 4 ingredients. Gluten-free and vegan, the breads are perfect for both sweet and savory toppings.

Effortlessly Delicious: Your Go-To 4-Ingredient Chickpea Flour Brown Rice Mini Breads
In a world where culinary traditions often dictate that bread must be a grand, leavened loaf, it’s refreshing to break free from such rigid norms. Why should all bread conform to a singular, loafish ideal? Across diverse cultures, the true essence of bread is celebrated in myriad forms: flatbreads, intricate artisan loaves, savory bread balls, and delightful mini loaves are not the exception, but often the rule.
Today, we champion the cause of variety, celebrating all shapes, sizes, and textures of bread. Our particular passion lies in promoting recipes that are not only quick to prepare and incredibly versatile but also feature a minimal number of wholesome, nutrient-rich ingredients. This philosophy brings us to an extraordinary recipe that will transform your understanding of homemade bread: our 4-ingredient brown rice and chickpea flour mini breads.
These humble yet remarkable mini breads are a testament to simplicity meeting spectacular flavor. Crafted with utmost ease, they come to life by blending just four core ingredients: cooled, cooked brown rice, chickpea flour, a touch of olive oil, and baking powder. The result is a batch of tender, flavorful, and incredibly adaptable bread rounds that you are absolutely going to adore.

Why You’ll Love These Mini Breads: Unpacking the Recipe Benefits
Beyond their delightful taste and ease of preparation, these chickpea flour brown rice mini breads boast a compelling array of benefits that make them a perfect addition to any healthy kitchen. They are designed to fit seamlessly into various dietary needs and lifestyles, proving that wholesome food can indeed be both simple and satisfying.
- Completely Vegan: Made without any animal products, these breads are entirely egg-free and dairy-free, making them suitable for strict vegan diets or for anyone looking to incorporate more plant-based options into their meals.
- Naturally Gluten-Free: For those managing celiac disease or gluten sensitivities, these breads offer a delicious and safe alternative to traditional wheat-based products. Chickpea flour and brown rice are inherently gluten-free, ensuring a worry-free dining experience.
- Quick and Effortless Preparation: With a prep time of just 5 minutes and a cook time of around 20 minutes, these breads are ideal for busy weekdays or when you need a speedy snack or side dish. The simple blending method means minimal fuss and maximum convenience.
- Light and Healthy: Each mini bread round contains approximately 45 calories, making them a light and guilt-free option. They offer a satisfying bite without weighing you down, perfect for mindful eating.
- Muffin Tin Magic: Baking these breads in a standard muffin tin simplifies the process, ensuring perfectly portioned, uniformly shaped rounds every time. No special bread pans or complicated shaping techniques are required.
- Unbelievably Versatile: Their mild flavor profile makes them a blank canvas for an endless array of toppings and accompaniments. Whether you prefer sweet spreads for breakfast or savory toppings for lunch and dinner, these breads adapt beautifully. They are excellent as standalone snacks, delightful with soups and salads, or as a wholesome base for creative appetizers.
The Powerhouse Ingredients: Simple Yet Significant
The precise quantities for each ingredient are detailed in the recipe card at the end of this article. You can easily switch between US Customary (volume) and Metric (weights) measurements for your convenience.
The magic of these mini breads lies in their minimal yet mighty ingredient list. Each component plays a crucial role in delivering flavor, texture, and nutritional benefits.
- Chickpea Flour: Also widely known as garbanzo bean flour, gram flour, besan, or ceci flour, this ingredient is the star of the show. Chickpea flour is an excellent source of plant-based protein and dietary fiber. It lends a unique, slightly nutty flavor and a tender texture to the breads, often compared to cornbread. Its gluten-free nature makes it a fantastic alternative to wheat flours for those with sensitivities.
- Brown Rice, Cooked and Cooled: Any variety of cooked brown rice will work wonderfully here. Using cooked and cooled rice is essential for the batter’s consistency and ensures the grains blend smoothly. Brown rice adds substance, fiber, and a gentle earthy flavor, contributing to the breads’ satisfying chewiness. It’s also a complex carbohydrate, providing sustained energy.
- Baking Powder: This leavening agent is key to achieving a light and slightly airy texture in these mini breads, without the need for yeast. It’s important to use certified gluten-free baking powder if you are strictly avoiding gluten, as some brands may contain corn starch or other gluten-containing additives.
- Oil of Choice: While olive oil is my preferred choice for its healthy fats and subtle flavor, you have the flexibility to use any oil you like. Avocado oil offers a neutral taste, while coconut oil can add a faint tropical hint (though it’s best melted if solid). For those aiming for an oil-free option, simply refer to the notes in the recipe card for an easy substitution.
Additionally, you’ll need some water to achieve the perfect batter consistency. I typically use filtered tap water. A touch of salt is also recommended to enhance the flavors, though the amount is entirely optional and adjustable to your personal preference and dietary needs.
Step-by-Step Instructions for Your Perfect Mini Breads
For precise measurements and full detailed directions, please consult the comprehensive recipe card located at the end of this post.
Creating these delightful mini breads is a straightforward process that yields impressive results. Follow these simple steps to bake your way to a batch of golden, tender bread rounds:
- Prepare Your Oven and Muffin Tin: Begin by preheating your oven to 350°F (180°C). Then, prepare a standard muffin tin by greasing or lightly spraying 9 of its cups. This ensures the breads release easily after baking.
- Blend the Base Ingredients: In a high-speed blender or food processor, combine the cooked brown rice with the water. Process until the mixture is thoroughly blended and mostly smooth. A few tiny rice bits are fine and add character.
- Incorporate Remaining Ingredients: Add the chickpea flour, chosen oil, baking powder, and optional salt to the blender or food processor. Continue to blend until all ingredients are well combined and a smooth batter forms. Don’t forget to pause and scrape down the sides of the blender or processor with a spatula at least once to ensure everything is fully incorporated.
- Portion the Batter: Distribute the batter evenly among the 9 prepared muffin tin cups. Each cup should receive approximately 2 tablespoons of batter. To achieve a neat and smooth top, lightly moisten your fingertips and gently smooth the surface of the batter in each cup.
- Bake to Perfection: Place the muffin tin into your preheated oven and bake for 18 to 20 minutes. The breads are ready when they are set at the centers and have a lightly golden hue.
- Cooling Process: Once baked, remove the muffin tin from the oven. Allow the breads to cool in the tin for 5 minutes before carefully transferring them to a wire rack to cool completely. Cooling thoroughly is important for their final texture.
The Flavor Profile: Mild, Nutty, and Wonderfully Versatile
These mini breads are cherished for their tender crumb and delightfully mild flavor. There’s a subtle, almost ethereal similarity to the comforting taste of cornbread, a nuance that originates from the distinct character of the chickpea flour. This gentle flavor profile ensures that the breads do not overpower, but rather complement, any accompanying ingredients.
Your choice of oil can also subtly influence the final taste. Using olive oil, as I did, imparts a very faint, pleasant Mediterranean undertone. Should you opt for avocado oil, the breads will likely maintain an even more neutral profile, allowing other flavors to truly shine. Coconut oil might introduce a whisper of sweetness or tropical essence, depending on the type used. Experimentation is encouraged to discover your perfect match!
Endless Serving Possibilities: Get Creative!
The beauty of these chickpea flour brown rice mini breads lies in their incredible versatility. Their mild, adaptable flavor makes them an ideal canvas for almost any topping or accompaniment you can imagine. Here are just a few ideas to spark your culinary creativity, extending their use far beyond a simple side dish:
Sweet Serving Suggestions:
- Berry Bliss: A simple yet divine option is to spread coconut yogurt (or any dairy-free yogurt) on top, then garnish with fresh berries like blackberries, raspberries, or sliced strawberries. For an extra burst of flavor, mash some berries into the yogurt before spreading.
- Nut Butter Power-Up: Slather with your favorite nut or seed butter (peanut, almond, cashew, sunflower seed butter) and drizzle with a touch of maple syrup or honey (if not strictly vegan). A sprinkle of chia seeds or chopped nuts adds texture.
- Fruit & Jam Delight: Top with fruit preserves, homemade chia jam, or thinly sliced fresh fruit such as bananas, apples, or peaches. A dusting of cinnamon can elevate the experience.
- Sweet Spreads: Consider a vegan chocolate spread for an indulgent treat, or a homemade lemon curd for a zesty breakfast or afternoon snack.
- Breakfast Staples: Serve alongside scrambled tofu, a fruit smoothie, or a bowl of oatmeal for a wholesome and satisfying breakfast spread.

Savory Serving Suggestions:
- Cheesy Goodness: Homemade cashew cheese or any store-bought vegan cream cheese spread makes for an equally scrumptious topping. Add a sprinkle of fresh herbs like chives or dill for an added layer of flavor.
- Avocado Toast Twist: Mash ripe avocado with a squeeze of lime juice, a pinch of salt, and a dash of chili flakes. Spread it on the mini bread for a quick and healthy snack, reminiscent of a bite-sized avocado toast.
- Mediterranean Medley: Top with hummus, thinly sliced cucumbers, cherry tomatoes, and a sprinkle of za’atar or fresh parsley for a refreshing Mediterranean bite.
- Soup & Salad Companion: These mini breads are excellent for dipping into hearty soups, stews, or alongside crisp, fresh salads. They add substance and soak up flavors beautifully.
- Appetizer Base: Their small size makes them fantastic make-ahead bases for a range of appetizers. Think elegant tea sandwiches with fillings like cucumber and dill, watercress, or even a savory lentil pâté.
- Mini Sandwiches: Create adorable mini sandwiches for lunchboxes or party platters. Fill with vegan deli slices, lettuce, tomato, and a smear of mustard or vegan mayo.

These versatile breads can transform an ordinary meal into something special, proving that you can truly have your bread and eat it too, in countless delicious ways!

Storage and Longevity: Keeping Your Breads Fresh
Proper storage is key to extending the freshness and enjoyment of your homemade chickpea flour brown rice breads. They are remarkably resilient and can be stored in several ways to suit your needs:
- Room Temperature: For immediate enjoyment, store the cooled breads in an airtight container at room temperature for up to 2 days. Ensure they are completely cool before storing to prevent condensation, which can lead to sogginess.
- Refrigeration: To prolong their freshness, transfer the breads to an airtight container and store them in the refrigerator for up to 1 week. This is an excellent option for meal prepping throughout the week.
- Freezing: For longer-term storage, these breads freeze beautifully. Place them in a freezer-safe bag or container, ensuring as much air as possible is removed, and freeze for up to three months. When ready to enjoy, simply thaw them at room temperature or gently warm them in an oven or toaster oven until heated through.
Frequently Asked Questions (FAQ)
Here are answers to some common questions you might have about making these chickpea flour brown rice mini breads:
- Can I make the breads oil-free? Yes, absolutely! To make these breads completely oil-free, simply replace the 2 teaspoons of oil with 2 additional teaspoons of water. The texture will be slightly denser but still delicious.
- Can I use cooked white rice instead of brown rice? Yes, you certainly can! Cooked white rice can be substituted in an equal amount for the brown rice without significantly affecting the recipe. You can also experiment with other cooked grains like millet or quinoa for varied textures and nutritional profiles.
- Can I swap the chickpea flour for another type of flour, such as almond flour or buckwheat flour? No, I do not recommend substituting chickpea flour with other flours like almond or buckwheat flour for this particular recipe. Chickpea flour has unique binding and textural properties that are crucial to the success of these breads. I have only tested this recipe extensively with chickpea flour, and results with other flours may vary significantly.
- Can I add herbs or spices to the batter? Yes, this is a wonderful way to customize the flavor! Feel free to incorporate dried herbs like oregano, rosemary, or thyme, or a pinch of garlic powder or onion powder for a savory twist. For a hint of warmth, a dash of paprika or chili flakes could also be added. Start with 1/2 teaspoon and adjust to taste.
- What if my batter is too thick or too thin? The consistency of cooked rice can vary, which might affect the batter. If your batter seems too thick, add water one teaspoon at a time until it reaches a thick, pourable consistency. If it’s too thin, you can add a tiny bit more chickpea flour (1/2 teaspoon at a time) to thicken it.
- Can I bake these in a different shaped pan? While the muffin tin ensures individual portions, you could potentially bake the batter in a small loaf pan for a single, denser loaf, or even on a baking sheet to create flatbread-like crackers. Adjust baking time accordingly; larger forms will require more time, and thinner forms less.
Related Wholesome Recipes You Might Enjoy
If you’ve loved making these simple, healthy mini breads, you might be interested in exploring other quick, vegan, and gluten-free recipes that celebrate wholesome ingredients:
- Easy 2 Ingredient Brown Rice Chips (Oil-free, V, GF)
- Vegan Gluten-Free Oat Sandwich Bread (Oil-free, Yeast-free)
- Vegan Coconut Flour Sandwich Bread (Gluten-free, Oil-free)
- Gluten-Free Buckwheat Sandwich Bread (Oil-free, No yeast)
- Chickpea Flour, Chia & Oat Granola Bars (GF + V)
Chickpea Flour Brown Rice Breads (V, GF)
By: Camilla
4-Ingredient mini breads made from cooked brown rice and chickpea flour. They are naturally vegan and gluten-free, plus, only 45 calories each.
Prep Time: 5 minutes
Cook Time: 20 minutes
Total Time: 25 minutes
Servings: 9 mini breads
Ingredients
- 1 cup cooked, cooled brown rice (any variety)
- 1/3 cup water
- 1/4 cup chickpea flour
- 2 teaspoons olive oil (or oil of your choice)
- 1/2 teaspoon baking powder (certified GF, as needed)
- 1/4 teaspoon salt (optional/adjustable)
Instructions
- Preheat oven to 350°F (180°C). Grease or spray 9 cups of a standard muffin tin.
- In a blender or food processor, process the brown rice and water until blended and mostly smooth.
- Add the chickpea flour, olive oil, baking powder, and salt. Blend until well combined, stopping to scrape down the sides with a spatula at least once.
- Divide batter evenly (about 2 tablespoons per cup) between the prepared cups; smooth tops with moistened fingertips.
- Bake in the preheated oven for 18 to 20 minutes until set at centers.
- Cool in the tin for 5 minutes, then remove to a wire rack and cool breads completely.
Notes
- Storage: Store the breads in an airtight container at room temperature for 2 days, in the refrigerator for 1 week or freezer for up to 3 months.
- Oil-free option: Replace the oil with 2 additional teaspoons of water.
Nutrition
Calories: 45 kcal |
Carbohydrates: 7.5g |
Protein: 1.2g |
Fat: 1.2g |
Sodium: 52mg |
Fiber: 0.8g
Like this recipe? Rate and comment below!