
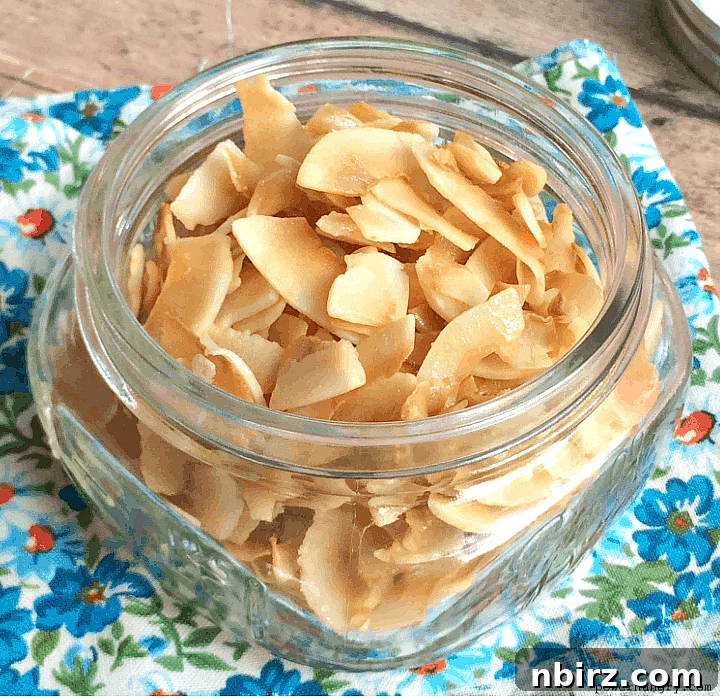
Indulge in the perfect crunch with these unbelievably delicious sweet & salty baked coconut chips. Crafted from just three humble ingredients, this healthy energy snack is not only incredibly easy to make but also highly addictive. Prepare a double batch – you’ll thank yourself later!
Discover Your New Favorite: Homemade Baked Coconut Chips
In our busy lives, finding snacks that are both genuinely healthy and undeniably delicious often feels like searching for a needle in a haystack. We crave something that provides sustained energy without the sugar crash, satisfies our sweet tooth without guilt, and is simple enough to whip up on a whim. Enter: homemade baked coconut chips.
My quest for the perfect portable snack began, as many good stories do, with a lively weekend. Mine recently kicked off with a much-needed Friday night dinner among friends – a wonderful reminder of human connection! This was followed by an invigorating, early morning run with my running buddies on Saturday, naturally earning me a well-deserved nap. The rest of the weekend was dedicated to my son, Nickster, with baseball games dominating our schedule. Amidst the chaos of cheering and shuttling, I managed to create a few healthy snack recipes to fuel our days. One particular creation, made explicitly for Nick, quickly became a family obsession: these incredibly addictive Baked Sweet & Salty Coconut Chips.
The inspiration struck during a flight home from California. I had purchased a small packet of store-bought coconut chips, hoping for a light, satisfying treat. My son, however, claimed almost the entire bag before I could get more than a few pieces! He adored the delicate balance of faint sweetness and a subtle hint of sea salt. Seeing his enthusiasm, coupled with the surprisingly steep price tag of that tiny packet, I knew I had to try making them myself. Little did I know, they are ridiculously easy to make at home, offering a superior taste and incredible cost savings.
Why You’ll Love This Recipe: Unbeatable Benefits
Beyond their delightful flavor, these homemade baked coconut chips boast an impressive array of health and convenience benefits:
- Made with Just Three Whole Food Ingredients: Simplicity is key to healthy eating. You won’t find any mysterious additives or artificial flavors here, just pure, wholesome goodness. This minimal ingredient list makes them incredibly accessible for even the most beginner home cooks.
- Vegan (Egg-Free, Dairy-Free): Perfect for those following a plant-based diet or with egg and dairy sensitivities. These chips offer a naturally satisfying crunch without compromising dietary preferences.
- Grain-Free: An excellent choice for anyone avoiding grains, whether due to allergies, sensitivities, or specific dietary plans like paleo or keto (with minor maple syrup adjustment for strict keto).
- Gluten-Free: Naturally free of gluten, making them a safe and delicious snack option for individuals with celiac disease or gluten intolerance.
- Oil-Free: Unlike many commercial chips that are fried in unhealthy oils, these are baked to crispy perfection without any added oils, making them a lighter and healthier alternative.
- Quick and Easy to Make: From start to finish, this recipe takes minimal effort and time, proving that healthy snacking doesn’t have to be complicated or time-consuming.
- Affordable: Making your own snacks is almost always more budget-friendly than buying pre-packaged options. You control the cost by choosing your ingredients.
Essential Ingredients for Your Perfect Baked Coconut Chips
The precise quantities for each ingredient are provided in the detailed recipe card at the end of this article. You can easily switch between US Customary (volume) and Metric (weights) measurements for your convenience.
The magic of these humble, yet utterly amazing, chips lies in their simplicity. You need no more than these three core ingredients:
- Large, Unsweetened Coconut Flakes: These are the star of the show. Using large flakes provides a substantial, satisfying crunch, far superior to finely shredded coconut for a standalone chip. It’s crucial that they are unsweetened, as we’ll be adding just the right amount of natural sweetness ourselves.
- A Hint of Pure Maple Syrup: Maple syrup provides a subtle, natural sweetness and helps the flakes achieve that beautiful golden-brown color and crisp texture. Its unique flavor complements the coconut perfectly. Make sure to use pure maple syrup, not pancake syrup, for the best results and natural ingredients.
- Fine Sea Salt: This is where the “salty” in sweet and salty comes in. A delicate sprinkle of fine sea salt enhances both the sweetness of the maple syrup and the natural flavor of the coconut, creating an irresistible flavor profile. Fine sea salt adheres better to the flakes than coarse salt.
Locating large coconut flakes used to be a challenge, but thankfully, they are much more widely available today. Most major supermarkets and larger grocery stores now carry them. You can typically find them in the baking aisle, often near other dried fruits and nuts, or in the health food section of your store. If you have trouble finding them locally, numerous online retailers offer high-quality large unsweetened coconut flakes, making them accessible to everyone.
Crafting Perfection: How to Make Your Own Baked Coconut Chips
For the full, detailed instructions, please refer to the comprehensive recipe card located further down the page.
Achieving the perfect balance of sweetness, saltiness, and unparalleled crispness required a few experimental rounds. The goal was to use just enough maple syrup to lightly coat the coconut flakes without making them sticky or overly sweet, ensuring they remained a healthy snack rather than a dessert. Rest assured, the “reject” batches were still delightfully tasty, but I’ve perfected the method for you to get it right on the first try!
- Prepare Your Workspace: Begin by preheating your oven to 275°F (135°C). This lower temperature is crucial for gradually toasting the coconut to a perfect golden crisp without burning. Line a large, rimmed baking sheet with parchment paper. Parchment paper is essential here to prevent sticking and ensure easy cleanup, as the maple syrup can become quite caramelized.
- Combine Ingredients: Place the large unsweetened coconut flakes into a spacious mixing bowl. Drizzle the pure maple syrup evenly over the flakes, then sprinkle with the fine sea salt. Now, using your clean hands, gently toss the ingredients together. The key is to mix carefully but thoroughly, ensuring each flake is lightly coated with the syrup and salt. Avoid pressing or crushing the flakes to maintain their large, appealing shape.
- Spread for Even Baking: Once coated, spread the coconut flakes in a single, even layer across the prepared baking sheet. It’s important not to overcrowd the sheet; if necessary, use two baking sheets to ensure the flakes have enough space to crisp up properly. A single layer allows for consistent air circulation and even toasting.
- Bake and Stir: Place the baking sheet in your preheated oven and bake for 10 minutes. At this point, open the oven and gently stir the coconut flakes with a spatula. This step helps to redistribute the flakes, moving the browner pieces from the edges (where they cook faster) towards the center of the sheet, and vice versa. Continue baking for an additional 5 to 10 minutes, keeping a close eye on them. Coconut can go from perfectly golden to burnt very quickly, so watch for that beautiful, even golden-brown color.
- Cool for Ultimate Crispness: Once golden brown and fragrant, remove the baking sheet from the oven and transfer it to a wire rack. Allow the coconut chips to cool completely on the rack. This cooling process is vital, as the chips will continue to crisp up as they come to room temperature. Resist the urge to snack on them warm; patience will be rewarded with the best possible crunch!
Versatile & Delicious: How to Enjoy Your Baked Coconut Chips
These baked coconut chips are far more than just a simple snack; they are a versatile powerhouse that can fit into countless moments throughout your day. Their perfectly balanced sweet and salty flavor makes them an ideal choice whenever you need a boost or want to satisfy a craving without the usual sugar-induced crash.
Here are some fantastic ways to incorporate these crunchy delights into your routine:
- The Ultimate Energy Boost: Grab a small handful as a pre-workout nosh before a run, a spin class, or any physical activity. The natural fats provide quick, sustained energy without weighing you down.
- Kids’ Game Day Fuel: For active kids like Nick, these chips are an excellent, high-energy snack between games. They offer a welcome and healthy contrast to many typical, often heavily processed, energy bars and balls found on the market.
- Breakfast Topping: Sprinkle them over your morning yogurt, oatmeal, or smoothie bowls for added crunch, flavor, and healthy fats. They transform a simple breakfast into a gourmet experience.
- Salad Enhancer: Believe it or not, these chips make a fantastic addition to savory salads, especially those with fruit or a vinaigrette dressing. The sweet and salty notes add an unexpected layer of flavor and texture.
- Trail Mix Upgrade: Ditch the bland store-bought trail mix and create your own custom blend by adding these coconut chips along with nuts, seeds, and dried fruit.
- Dessert Garnish: Crush them lightly and use them as a topping for ice cream, puddings, or even baked goods to add an exotic, crunchy finish.
The secret to their effectiveness as an energy source lies in the unique composition of coconut. The fat in coconut is predominantly made up of medium-chain fatty acids (MCTs). Unlike other fats, MCTs are metabolized differently in the body. They travel directly to the liver, where they are quickly converted into energy, allowing our cells to use this fuel almost immediately. This makes coconut chips an incredibly efficient and delicious way to fuel your body and mind.
So, whether you’re genuinely power-hungry or simply craving a wholesome, satisfying treat, these baked sweet & salty coconut chips are the perfect solution. Grab an extra nibble, and feel good about what you’re eating!
Frequently Asked Questions About Baked Coconut Chips
- How should I store the baked coconut chips? For optimal freshness and crispness, store your homemade coconut chips in an airtight container. A glass jar with a tight-fitting lid works exceptionally well to keep moisture out. Keep them at room temperature in a cool, dry place. They will remain wonderfully crisp and fresh for up to 2 weeks.
- Can I use honey in place of maple syrup if I do not need the recipe to be vegan? While technically possible, I do not recommend substituting honey for maple syrup in this specific recipe. I’ve experimented with honey, and the results were not as favorable. The primary issue was the stickiness of the honey; even after toasting, the chips remained unpleasantly tacky. Furthermore, they quickly lost all their crispiness within a day, becoming chewy rather than crunchy. Maple syrup provides the ideal texture and flavor for these chips.
- Can I make the recipe with finely shredded coconut? Yes, you can use finely shredded coconut, but the outcome will be quite different. Shredded coconut pieces are much smaller, leading to a different texture. While still tasty, they won’t form large, handheld chips and are generally better suited as a topping for other dishes rather than a standalone snack. For true “chips,” large flakes are essential.
- Can I add other flavors to my coconut chips? Absolutely! Once you’ve mastered the basic recipe, feel free to experiment. A pinch of cinnamon, a dash of vanilla extract (added with the maple syrup), or even a hint of cayenne pepper for a spicy kick can elevate the flavor profile. Just be mindful not to add too much liquid.
- How do I prevent the coconut chips from burning? The key to preventing burning is baking at a lower temperature (275°F/135°C) and stirring halfway through. Keep a close eye on them during the last 5-10 minutes of baking, as they can go from golden to burnt very quickly. If your oven has hot spots, rotate the baking sheet as well.
Explore More Healthy & Delicious Recipes
If you loved these sweet and salty baked coconut chips, be sure to check out some of my other healthy and flavorful creations:
- Keto Vegan Coconut Flour Cookies {grain-free, gluten-free}
- Chocolate Chip Banana Quinoa Muffins {vegan, GF, flourless}
- Stuffed Breakfast Sweet Potatoes {Vegan, 4 ingredients)
- Oil-Free Chocolate Chip Cookies {vegan, grain-free}
- Coconut Almond Flour Banana Bread {4 ingredients, vegan, oil-free}
Pin
Baked Coconut Chips (3 ingredients)
Camilla
5 minutes
30 minutes
35 minutes
3
cups
Ingredients
- 3 cups large unsweetened coconut flakes
- 4 teaspoons pure maple syrup
- 1/4 teaspoon fine sea salt
Instructions
-
Preheat oven to 275F (135C). Line a large, rimmed baking sheet with parchment paper.
-
Place the coconut flakes in a large bowl. Drizzle with maple syrup and sprinkle with salt. Using your hands, gently toss to coat, being careful not to break the large pieces of coconut.
-
Spread the coconut in a single layer on the prepared baking sheet.
-
Bake in the preheated oven 10 minutes; open oven and gently stir the coconut, moving browner pieces at the edge closer to the center. Bake for 5 to 10 minutes longer until coconut is golden brown.
-
Transfer sheet to a wire rack and cool completely (coconut will continue to crisp as it cools).
Notes
Nutrition
Calories: 126kcal |
Carbohydrates: 6g |
Protein: 1g |
Fat: 11g |
Saturated Fat: 9.5g |
Sodium: 82.7mg |
Fiber: 2g |
Sugar: 3.1g
Like this recipe? Rate and comment below!