
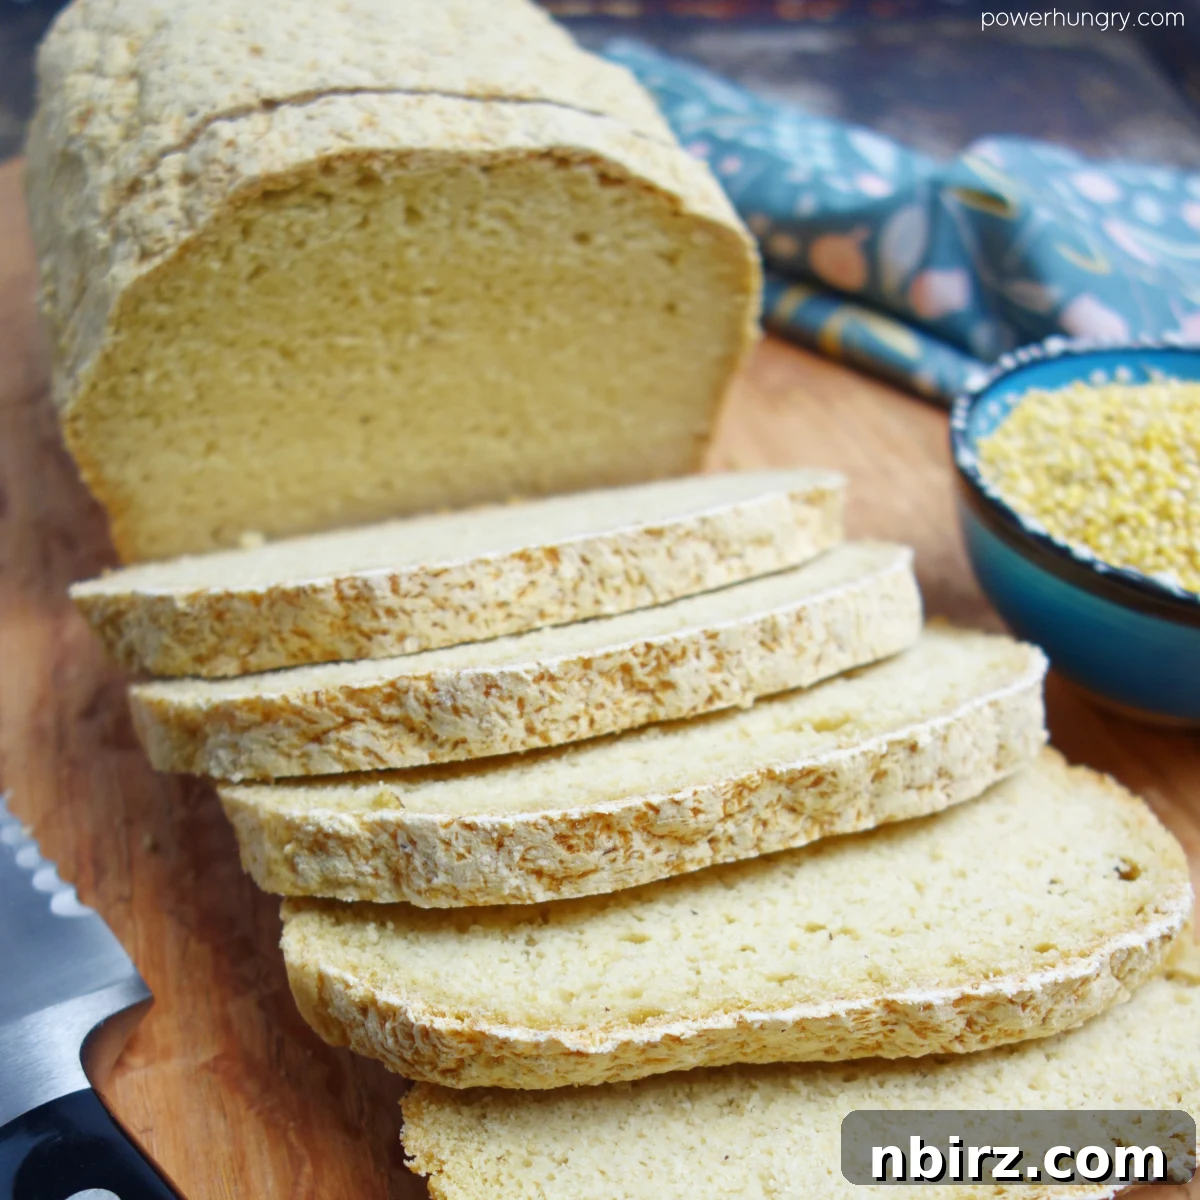
Welcome to the world of extraordinary homemade bread! This fine-textured, crusty loaf is not just any bread—it’s 100% Millet Sandwich Bread, set to become your new favorite “white bread.” Crafted entirely from millet flour, this delightful creation offers a subtly toasty, mild-corn flavor that complements virtually any meal. It’s perfect as a superior piece of toast, a sturdy base for sandwiches, or simply enjoyed on its own. Best of all, this recipe is remarkably easy to follow and adheres to strict dietary needs: it’s vegan, gluten-free, oil-free, sugar-free, xanthan gum-free, and entirely yeast-free. Prepare to bake a perfectly delicious and wholesome loaf that everyone will love!
Introducing 100% Millet Sandwich Bread: A Purely Vegan & Gluten-Free Delight
Are you searching for an effortlessly delicious, gluten-free, and vegan white bread that genuinely satisfies? Your quest ends here! Today, I am thrilled to share my signature 100% millet sandwich bread recipe. What makes this recipe truly stand out is its commitment to simplicity and purity: it’s made with *only* millet flour, without the need for any other flours or starches commonly found in gluten-free baking. Yes, really and truly—a pure millet masterpiece!
Whether you’re a newcomer to the exciting world of gluten-free bread baking or a seasoned pro looking to expand your healthy, everyday bread repertoire, this recipe is a must-try. Its straightforward preparation and incredible flavor make it an accessible and rewarding baking project for all skill levels. Forget the complicated blends and endless ingredients lists; this millet bread simplifies gluten-free baking without compromising on taste or texture.
So, gather your ingredients, and let’s embark on this baking journey together. You’re just a few steps away from enjoying a homemade loaf that redefines what gluten-free bread can be.
Unlocking the Health and Simplicity: Key Benefits of This Millet Bread Recipe
Before we dive into the recipe, let’s talk about the unsung hero of this loaf: millet. This ancient grain is truly a powerhouse—humble, economical, and utterly fabulous. Millet is celebrated for its impressive fiber content and low-glycemic index, meaning it helps regulate blood sugar levels, preventing the post-meal spikes often associated with refined carbohydrates. Beyond this, millet is brimming with essential nutrients, including B vitamins, calcium, iron, potassium, zinc, and magnesium. Its naturally mild flavor makes it incredibly versatile, and its affordability makes it an ideal choice for regular baking. It’s the perfect foundation for a delicious, everyday bread like this one.
While millet flour is often blended with other flours in gluten-free recipes, this bread champions millet alone, creating a truly unique and pure flavor profile. This recipe stands out with a multitude of benefits tailored for a health-conscious and allergy-friendly lifestyle:
- 100% Gluten-Free: Absolutely no gluten-containing ingredients, making it safe for those with celiac disease or gluten sensitivity.
- Vegan (Egg-Free & Dairy-Free): Completely plant-based, suitable for vegan diets and those avoiding eggs and dairy.
- Yeast-Free: Achieves a perfect rise without any active dry or instant yeast, simplifying the baking process and eliminating waiting times.
- Xanthan Gum-Free: Uses natural binders instead of gums, catering to those who prefer to avoid these additives.
- Oil-Free: Baked without any added oils, making it a lighter and healthier option.
- Sugar-Free: Contains no added sugars, ideal for managing blood sugar or reducing sugar intake.
- Nut-Free: Safe for individuals with nut allergies, ensuring it can be enjoyed by a wider audience.
- High in Fiber: Each slice delivers approximately 3.9g of dietary fiber, supporting digestive health and satiety.
- Minimal Ingredients: Requires only a few basic pantry staples, demonstrating that extraordinary bread doesn’t need an exhaustive list of components.
- No Added Starches: Free from common gluten-free starches like potato or tapioca starch, relying solely on millet’s natural properties.
- Easy to Make: Designed for simplicity, ensuring a successful bake even for beginner bakers.
Essential Ingredients for Your Perfect 100% Millet Sandwich Bread
The precise quantities for each ingredient are thoughtfully detailed in the recipe card located at the conclusion of this article. For your convenience, you can easily switch between US Customary (volume) and Metric (weights) measurement options.
Creating exceptional gluten-free bread doesn’t require an overwhelming array of ingredients. This particular loaf celebrates simplicity, calling for just a handful of straightforward components. You will need:
- Millet Flour: The star of our show, providing the unique flavor and structure.
- Whole Psyllium Husks: Crucial for binding and providing the necessary elasticity and structure without gluten (note: *whole* husks, not powder).
- Baking Powder: A leavening agent that works with baking soda to give the bread its rise.
- Baking Soda: Reacts with the acid (vinegar) to create carbon dioxide, contributing to the bread’s airy texture.
- Salt: Enhances the overall flavor profile of the bread (optional and adjustable to taste).
- Water: The primary liquid component, ideally filtered and at room temperature for optimal mixing.
- Cider Vinegar: Provides the acidity needed to activate the baking soda and aid in leavening.
Expert Tip: Maximize Freshness by Grinding Your Own Millet Flour
For the freshest flavor and finest texture, consider grinding your own millet flour at home. It’s surprisingly quick and easy, especially if you have the right tools. Freshly ground flour often results in a more aromatic and flavorful bread, elevating your baking experience.
If you own a high-speed blender, you can transform whole millet grains into a perfectly fine flour in about a minute. Simply add the whole millet to your blender and process until it reaches a powdery consistency. Alternatively, a small electric coffee grinder also works wonders. With a coffee grinder, it’s best to process about 1/4 cup of millet at a time; this method is surprisingly fast and efficient. Any extra flour you grind can be stored in an airtight bag or container and frozen, preserving its freshness for your next baking adventure.
A word of caution: standard food processors are typically not suitable for grinding whole millet into a fine flour. I’ve experimented repeatedly, and the tiny, tough millet grains resist breaking down sufficiently, often resulting in nothing finer than a coarse meal even after prolonged grinding. Stick to high-speed blenders or coffee grinders for the best results.
Understanding Vinegar’s Role and Alternative Choices
Cider vinegar plays a crucial role in this recipe by reacting with the baking soda, creating carbon dioxide bubbles that help the bread rise. This acidic component is essential for the yeast-free leavening process. Fortunately, you have flexibility with your choice of acid.
Any other type of vinegar—whether light or dark—can be substituted for cider vinegar with equally good results. White vinegar, red wine vinegar, or even balsamic vinegar (though it might impart a slightly different color) will work effectively. If vinegar is not available, or if you avoid it for dietary reasons, an equal amount of fresh lemon juice or lime juice can be used as a perfect substitute. These citrus juices provide the necessary acidity to activate the baking soda and contribute to the bread’s excellent texture and rise.
Step-by-Step Guide: How to Craft Your Perfect Vegan Gluten-Free Millet Bread
Baking this bread is a straightforward and enjoyable process. Let’s walk through each step to ensure your success!
Step One: Prepare and Combine the Dry Ingredients
Begin by preheating your oven to 325°F (160°C). This specific temperature and conventional heat setting are crucial for optimal results (refer to the “Important Note: Convection Ovens” section below for more details). Prepare a 9×5-inch (22.5 x 12.5 cm) loaf baking pan by spraying or greasing it thoroughly, or lining it with parchment paper for easy removal.
In a large mixing bowl, combine the millet flour, baking powder, baking soda, and salt. Whisk these dry ingredients together thoroughly until they are well blended and evenly distributed. This ensures that the leavening agents are spread throughout the flour, contributing to a consistent rise in your bread.
Step Two: Activate the Psyllium in Wet Ingredients
In a separate, medium-sized mixing bowl, whisk together the water, vinegar, and whole psyllium husks. Stir until all components are well combined. Once mixed, let this solution stand for approximately 5 minutes. During this brief resting period, the psyllium husks will absorb the liquid and thicken significantly, forming a loose, pale gel. This gel-like consistency is vital as it acts as a binder, mimicking the role of gluten and providing structure to the bread. It will resemble flax or chia seed gels, though it’s typically less sticky.
Step Three: Combine Wet and Dry to Form the Dough
Now, add the psyllium gel mixture to your bowl of dry ingredients. Using a sturdy rubber spatula, a wooden spoon, or even your clean hands, mix thoroughly until the wet and dry components are completely combined. The dough will be quite thick and somewhat stiff, but it should come together easily into a cohesive mass. Make sure to scrape the sides and bottom of the bowl diligently to ensure no dry pockets of flour remain. Once fully mixed, roughly shape the dough into a cohesive ball or a general mass while it is still in the mixing bowl.
Step Four: Shape and Prepare the Loaf
After handling the dough, wash any excess off your hands. With your hands still slightly moist (this helps prevent sticking), take the dough ball and gently shape it into a neat loaf that fits snugly into your prepared 9×5-inch (22.5 x 12.5 cm) loaf pan. Once the dough is in the pan, use your moist hands to smooth the top surface and gently press it into shape, ensuring the corners and sides are nicely rounded. This careful shaping contributes to an attractive final loaf.
Step Five: Bake and Cool to Perfection
Place the prepared loaf pan in your preheated 325°F (160°C) oven. Bake for a full 90 minutes. During this time, the bread will experience a significant rise. You’ll know it’s done when the surface appears beautifully golden brown, dry to the touch, and forms a delightful crust. Additionally, when tapped on the bottom, the bread should sound hollow, indicating it’s thoroughly baked through.
Once baked, remove the bread from the oven and allow it to cool in the loaf pan, resting on a wire cooling rack, for 15 minutes. This initial cooling period in the pan is important for the bread to set and firm up without collapsing.
After 15 minutes, carefully remove the bread from the pan and transfer the naked loaf directly onto the cooling rack. It is crucial to let the loaf cool completely at room temperature before attempting to slice it. Slicing warm gluten-free bread can lead to a gummy texture and crumbly slices. Patience here will be rewarded with a perfect loaf!
Indeed, that is one magnificent-looking loaf of bread, ready for your enjoyment!
Crucial Baking Insight: Why Avoid Convection Ovens for This Bread
If your oven is equipped with a convection option, often referred to as a “fan oven” outside of the US, it is critically important to avoid using it for this specific bread recipe! While convection ovens are highly efficient for many culinary tasks, they are not suitable for all baking projects, particularly those requiring a long, slow, and even bake. This millet bread thrives on the consistent, radiant heat provided by a conventional oven.
The circulating hot air of a convection oven can cause the outer layer of this bread to bake and set too quickly. This rapid exterior baking can lead to several undesirable outcomes: a large air bubble forming just beneath the crust, a dense or gooey interior and bottom, and an overly hard outer crust. For this delicate, gluten-free structure, the gentle and steady radiant heat of a conventional oven is essential for an even rise and a tender, properly cooked crumb throughout the loaf. Ensure your oven is set to its standard, non-convection bake mode for the best results.
Versatile Slicing: Adapt Your Millet Bread to Any Preference
One of the many appealing characteristics of this millet bread is its robust yet flexible texture, resulting in minimal crumbs during slicing. This resilience means you have complete freedom to slice your loaf exactly as you prefer—whether you enjoy hearty, thick-cut slices for a substantial breakfast toast, or delicate, thin slices perfect for elegant sandwiches. The bread holds its shape beautifully, offering a clean cut every time, making it incredibly versatile for any culinary application.
Experience the Unique Texture & Taste of Millet Sandwich Bread
Prepare your senses for a truly delightful culinary experience with this 100% millet sandwich bread.
First, let’s talk about the texture: This bread boasts a fine, uniform crumb and a wonderfully firm structure, reminiscent of a classic white sandwich bread made with all-purpose flour. It’s substantial without being heavy, providing a satisfying chew. When toasted, the slices transform into a gloriously crisp, crunchy, and exceptionally hearty texture that holds up beautifully to any topping. You’ll appreciate its robust mouthfeel and satisfying density.
Now, for the taste: The flavor profile of this bread is delightfully mild and subtly toasty, with an intriguing hint that many describe as akin to sweet corn. This understated richness makes it incredibly versatile, allowing it to pair seamlessly with both sweet and savory accompaniments. I absolutely adore it toasted, generously slathered with melting vegan butter and a thick layer of fruity jam—a truly comforting combination. It also excels as the foundation for sandwiches. Given its filling nature, I recommend slicing it a bit thinner for sandwiches to achieve a perfect balance of flavors and textures.
Don’t limit yourself! Have fun exploring the myriad ways to enjoy this versatile loaf. Spread it with creamy nut butter, savory hummus, or your favorite fruit preserves. And for a truly comforting experience, don’t forget how wonderfully it holds up when dunked into hearty soups and stews, soaking up every drop of flavor with admirable aplomb.
Frequently Asked Questions About 100% Millet Sandwich Bread
Can I substitute other flours for the millet flour in this recipe?
I strongly advise against substituting other flours directly in this particular recipe. The precise ratios of wet and dry ingredients, as well as the specific quantity of whole psyllium husks, have been meticulously calibrated for millet flour. Millet has unique absorption properties and a distinct protein structure (or lack thereof, in a gluten-free context) that is central to the success of this bread.
The good news is that I’ve already developed and rigorously tested successful variations using other single-source gluten-free flours, so you don’t have to experiment! Each yields an equally easy and delicious loaf with its own unique characteristics:
Gluten-Free Buckwheat Sandwich Bread {vegan, no yeast}
Vegan Gluten-Free Oat Sandwich Bread {oil-free, yeast-free}
What specific type of millet flour should I use for this recipe?
This is an excellent question, especially for my international readers, as millet can vary regionally. In the United States and Canada, the most commonly available type of millet for human consumption, and consequently the millet flour derived from it, is simply labeled “millet.” It’s characterized by its small size and pale yellow color. While North American manufacturers typically don’t specify the botanical type on packaging, various sources confirm that the primary millet grown and processed for food in these regions is proso millet.
If you live in a country where several types of millet are available, always opt for proso millet (and flour made from proso millet) to ensure the best results with this recipe. Its specific starch and protein composition is what this recipe relies on.
A Critical Note: Avoid Sorghum Flour or Amaranth Flour. It’s also important to understand that in some global contexts, grains such as sorghum and amaranth are sometimes broadly categorized or referred to as “millet,” even though they are botanically distinct. For the integrity of this recipe, neither sorghum flour nor amaranth flour will work as a substitute. Their different properties will drastically alter the dough’s consistency and the final bread’s texture.
My bread turned out gooey in the middle. What went wrong?
A gooey center is a common troubleshooting issue with gluten-free baking, and several factors can contribute to it. The most probable reasons for your bread coming out gooey in the middle are:
- Baking in a Convection Oven: As highlighted in the “Important Note” section above, using a convection oven for this bread is a common pitfall. Convection heat bakes the exterior too quickly, forming a crust before the interior has a chance to fully cook and set. This traps moisture, leading to a raw or gummy center. Always use a conventional (radiant heat) oven.
- Not Gelling Psyllium Separately: For this recipe, the whole psyllium husks *must* be gelled separately with the wet ingredients before being combined with the dry. This step is non-negotiable for success. If you tried to mix all ingredients together at once, the psyllium may not have had enough time or liquid to properly hydrate and form its essential gel, which is crucial for binding and structure.
- Inaccurate Oven Temperature: An oven that runs too hot can mimic the effects of a convection oven, causing the outside to bake before the inside. Conversely, an oven that runs too cool will prolong baking time, but can also result in a dense, undercooked interior if not adjusted correctly. I highly recommend regularly checking your oven’s accuracy with an inexpensive, standalone oven thermometer. If your oven temperature is off, it can force a faster rise to the bread, leading to a bubble under the top of the loaf and an uncooked interior.
- Insufficient Baking Time: While the recipe provides a standard baking time, oven performances can vary. It’s possible your loaf simply needed a few more minutes to bake through completely. Always rely on visual cues (golden-brown, crusty exterior) and the “hollow sound when tapped” test to confirm doneness.
Can I use an alternative to whole psyllium husks?
Regrettably, no, for this particular recipe, it is imperative to use whole psyllium husks. The unique gelling and binding properties of whole psyllium husks are central to the structure and success of this gluten-free, yeast-free bread. They create a strong, flexible matrix that holds the bread together without gluten or other gums.
Other common gelling agents, such as ground flaxseed meal or chia seeds, do not possess the same binding strength or hydration capacity in the precise quantities used here. While they are excellent in many other recipes, they will not function as direct, one-to-one substitutes for whole psyllium husks in this specific formulation. Substituting them would require extensive experimentation to determine their efficacy and proper ratios, which would fundamentally change the recipe.
Furthermore, I do not recommend using psyllium powder instead of whole husks for this bread. Psyllium powder is much more concentrated and absorbent than whole husks, and using it would lead to a significantly different dough consistency and a potentially dense or crumbly bread that does not rise properly. Always opt for whole psyllium husks for guaranteed results.
How can I customize or vary the flavor of this millet bread?
While delicious on its own, this millet bread offers a fantastic canvas for flavor variations, allowing you to tailor it to your preferences. You can easily create both savory and sweet versions:
For a savory twist, consider incorporating dried herbs or spices into the dry ingredients. Try adding 1 to 2 tablespoons of dried Italian herbs, herbes de Provence, or a mix of dried rosemary and thyme. Alternatively, for an earthier profile, 2 to 3 teaspoons of ground cumin, curry powder, garlic powder, or onion powder would be excellent. These additions are wonderful for serving with soups, stews, or alongside savory spreads.
If you’re in the mood for something sweet, this millet bread can also be adapted! For a ready-to-go sweet treat, I recommend trying my dedicated recipes for sweet millet breads, which are specially formulated for optimal flavor and texture with fruit additions:
100% Millet Banana Bread
100% Millet Pumpkin Bread
Happy baking! I genuinely hope you give this incredible millet sandwich bread a try. Please let me know what you think!
Explore More Vegan Gluten-Free Millet Recipes
If you’ve fallen in love with millet, you’re in luck! This versatile grain is a staple in my kitchen. Here are more delicious vegan and gluten-free millet-based recipes to broaden your culinary horizons:
- Flourless Millet Oat Bread {vegan, GF, 5 ingredients}
- Carrot Cake Millet Breakfast Bars
- Flourless Apple Millet Muffins
- Millet Apricot Energy Bars
- Vegan Millet Kale Quiches {GF, high protein}
- Strawberry Puffed Millet Bars {Vegan, Nut-Free, GF}
- Millet Pilaf with Dried Cranberries {gluten-free & vegan}
100% Millet Sandwich Bread {vegan, gluten-free, no yeast}
Ingredients
- 2 and 1/2 cups, 400 g millet flour (see tip to grind your own)
- 2 teaspoons baking powder
- 3/4 teaspoon fine sea salt
- 1/2 teaspoon baking soda
- 2 and 1/2 cups, 593 mL water
- 1 tablespoon cider vinegar, see notes for options
- 1/3 cup 27 g whole psyllium husks
Instructions
-
Preheat the oven to 325°F (160°C). Note: do not use the convection setting for this bread (see the detailed explanation in the post above). Spray or grease a 9×5-inch (22.5×12.5 cm) loaf baking pan, or line it with parchment paper for easy removal.
-
In a large mixing bowl, whisk together the millet flour, baking powder, salt, and baking soda until thoroughly blended.
-
In a medium bowl, whisk the water, vinegar, and psyllium husks until well blended. Let this mixture stand for approximately 5 minutes until it thickens into a gel-like consistency.
-
Add the thickened psyllium mixture to the flour mixture. Mix thoroughly (using a wooden spoon, rubber spatula, or clean hands) to completely combine all ingredients into a cohesive dough. Be sure to scrape the bottom and sides of the bowl to integrate all components (the dough will be thick). Gather the dough into a rough ball while still in the bowl.
-
With moist hands, shape the dough into a uniform loaf to fit your prepared loaf pan. Place it into the pan. Use moist hands again to smooth the top surface and gently round the sides for a perfect finish.
-
Bake in the preheated oven for 90 minutes, or until the surface appears pale golden-brown, dry, and crusty. The bread should sound hollow when tapped on the bottom. After baking, cool the bread in the pan, on a cooling rack, for 15 minutes.
-
Carefully remove the bread from the pan and transfer it to the cooling rack to cool completely before slicing. This step is essential for achieving the best texture.
Notes
Millet Flour: Millet flour can be purchased pre-ground or freshly ground at home from whole millet grains. Use a high-speed blender to grind whole millet into a fine flour (this typically takes about 1 minute), or grind it in smaller batches (about 1/4 cup at a time) using a small electric coffee mill.
Vinegar Options: An equal amount of any other type of vinegar (such as white vinegar or red wine vinegar), or fresh lemon or lime juice, can be used effectively in place of the cider vinegar.
Psyllium Tip: It is crucial to use whole psyllium husks, not psyllium powder. Whole psyllium husks have a flake-like appearance and are typically pale tan in color.
Nutrition
Calories: 111kcal |
Carbohydrates: 22.5g |
Protein: 3.2g |
Fat: 1.3g |
Sodium: 231.1mg |
Fiber: 3.9g
Like this recipe? Rate and comment below!